Search this blog

Wednesday, October 16, 2024

Lots of Wows!

Mrs. Woody and me had a day out - it was her birthday after all! We ended up at Burghley House just outside Stamford in Lincolnshire. We had never been before and it was to say the least a Wow property. You jus kept saying Wow! 

First thing that made me go Wow was the house itself.

Burghley House

Second Wow was the arrival of the chimney sweeps! Looking at all those chimneys on the house these guys must have at least a months worth of work ahead of them!

Burghley House

Going inside the kitchen is another Wow with all the copper pots.

Burghley House

Theses were just some of the bells that would ring in the servants area when assistance was required - Wow!

Burghley House

Before being queen, Victoria slept in this so called 'Travelling' bed!

Burghley House

There are around 350 paintings on display.

Burghley House

It was not just paintings on display but entire rooms painted like this.

Burghley House

The rooms were all painted in a 3D manner - very deceptive to the eye.

Burghley House

More Wow moments n the huge gardens with the Garden of Surprises being particularly interesting with a variety of water features.

Burghley House

Burghley House

Burghley House

The day really was a Wow day and after a birthday meal out it was back to WMD HQ where I was onto more painting of the  Airfix Curtiss Tomahawk. This time the underside using the provided paint which looks like that classic duck egg green that was used during WW2. First off though was a bit of masking.

Airfix Curtiss Tomahawk11B,

With that applied the paint was airbrushed on.

Airfix Curtiss Tomahawk11B,

Then it was that precarious moment as I removed the masking tape hoping it would not pull the paint under it off the model. Wow! I was lucky or should that be skillful? 

Airfix Curtiss Tomahawk11B,

It needs some varnish next to allow the decals to be applied but all in all, so far a quick and easy build as Mr. Beecham said it would be when I started. Wow!


Tuesday, October 15, 2024

Seat goes up, seat goes down! Or how to amuse a simple mind!

Following on from the kitchen rebuild, Mrs. Woody has decided that the 1993 bathroom needs updating. For an easy life I have agreed (I am learning in old age!) so we are now touring bathroom showrooms. Surprisingly I was informed that bathroom suites in those old favorite colours of yellow, chocolate brown, burgundy and powder blue are no longer available with white being the in colour! Apparently it has been the in colour for some years now. Mrs. W is not surprised that fact bypassed me noting my fashion sense over the years!!

Now the choice of bathroom suites is enormous and you become blind to the differences after seeing several dozen of the things but occasionally something stands out and for me it was this automated toilet seat! Now as Mrs. W would tell you simple things amuse my simple mind and this is just one such thing! Had to video it and love the way it rises as you approach. 


As Homer Simpson would say, Seat goes up, seat goes down! 

This bathroom perusal is going to take some time so I hope there are more items like this to amuse my simple mind!

Back at WMD HQ the Airfix Curtiss Tomahawk is progressing with the second part of the camouflage now applied - almost the same colour as those chocolate brown bath suites of old! I did manage to break one of the machine gun barrels off the wing but luckily found it and reaffixed it. Somehow I think I might be having to do that again with my clumsiness in painting the model!


Airfix Curtiss Tomahawk11B,


Monday, October 14, 2024

Gravy or paint?

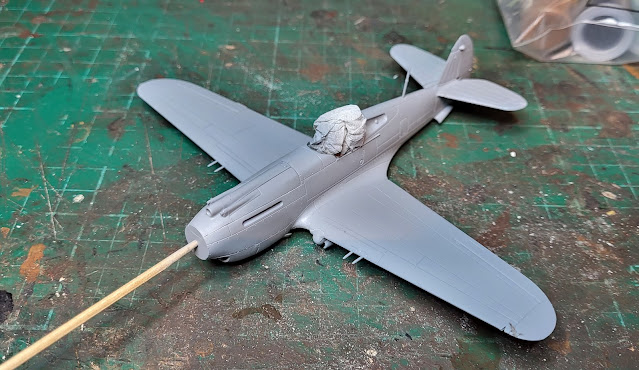
Time for some painting which seems a common theme of my life as of late! However in this case a more pleasurable painting operation involving the Airfix Curtiss Tomahawk. Having got to the stage where the main parts had been assembled it was prudent to give the model a coat of primer. In this case a light grey which just happened to be to hand which was handy! There are not a lot of places to hold this small model when airbrushing it so a cocktail stick was carefully inserted where the propeller will eventually fit - oh nasty!

Airfix Curtiss Tomahawk11B

That cocktail stick did its job though and all the model got a good coating of primer.

Airfix Curtiss Tomahawk11B

Whilst the primer was drying I was looking at top coat options. I could search through the WMD HQ paint store to find suitable colours or I could use what was supplied in the kit. The supplied paint did not exactly look inspiring, in fact it looked more lumpy than any gravy I have ever made without the close supervision of Mrs. Woody. However, I decided it was worth a go to see if I could thin it out and actually have something workable unlike my gravy! Mixing some of the lumps with some thinners and stirring like mad for some time actually produced a paint like substance so it was time to see if it actually would come out of the airbrush or just clog it.

Airfix Curtiss Tomahawk11B

Pleasantly surprisingly it did actually spray well! So the first part of the paint scheme is now applied. I just need to let that dry thoroughly and then see if I can get the darker brown lumpy gravy paint to thin out suitably to airbrush or even brush paint. Now did Mrs. W want gravy with her dinner......

Airfix Curtiss Tomahawk11B


Sunday, October 13, 2024

In the flying seat!

 Just a finishing touch to the cockpit with the application of some panel line wash to highlight the detail. It probably will be unseen but it was something I thought worthwhile doing as I would know it was done!

Airfix Curtiss Tomahawk11B

In preparation for the placement of other parts of the fuselage I had to smooth the joint between the two halves. Doing this obliterated part of a recessed panel line so I had to reinstate it. A piece of masking tape highlights where it should be and the very thin razor saw was used to 'cut' in a new panel line along the edge of the tape.
  
Airfix Curtiss Tomahawk11B

The beauty of this kit is that it is relatively simple with only a few parts so you see some results fairly quickly. It already looks like a plane! That model pilot is probably hoping he will be flying something other than what I have built! No such luck for him though. He just needs a bit more painting and he will be in the flying seat!

Airfix Curtiss Tomahawk11B


Saturday, October 12, 2024

Cockpit capers!

Quick and relatively easy progress (as predicted by Mr Beecham yesterday) with the cockpit interior assembled and painted. Just five parts for this caper, including the pilot, go to make up the cockpit and the general overall colour is green but having looked at a few pictures I have highlighted a few boxes in black and a two floor rails in aluminum. No idea how accurate that is but given the small scale and that most of it will be hidden once the canopy is fitted no one will be able to see anyway! The pilot is still a work in progress though. I have even managed to put the propeller together and paint that.

Airfix Curtiss Tomahawk11B

There is a decal for the instruments which I applied and I must say for the scale is very detailed. I am impressed by that!

Airfix Curtiss Tomahawk11B

Once all is dry the fuselage halves can be joined and then the rest of the parts should follow relatively quickly and easily!


Friday, October 11, 2024

A quick, easy build with no brass etched parts!

From the start of this blog I have featured me building quite a few kits, mainly military and trucks but never a plane. However that has now changed! There is a story behind this kit. Last year, Rob at the Rocks by Rail Museum who built models some time ago suggest a build off to see who could come up with the best model. He also helpfully pointed out that Lidl, the discount store, had some Airfix kits on offer for I think £7.99. I was up for the challenge and for reasons that I cannot recall it was left to me to go to Lidl's to get two Spitfires and actually coming out with two Tomahawks as the Spitfires had sold out! I presented Rob with his kit and we agreed that the new year would be the time to build. Well Rob still has not started so I decided it was time before the new year became another new year!

The kit is one of the new style beginners packages with the kit, paints, paint brush and glue - great value! 

Airfix Curtiss Tomahawk11B

Opening the box reveals the contents which are a lot different from those that came when I was a lad many, many years ago!

Airfix Curtiss Tomahawk11B

The instructions are much the same once you wade through the various safety warnings in many different languages. The paint brush is a nice Humbrol one and the paints are acrylics in small pots that can unfortunately dry out with age. Not sure how these ones will fair but I generally use my paint collection so I probably will not use these. 

Airfix Curtiss Tomahawk11B

The moulding themselves are a revelation over my memories of these Airfix kits with crisp, flash free parts that look very detailed.

With the examination out of the way it was time to start building and as Mr. Beecham commented to me when I told him I was building this, it should be a quick and easy build with no brass etched parts! He is right about the etched parts but quick and easy with my history - that might be optimistic!

The first thing you have to do is paint the cockpit interior. This is where the kit and reality are at odds with each other. From what I can gather the cockpit interior was green whilst the instructions and supplied paint say it was like a beige. Having a suitable green paint in stock I will be painting it green!

Airfix Curtiss Tomahawk11B

If Mr. B is right, by this time next week I should be finished! Stay tuned to see if that is any where near correct!


Thursday, October 10, 2024

A new arrival!

As I arrived for a day of volunteering at the Rocks By Rail Museum this new arrival was parked in the platform siding.

Rocks by Rail Museum

This is an Avonside manufactured loco originally named Barrington and built in 1921 making it 103 years old and to be fair not looking bad despite those years!

Rocks by Rail Museum

Barrington is an 0-4-0 loco with a very tight wheelbase making it an ideal loco for quarry type operation.

Rocks by Rail Museum

It all looks in reasonable condition under the boiler.

Rocks by Rail Museum

From the limited ability to take a picture through a rear spectacle window the cab interior also looks in good fettle.

Rocks by Rail Museum

Barrington was originally built in 1921 by the Avonside Engine Company as an export order for the Bombay Harbour Improvement Trust where she worked for about 9 years before being repatriated to the UK. Back on home turf the loco served in several quarry type locations ending its working life in the early 1970's at the Barrington Rugby Portland Cement works in Cambridgeshire. From there the loco spent time at several other railways including the Great Central and Nene Valley before going to the Colne Valley Railway from where she was purchased by one of the Rocks By Rail Museum members.

Rocks by Rail Museum

Barrington has a strong link to the Museum as Mr. D the diesel undergoing restoration at the moment, replaced Barrington at the cement works.

Rocks by Rail Museum

I have to admit that I have taken to this loco at first sight. It has lovely proportions and a hint of quirkiness which makes it just right for the Museum! Once painted up and various parts fettled it should look great.

Still dealing with steam engines, work continues with the retubing of 1391. However, as with all such jobs, there are complexities like removing all the pipework that is in front of the tubes which is a matter John and Richard are discussing in detail.

Rocks by Rail Museum

Looks as though Richard drew the short straw with having to get into the dirt of the smokebox!

Rocks by Rail Museum

Alex, having a variety of 'persuading' tools to hand to supplement his small dust removing brush continues the seemingly never ending cement and rust removal along with painting of Ketton No1. It will be well worth it once finished.

Rocks by Rail Museum

Pete and Pam continue with the painting of the Sundew cab and Martin has progressed with the dragline repaint project.

Rocks by Rail Museum

Rocks by Rail Museum

Rocks by Rail Museum

For me it was inevitably more grass cutting but with a pit stop to deal with a jammed drive wheel.

Rocks by Rail Museum

Once back on the grass it was time to make a difference in some parts of the site that had not seen any grass cutting in a while like this!

Rocks by Rail MuseumRocks by Rail Museum

It may not look much in the picture but it does look very different on site. No doubt it will have grown by next week too!


Wednesday, October 9, 2024

Various arts!

It was the art of soldering for me and doing one of those long outstanding jobs that exist on my (not Mrs. Woody's list!) list of things to do. It was to solder up a phono plug to connect the power from my DCC controller to my 009 narrow gauge layout Chalkdon. Prior to this momentous moment I had used a pair of crocodile clips which was not really the best way to do things!

009 gauge layout

With this job done I can easily move the DCC controller from this layout to my USA switching layout for which I soldered up a similar plug some time ago. Amazing how time flies by!

009 gauge layout

Just out of interest, the Kato track that I posted about yesterday has a discrete means of plugging a power supply in with this socket under the track into which the ready wired power wires just plug into. That is an artful solution! 

More art on the canal which I have posted about recently in the form of the art of finding more wrong than you originally thought! Out on a bike ride I stopped off to see how things were going. More Hi Viz present and an overheard remark of 'well its rotten' which I presume is part of the lock gates which can now be inspected with the water level so low. No doubt more art will follow with the art of repairing!

Canal

Finally we have the art of realising it is just going to happen and perhaps sat navs are not that good! Whilst travelling through the Lincolnshire town of Grantham which has the East Coast Main Line railway bisecting it with several low bridges I got caught up in traffic which was at a standstill not because of the road works but due to that truck the other side of the bridge. The driver was trying to make a 180 degree turn onto a side road that goes under the arch on the far left of the picture below.

Grantham

He gained a bit of an audience over the five or so minutes that he tried to turn the truck but eventually he gave up and drove off probably with a health deposit in his dashboard sware jar!

Grantham

Right I am off to practice the art of making Mrs. W's dinner!


Tuesday, October 8, 2024

Train set on the floor!

Kato are a Japanese firm that produce a great deal of n gauge equipment that caters in the main for the home market where space is at a premium for Japanese modellers. However they have developed quite a catalogue of USA outline stock in both n and H0 scales and have done some UK both in n and 009 all at competitive prices.

This is the Kato CV1 track pack which is an oval of track which you may not think is that unusual. However, this pack is unusual!

Kato track

Whereas the minimum radius n gauge track supplied by UK and most European manufacturers is 9 inches, this Kato track pack has 6 inch radius curves meaning this oval of track is just about 1 foot by 2 feet. That is small! I have a plan for it but like most of my projects will probably emerge around about the earth's next glacial age. But, in the meantime I needed to have a play so it was just like being a young lad at Christmas (only 77 days to go at the time of writing this!) with the train set on the floor!

I knew that the Kato chassis that I use for the 3D printed locos I have built would go round the curves but would anything else? Most manufacturers state that 9 inches is the minimum radius that their rolling stock will go round. Well that is not completely correct! Getting some of my USA outline stock out, most of the diesel locos would go round but given their bogie wheel configuration that was perhaps to be expected. Most of the rolling stock seemed happy enough too.

Kato track

Kato track

Kato track

With the diesels having gone OK round the curves would a more rigid wheelbase steam loco do the same? This 2-8-0 loco had no problems.

Kato track

The 4-6-2 had no problems but the lengthy coaches did! They derailed due to the couplers not having enough movement.
 
Kato track

Whilst all this may seem a bit frivolous and Mrs. Woody could find better things for me to do with my time, it does prove that you can have a small layout that just about any home could accommodate. In fact Mike Potter from Budget Model Railways on YouTube proves the point with a layout he has recently built and this is the video.


It was great to see life in my USA outline stock and this has experiment has again awoken my love of the scale which means more projects whirring in my mind! Oh dear!

Monday, October 7, 2024

Workbench tidy!

After several weeks of creating a mess in the Man Cave building the Tiger 1 it was time to tidy the workbench, after all I had spent the morning tidying the house much to Mrs. Woody's amazement!

Nice Tiger tank on the cutting board!

Workbench tidy

I even went as far as giving the floor a wash bringing me to my knees!

Workbench tidy

By the colour of the water that floor really did need a clean!

So with the workbench tidy and the floor washed I had a few minutes to have a quick look at this.

Kato track

More of this another time though as its time to make Mrs. W's dinner!