Search this blog

Thursday, October 24, 2024

Seeing double!

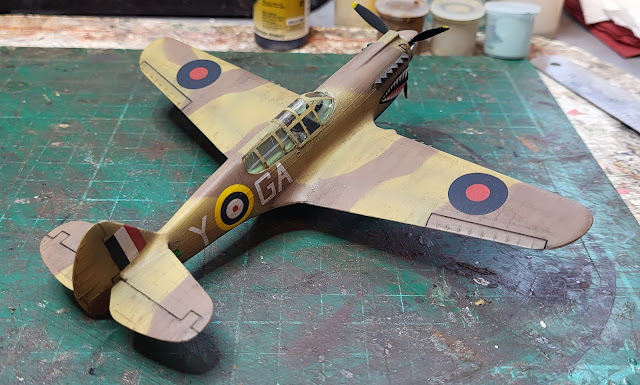
 Its finished!

Airfix Curtiss Tomahawk11

Is it really finished? That is not like me!

Airfix Curtiss Tomahawk11B,

Rubbing my eyes in disbelief that it was finished I had to double take on the situation!

Airfix Curtiss Tomahawk11B

Then there were two!

I had to double take on the situation!

No! I have not built a second one! Mr Beecham, he of cycling and model making prowess dropped off his build of the earlier Airfix kit of the P-40B which is an interesting comparison. Mr. B's model making skills exceed mine but Airfix have certainly provided a far more detailed kit in their revised model that I built. Most markedly are the panel lines that are recessed on my model whereas Mr. B's has the raised panel lines.

I had to double take on the situation!

Mr. B's model looking good back it will have to go back to his display shelves!

Airfix Curtiss Tomahawk11B,


Wednesday, October 23, 2024

A moment of panic!

Sometime you doubt yourself and a moment of panic struck me as I applied some panel line to the Airfix Curtiss Tomahawk. Basically panel line is an enamel based product that is thinned black paint. The idea, like my home made washes, is that the dilute colour collects in the recesses of the model to highlight the details, in this case the various panel lines that make up the aircrafts superstructure. The idea is that you paint your model in acrylic paints and apply the enamel panel line over it. Being a different product the enamel being oil based should not harm the acrylic water based paint and so you can use enamel thinners to clean off the excess panel line. It just looks horrible when you apply it first and so that moment of panic strikes as to what happens if the two products react or the enamel thinners don't clear the excess off!

Airfix Curtiss Tomahawk11B,

Airfix Curtiss Tomahawk11B

However, calm was restored as I applied the thinners and it worked! Whats more is that it left a nice streaking weathered effect!

Airfix Curtiss Tomahawk11B

Having started on the underside, thinking if it goes wrong at least the underside is partly hidden, based upon it going well attention turned to the top side.

Airfix Curtiss Tomahawk11B
 
All that mess cleaned off laeving the panel lines highlighted and a nice weathering effect!

Airfix Curtiss Tomahawk11B

All I need to do know is fix that canopy permanently along with the side glass and things should be almost finished!

Airfix Curtiss Tomahawk11B

Almost finished! That is another moment of panic - I never finish things this quick!

Airfix Curtiss Tomahawk11B


Tuesday, October 22, 2024

Canopy capers!

As I said yesterday the canopy to the Airfix Curtiss Tomahawk needs fitting but before that can happen it also needs to have the frame parts painted. Now the last time I did one of these I probably painted the frame with what would have been like a tar brush as a young lad with lots of imagination and keenness but no skill or patience! Things haven't changed much then in the passing years as Mrs Woody would no doubt say!

However, with this caper I did take my time and thought about the issue of painting fine lines on a clear canopy moulding. You can, if you hunt about on the internet, find firms who sell self adhesive masks that you can mask up the clear parts of the canopy with and from what I have seen most are really good. However my wallet is empty, I am not patient enough to wait for delivery and in my typical way I am sure I can manage without. Hence the mass of masking tape in the picture below. I did the vertical lines first and then masked off the horizontal once the paint had dried and....


Airfix Curtiss Tomahawk11B

...it turned out quite well in my view for a first attempt. The good thing about clear parts on a model is that you can generally clean unwanted paint off them using a soft blunt instrument such as a cocktail stick which is what I did.

Airfix Curtiss Tomahawk11B

I trial fitted the canopy which seems to fit and just need to fit the two rear canopy side pieces that are in front of the model in the picture below.

Airfix Curtiss Tomahawk11B

In other news, and of interest to those loyal blog readers with an interest in canals, a bike ride past the recently dried out canal has revealed that it is full again! Not sure if this is down to storm Ashley and its rain or whether some flow stopping device has failed or if all the repair works that required the drained canal have now been finished? 

Airfix Curtiss Tomahawk11B

Airfix Curtiss Tomahawk11B


Monday, October 21, 2024

Today I haver mainly been doing the undercarriage!

After the excitement of the finishing the last event for this year at the Rocks by Rail Museum yesterday it was time to get back to trying finish the Airfix Curtiss Tomahawk kit. The decals have been applied so it was time to think about adding the parts that I would, through clumsy hands, break off whilst putting the decals in place had I of  already fitted them! These parts are mainly the undercarriage. I have been wise enough (can you use the word 'wise' and Woody in the same sentence?) to already have painted them so fitting would be easier.

Airfix Curtiss Tomahawk11B

With those fitted and the engine exhausts, pilots head rest and the pilot himself, the model took on a new look.

Airfix Curtiss Tomahawk11B

Airfix Curtiss Tomahawk11B

Airfix Curtiss Tomahawk11B

I just need to matt varnish the model, then do a bit of weathering and fit the canopy! Not too much if you say it quick!

Sunday, October 20, 2024

The season finale!

Over for another year! The last public event of the year happened today and whilst we all thought that it might not be the finish we wanted due to Storm Ashley lashing the Country with rain and gales it actually went remarkably well with a good number of guests coming to visit. It must have been good as two even became members and asked about volunteering! 

As usual brake van rides were available all day.

Rocks by Rail Museum

For me however, it was not the luxury of riding in a relatively cosy diesel engine cab or brake van. The reality was walking up and down the quarry sidings shunting wagons which I actually enjoy a lot! Something therapeutic in sorting wagons and locos! Today was also different from other times in that I had assistance from loyal blog reader Mrs. B. who on numerous occasions put me to shame but we wont dwell on that!

Point switching was no issue to her!

Rocks by Rail Museum

Directing the locos was no problem either!

Rocks by Rail Museum

Nor was coupling!

Rocks by Rail Museum

The day was also different with as Mr. D was out on his maiden operating session. 

Rocks by Rail Museum

Trevor, who had the privilege of driving, did say it drove very smoothly but the controls were the other way round to the Sentinel locos that he had been driving for the last 5 or 6 years. Well, there were no issues so he must have got used to them.

Rocks by Rail Museum

Interestingly, the operating consul (I keep wanting to call it a dashboard as would be in a car) does have a speedometer which registers speed in either direction which of course it needs to as the loco can go in either direction at the same speed. It just looks odd when you are used to a speedometer in the dashboard of a car.

Rocks by Rail Museum

This the Sentinel loco that hauled wagons up to the quarry to be exchanged with the ones that were being shunted.

Rocks by Rail Museum

Withy both locos, eight wagons and a brake van things can get messy if you don't have a Mrs. B around to keep you on the right track!

Rocks by Rail Museum


Rocks by Rail Museum

The face shovel is a brute of a machine and much respect to Martin who operates it - you really do need to know what you are doing!

Rocks by Rail Museum

Rocks by Rail Museum

Even though some of us got wet at lunchtime, Pam here 

Rocks by Rail Museum

getting a bit wetter than most as she was looking after the crossing by the platform so could not leave to shelter, we all enjoyed the season finale and I think our guests did too given the positive comments I heard. That may be the end of the season for the Museum but work carries on over the Winter as we prepare to reopen next Easter. That may seem a long time but I suspect the time will wizz by!


Saturday, October 19, 2024

More decals!

 Work on the Airfix Curtiss Tomahawk11B carries on with the last of the decals being applied to the undersides of the wings....

Airfix Curtiss Tomahawk11B

and the interesting mouth and eye markings around the front end. Yes, I have managed to break off one of the machine guns in the wings as predicted but it is safe ready to be glued back in place.

Airfix Curtiss Tomahawk11B

These last decals were not the easiest to fit as they had to meet in the middle. There is a bit of a gap but I should be able to hide that with some paint. I am somewhat in territory I have not been in before with aircraft so a lot of looking at pictures on the net has taken place to clarify details including that the wheel wells were painted greem so that is what I also did!

Airfix Curtiss Tomahawk11B

Reaching this stage means that the last few pieces can be fitted so hopefully that will be a job for the next day or so once I have sealed the decals with a coat of matt varnish.


Friday, October 18, 2024

Inside a smoke box!

 Rocks by Rail Museum

That is what it looks like inside a steam engine smoke box! This is 1391 at the Rocks by Rail Museum where all those tubes behind the big pipes need to be replaced. However those big pipes need to come out and old nots and bolts need some persuasion to come free which is taking time which is why Richard probably is looking down at the ground for inspiration! 

Rocks by Rail Museum

Alex and John are smiling in the maerntine - maybe they are glad not to be in the smokebox!

Rocks by Rail Museum

Back at the cab end of the loco, the work on dismantling the cab continues as the top half will need to be lifted off as part of the retubing work. Who said steam engines were easy to work on?

Rocks by Rail Museum

Mr. D on the other hand is progressing well having moved across to the exhibition centre.

Rocks by Rail Museum

John has started repainting it back into shiny green rather than the weathered out green that it has worn for the last few years.

Rocks by Rail Museum

Rocks by Rail Museum

And even more painting with Martin continuing the repaint of the drag line. Luckily for Martin, he can swing the cab round so he is always in the sun!

Rocks by Rail Museum

For me, apart from grass cutting I did straighten up some posts which was interesting as they all had been bent over the years.

Rocks by Rail Museum

So, what I thought would be a straightforward bang it back in the ground ended up having to dig holes! At least it was sunny!

Rocks by Rail Museum

It looked better afterwards though.

Rocks by Rail Museum

And just to prove I am not the only one taking pictures, here is Pete taking photos of his and Pam's painting of the Sundew cab. A lot better than being inside a smoke box!

Rocks by Rail Museum


Thursday, October 17, 2024

Decal delight!

I don't normally get anywhere near this stage of a model build in such a short time so I was delighted to be decaling (is that a word???) on the Airfix Curtiss Tomahawk model  First off though a coating of gloss varnish was airbrushed all over the model. This gives a smooth surface that the decals can be applied to which avoids the possibility of 'silvering'. This is the phenomena where applying the decal to a rough matt surface traps air between the decal and the surface which results in the decal having a silver colour around its edges in certain light conditions.

Airfix Curtiss Tomahawk11B

There are a quite a number of decals for such a small model and it is worth taking time to position them correctly otherwise any imperfections stick out like a sore thumb. In addition there are a number of recessed panel lines on the model over which the decals go. Just leaving them flat would not look right as the decal should drop into the recess of the panel line. Luckily there are products (Micro Sol and Mirco Set are two such products) that assist in creating this by softening the decal so that it moulds its self to the surface over which t is placed. These are brushed on  and left to do their work with maybe a little encouragement from a moist cotton bud. Patience is the name of the game. 

Airfix Curtiss Tomahawk11B

I still have the underside wing roundels and the Tomahawk bird teeth and eyes to fit  but in the picture below the effect of the decal moulding itself to the underlying surface is clear to see.

Airfix Curtiss Tomahawk11B

Hopefully getting the last of the decals applied will also be a delight!