Search this blog

Tuesday, June 17, 2025

The station building.

I needed a small station building to go on top of the bridge section that I built a few days ago for my Last Great Project layout. I could scratch build one but there are several kits available in both card and plastic. I decided the oldest running one fitted the bill - The Dapol (ex Airfix) Station Building kit was my choice. 

My Last Great Project

It dates from the early 1960s when you could buy it for the equivalent of 7.5 pence compared to the near £10 today. Given its ancestry it is still a nice kit, not many parts but reasonably detailed.

My Last Great Project

Despite what the instructions said and with the advantage of having built several of these before, the four walls were glued together. That way I could test how it looked on the bridge section.

My Last Great Project

My Last Great Project

I think once all the bridge is finished that building will fit in well especially with the steps. So it is on with the build!


Monday, June 16, 2025

I concluded yesterdays post by highlighting I was not too happy about the very top of the steps that I have been building in 4mm scale. Looking at the picture below, the two uprights on the top of second flight of steps are too close together and it just looks odd to me.

My Last Great Project

I could have left it but I would always be drawn to that part of the model so I took the plunge and altered it! 

My Last Great Project

I think that looks better! I just need to fill a few joints with some acrylic putty and then its time for paint. However, before that there is another structure to build so that will mean yet more plastic to glue!


Sunday, June 15, 2025

The steps to nowhere!

The second flight of steps has been added to what is becoming a long project! However, it is nearly there!

My Last Great Project,

My Last Great Project,

This is what it finally looks like complete with a 4mm test user who is going up the steps to nowhere - at present!

My Last Great Project,

Overall it looks as I hoped apart from the very top. I may alter that. 

Saturday, June 14, 2025

Adding a handrail!

With progress being made on making the steps to the platform for my 00 gauge layout, it has come to the point of adding handrails. Nothing too challenging - just take a bit of time and it should all work out! Well, that is the theory!

First off, add some support uprights from plastic strip to the first flight of steps.

My Last Great Project,

Next add the handrail from the same plastic strip.

My Last Great Project,

With that nearly finished and once the glue dries I can add the second flight of steps. However, even at this early point it is looking as I hoped! 

Friday, June 13, 2025

Were my calculations incorrect?

With the second flight of steps constructed as part of the bridge to platform access, it was time to see if it fitted its intended location or were my calculations incorrect?

Well my calculations were slightly out but at least in a good way!

My Last Great Project,

I have ended up with the second flight of steps being a bit to long but I can trim that. If they had been too short I might have added several contributions to the WMD HQ swear jar!

Taking a slightly different view point I think the steps fit in well. Once fully completed and painted they should really look the part - hopefully!

My Last Great Project,


Thursday, June 12, 2025

Soimething is missing!

Something is missing I though to myself as I viewed the interior of the restoration shed at the Rocks by Rail Museum.

Rocks by Rail Museum

Yes, it certainly looked somewhat empty compared to normal but there was an explanation.

Most of the rolling stock had moved outside and this is the first time I have seen Ketton No.1 in natural light.

Rocks by Rail Museum

This was to allow for the water tank on steam loco 1931 to be lifted clear of the rest of the loco. The gantry crane that had appeared a couple of weeks ago was a key piece of equipment in this operation along with the CAT which provided stability.

Rocks by Rail Museum

Rocks by Rail Museum

This really is big engineering and you get some interesting views of the various parts that make up a steam loco.

The front of the water tank complete with the funnel.

Rocks by Rail Museum

The rear of the tank.

Rocks by Rail Museum

The front of the boiler with the boiler plate where the tubes pass through.

Rocks by Rail Museum

Some good progress which will go a long way to getting this loco back in steam.

Progress to, with Thomas the ride in childrens amusement. He works! Plugged into the electrical supply and fed a £1 coin he did his thing all to the accompaniment of the Thomas theme music - lovely! I dared Pam, as a petite lady, to get in the cab but she would not!

Rocks by Rail Museum

After last weeks mower capers I had to put some real work in to catch up and the recent rain did not help in that it had encouraged the grass to grow!

Rocks by Rail Museum

It all looks a lot more manicured now ready for Sunday with the Fathers Day Driver 4 a Fiver event.

Wednesday, June 11, 2025

Another step forward!

Time to build the supporting structure for the first part of the steps that I am building at the moment. The overall concept of how to do this is in my head but as with all such things the final result may require some modification along the way! 

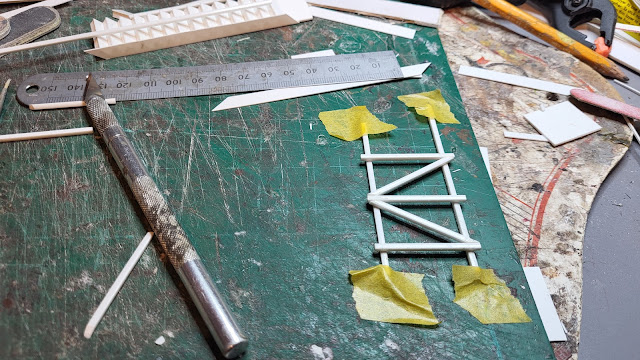
First off , the WMD Stores had some handy 2mm square section plastic strip in stock so this was the basis of the tower. Thinking about making side rails for the steps, the lengths cut of the strip reflected that need. They were then taped to the cutting board using the faded grid pattern on it to get the right measurements.

My Last Great Project,

Cross members were then cut and glued in place again using the grid to get the right spacings.

My Last Great Project,

With two sides made it was time to add the other cross parts in order to make a 'box' structure.

My Last Great Project,

Glued together, it was time to see whether my plan worked!

My Last Great Project,

It does! The supporting structure supports! A few more cross members to add but I am pleased with that. Another step forward!

Tuesday, June 10, 2025

One step at a time!

It is literally one step at a time as I continue building the steps between the bridge section and platform on my 00 gauge layout.

My Last Great Project,

But, step by step it is getting there!

My Last Great Project,

I have even formed the mid way platform between the two flights of steps to which a supporting structure will be formed.  That will be the next step in this project!

My Last Great Project,


Monday, June 9, 2025

One step beyond!

Before getting the paint out to paint the grid I posted about yesterday I thought that it would be best if I built everything that needed painting for this project so that it all could be painted in one airbrush session. Thinking ahead! Therefore I have started building the steps that take the miniature 4mm scale passengers from the bridge section down to the platform or indeed from the platform to the bridge. For me, it is a long time since I built any steps so this is probably a case of one step beyond my skill set!

Sensibly, for me anyway, I draw a rough plan of some angles and heights.

My Last Great Project,

With the rest of the plan in my head, never the most promising of starts, cutting of plastic card commenced.

My Last Great Project,

And with parts cut gluing commenced!

My Last Great Project,

And slowly the beginnings of a steps started to emerge!

My Last Great Project,

This could take some time to build but it is a step closer to finishing the layout even if only a vert small step!

Sunday, June 8, 2025

Making a grid.

I am no bridge engineer but I have worked with such people in the past so I understand a bit about bridge structures. So, I do know that the bridge deck sits on cross members that then sit on the girders. I certainly would not trust a real bridge that I designed but in model form it does at least look something like a real bridge should! On that basis I cut the required cross members from some plastic card and these then formed a grid pattern over he girders which I had cut to the right length.

My Last Great Project,

Putting the finished steel (or should that ne plastic?) work onto the underside of the bridge it begins to look like a real bridge should. It just needs painting once the glue hardens and then it can be glued into position.

My Last Great Project,