Search this blog

Showing posts with label Italeri. Show all posts

Wednesday, February 3, 2021

V is for Victory and Volvo!


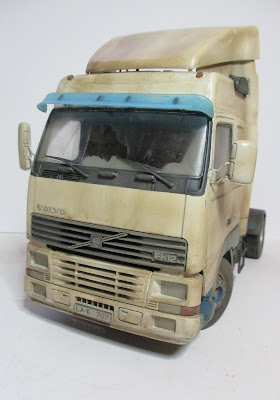
Its done! The Volvo FH16 is finished...well as far as I am going it. You may wonder at the title of this post - V is for Victory. Sometimes you just feel that the model is fighting with you to stop you making progress. Maybe it wants to be a Shelf Queen. The last couple of weeks in trying to finish off this kit have felt like a battle on several occasions. Some of it, well probably most of it, down to my stupidity but others where you think 'how did that happen?'. Stupidity illustrated by the fact that despite being an FH16 the grill badge is for an FH12! Did I stupidly put the wrong decal on? No, I did fit the FH16 decal. I however stupidly put the decal on the grill before attaching the grill to the body shell then finding out there was only one way the grill would fit. As you will have guessed it was not the way I had anticipated so the FH16 badge was upside down! No spare decal apart from the FH12 one so that is fitted. 'How did that happen?' illustrated by the fact that the front lower panel attached to the chassis fouled the cab tilting. I had tested everything before finally gluing in confidence that it all worked. Came to finally fit the cab to the chassis and suddenly the cab won't tilt! ' How did that happen?' only solution was to adjust the lower panel by breaking the joint with the chassis. Had it been any other part that I did not need to break it would have fallen apart. Not this joint though and some considerable force and a prayer that nothing would break ensued to separate the part. Would it glue back on after adjustment? Took me four attempts to get a solid joint. Anyway I am sure that other modelers go through similar experiences so I will leave it there but conclude by saying it felt a victory to finally finish.  If you do have a similar experience I would be interested to know -leave a comment.

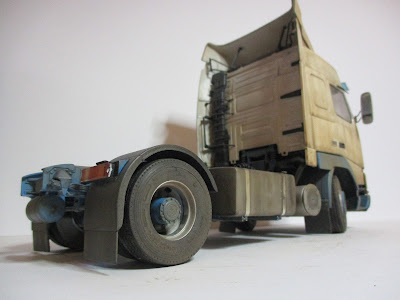
I did say in an earlier blog that the cab needed to be toned down from pristine white to match the weathered chassis and that is what I did with a mix of airbrushing and weathering powders. There are areas where things could be better but overall pleased to have created a look of a truck that has been out on the winter roads for some days and needs a wash! I will leave you with the pictures and let you judge as to whether my weathering (pun intended) has worked! You will note that I left the side skirts off the chassis feeling that the chassis looked more interesting without them. In addition I also added some airlines to connect the truck to a trailer. Made from electrical cable wrapped around a tube with plastic tube connectors. It adds a bit of interest to the model.


Well time to move onto something else but more on that another time!


Monday, January 11, 2021

VW means Volvo Weathered!


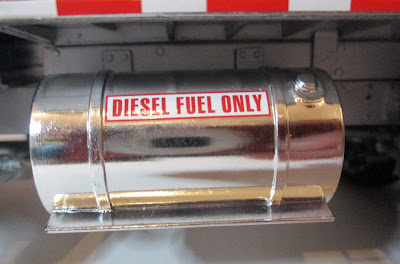
No doubt upset some VW fans with the title to this post but yes, whilst the weather may have been cold outside over the weekend the weathering inside was a much warmer affair. The chassis of the Italeri Volvo FH-16 saw some further weathering from the airbrush and the application of some washes to further tone down that bright blue chassis. The fuel tank was also installed having been modified with some new straps and chassis mounting brackets. I never got to the bottom of why the tank as supplied and instructed in the instructions just would not fit. More than likely that it is my ineptitude or misreading or both but the problem has been solved - the fuel tank mounting not my ineptitude or inability to understand instructions. My wife would agree with that last part and probably the first too! Anyway on the chassis front the rear lights and French registered number plate have been added (it is left hand drive so unlikely to be a British truck) and at the front, the lower panel with lights and blank number plate has been added. You may be wondering why the matching number plate has not been added. There lies a tale of old decals! Whilst the first applied yellow backed number plate for the rear went on without issue the front white backed number plate from these ten or so year old decals split into a thousand pieces. I forgot about the fragility of old decals and should have put a coat of varnish on them or some decal save solution before soaking them - lesson learnt - just have to find some more suitable decals in my stock. A few more pictures of the chassis and as with any build the obligatory balancing of other parts on it to see how the whole model will look. As always you can click on the picture to open it up and see it at full size.


That cab will certainly need some toning down!

On the 009 layout some grassing has taken place. With the basic landscape formed its the perfect base to start the scenic activities and there is something very satisfying about turning baron plaster into something that looks (hopefully!) green and lush. Part of the landscape was painted with PVA and then hanging basket liner was pressed into it with the backing side left exposed and left to dry over night. Once torn off the results were mixed. One part had stuck well the other not so well with bald patches resembling a scale representation of my lawn!


I should have painted one coat onto the plaster and left it to dry and seal the surface before applying a second coat and basket liner. Lesson learnt again! However not all was lost as my intention had always been to use some static grass on top of the liner to give that rough grass look of an embankment where it was not mown or cultivated. After trimming the liner (a bit like shaving stubble) and getting rid of the bits of string and other odd fibers that come with it a pleasant hour or so was spent with a mixture of fibers and the static grass applicator. I ended up with this - still more to do but it is getting there and progress is being made. Just hope it continues! 


Friday, January 8, 2021

Finish it Friday

I am guessing that most modelers have them - a model or two or even more that sit on a shelf or in a box just waiting for a few small jobs to finish them. I have to admit with the number I have I probably bump up any averaging calculation by an immense amount. However with today being Friday and there being no such thing as Model Kit SOS (now there's an idea for a TV show!) I thought it about time to start lowering that average with a 'Finish it Friday' project. The lucky recipient for todays attention  was a Revell 1/25 scale Kenworth Dump Truck kit number 07406. I built this back in about 2015 and for some reason never got round to adding some steps and ladders to the chassis and tipper body and applying some final transfers or are they now decals - shows my age! Anyway for reasons that probably made some sense to me at the time the truck went on a shelf and the steps and decals hung around the work bench for nearly 5 years including surviving the work bench moving without being lost! Today in little less than an hour the steps were added and the decals applied. Job done - well almost - just have to straighten the CB aerial that I see to have knocked and only just noticed as I uploaded the photographs! Oh well! 

From the point of view of the kit it certainly is not the best and shows its origins from the 80's. There are only half formed brake cylinders so if you look inside the chassis there are just holes where the rest of the cylinders should be. The tyres do not sit on the wheel rims very well. As with most kits with vast amounts of chromed parts the designers always seem to have the part attached to the spru so that when removed the loss of the chrome is very visible. However for all of its faults it still builds up into an impressive truck with that full on American look. No weathering (apart from a dilute wash of balck on the radiator grill) as these guys keep their rigs uber clean in real life.


On the Volvo front there has been some movement. Unlike the Kenworth dump truck above the Volvo FH 16 will be showing evidence of a working life where cleaning is something for the outside bits like the cab and side skirts. The chassis is being treated to some airbrushing, washes and weathering at the moment. Still more to do but there is progress.


Whether next week will se another 'Finish it Friday' is uncertain but at least there is now one less model awaiting! Do you have any models in a similar situation? Let me know in the comments section.


Sunday, January 3, 2021

Happy New Year and the first post of 2021!

Happy New Year!

I did say in my first post that this would be a diary of my modelling activity and some six months later I am making my second post. To be frank not a lot happened modelling wise in that six months. All sorts of things happening in my life - none of it Covid thank goodness - so modelling was something that took a holiday until the past few days. Hopefully I will have more time for model making in general so hopefully this blog may have a few more entries to it than in 2020!

The Volvo FH16 has made no further progress apart from re-doing the fuel tank which just did not mount to the chassis in a realistic way but more of that another time. The 009 layout has not progressed any further but I have finished the Italeri 1/35 scale T34!

Not the best of photos but gives an idea of where I got to on this and in real life it, to me at least looks good and is better than my last model which is always something positive!


I will do some better pictures and go though some of the details of what I did and used on this kit in the near future. 

As the start of a new year gives that opportunity to make a resolution to change something in your life looking at the junk in the background of the photograph above does make me think I need to be tidier and better organised so that will be something to aim for this year. Have you made any model making related resolutions for 2021 and if so how are they going even at this early stage of the year? Leave a comment if you would like to detail yours.


Sunday, June 7, 2020

A well belated start to this blog!

Well this should have started in January 2018. For all sorts of reasons it didn't, which is probably more down to me putting off until tomorrow!

Why am I doing this? Mostly as a diary. Looking at models I have built over the years I begin that thought process of when did I make that? In my case it is probably more when did I start that - I am a great one for starting projects but not too good at finishing. Too many distractions of new projects! However if anyone is reading this and what comes after I hope it is of some interest? I know I find reading other peoples blogs interesting and in many cases inspirational.

So as an introduction here are some of my current projects.

The 1/24 scale Italeri Volvo FH16 Globetrotter. Retrieved from the loft, I started this in October 2019. Bought as a part built glue bomb on eBay some years ago (can't remember when but do remember it was only £10) the engine and chassis had been built and had to be unpicked and is now at the stage of the chassis and engine almost complete and the cab interior waiting to go into the cab and then the finishing touches. No major modifications apart from trying to put a more accurate cab underside in place. The photos below probably explain better then my words do!


Italeri T34/84 in 1/35 scale. A Christmas present that I started in early January 2020. My Dad died in late January so it has been on one side like most of my projects as I deal with all the usual matters following such an event. The kit itself has an engine and interior and I have got as far as having completed the lower hull with those parts installed and weathered Again pictures explain better.


Lastly for this first post there is my 009 layout. Baseboard built at the start of the lockdown and track laid and initial scenery started. The idea is that there will be a second matching board. The initial board will have some a quarry served by a siding. Not an imaginative design but I do enjoy on occasions just watching trains go round - something very therapeutic! Hopefully this will continue yo progress faster than my normal glacial speed! In the meantime here is a picture.


Today's modelling will be painting the fuel tank for the Volvo and some old Triang fencing that I found in my box of railway bits which will hopefully find a home on the 009 layout - must think!of a name for it!