Search this blog

Showing posts with label weathering. Show all posts

Friday, August 27, 2021

Watching paint dry!

A gap of a couple of days since the last post as I have literally been watching dry on the K5350 Mustang Truck. Well there has also been some work on getting the last pieces of the cab fitted so it can be painted up but a lot of time has been taken up in applying 'washes' to the chassis and cargo body. I use very diluted brown and grey Vallejo paint. This is then painted on to the model and then I let gravity takes its course as the paint pigment gets trapped in nooks and crannies of the model as well as dulling the overall paint finish. As it is very dilute it does take a long time to dry hence you feel as though you are sat there watching paint dry. Its all very therapeutic though and you can get lost in time if you decide to intervene on gravity's effects by using the paint brush to start making streaking effects or adding paint here or taking it away from somewhere else. The idea however is to make the truck look well used - no shampoo and wax every Sunday for a working truck like this! In essence applying a dilute coat of paint like this is trying to emulate the environment the vehicle drives through. Take a car out on a wet day and it comes back home looking dirty. Rain itself contains dirt, the spray off the road has dirt and even the air itself can have dirt in it. All of this dirt just loves to deposit itself on vehicles - especially if you have just washed it! Something I have explained to Mrs. Woody on many occasions when she has deemed her car needs washing and I have tried to get out of it by pointing out that it will only get dirty again. Never works!

The cargo body started out looking like this 

and now looks like this


Still a way to go but you can almost feel that ingrained grime on the paintwork. 

Whilst I was waiting for the paint to dry I did have a look at some of my previous cherished models or as Mrs. W would say junk, which are beginning to reside on the shelves in the man cave AKA the Room of Gloom. Built about 18 years ago this is an Italeri 1/24 scale DAF 95XF Super Cab. It was a simple build as there was no engine to construct and it was one of Italeri's first ventures into their 'New Concert' of simplified truck kits. There were a few others but they were not popular with modelers and I am pleased to say all the new releases over the past few years have been full kits with engines and gearboxes.


Its hitched up to an Italeri Schmitz Dumper Trailer which is an impressively big model. Built in 2013 I recall managing to build the majority of the kit in a day! Wow! If only I could do that now. I can see from the photo that I need to get the duster out. Unlike the K5350 Mustang Truck this truck and trailer are cared for! 


Right back to the paint drying channel!
  

Tuesday, August 24, 2021

The Dirty Seven


This is not a WMD cheapskate rip off of The Dirty Dozen film! Mrs Woody holds the purse strings and me entering the World of making films is not something that would pass the funding analysis. Anyway this evening I left Mrs. W pursuing a handbag website and had a few minutes to do a bit more on the K5350 truck. Before finally assembling the wheels I need to do a bit more weathering. Trying to give the wheels that dirty look was done with the aid of a very dilute coating or two of Vallejo Earth colour. The idea is that being dilute it will be drawn into the nooks and crannies as well as toning the overall look of the tyres a bit further. They will need to dry overnight and you can see in the phot above they are still damp.

I also had time to put the seats, steering wheel and dashboard in the cab so that is almost complete. Not entirely happy with the weathering inside yet. I did use a Humbrol Dust Wash which took about 3 days to dry and still is shiny. I have splashed a bit of the dilute earth mix (almost sounds like the old advert for Brute aftershave with Henry Cooper and Barry Sheen - Splash it all over! - See the advert on YouTube by clicking here) that the tyres had in the cab to see if it will tone it all down. I will wait to see what tomorrow brings - possibly Mrs W's new handbag! Antway off to see if there is a Blood Moon again tonight as there was a great one last night.


Monday, August 23, 2021

Getting dirty!

No, not adult humour but time to start weathering the chassis of the K5350 truck. Over the last couple of days I have given the chassis a few washes of a MIG dust wash and added a few oil stains from a substance made by MIG that I have had so long that it is like tar! A bit of white spirit thinned it to a useable consistency and it was applied to things such as the universal joints and sump plugs. The exhaust which looked pristine in its aluminum paint will in real life have been made in steel and therefore will have rust as the heat of the gases burns off the protective paint. I replicated this with some suitable weathering powders. I still need to blacken the end where the diesel exhust would leave a sooty deposit.


As i need to finish off the inside of the cab so I can assemble it to paint the outside I spent a few minutes painting various things on the dashboard to make it look like a photo I had. Disappointingly the kit does not have a decal for this but hopefully given the small size, its location inside the cab and the steering wheel hiding it, my jerky painting may not be noticed! Finally to give the impression of a glass dial face I added a few drops of Tamiya gloss varnish inside the dial rims. Hopefully this will add a little variety to an otherwise large expanse of matt black. I also painted the two jerry cans that fit to the back of the body. Whilst the carrying case is painted in Russian Green the jerry cans themselves are in a Vallejo Reflective Green to add just a bit of variety. They will need a bit of weathering as well - you don't see that many pristine jerry cans in the military - they are usually a bit battered as they weigh so much, just like those paving slabs I reset today! Oh well I will just have to pretend they are jerry cans to make the job a bit more interesting when I do the rest of them!


Wednesday, February 24, 2021

Ballasting Time!

Any railway needs firm foundations for their track and the ballast provides a lot of that. The stones that usually form the ballast are angular and when compacted lock together holding the sleepers and rail allowing the trains to pass over without deflection that could derail them. Ballast also provides drainage preventing water ponding and soaking into wooden sleepers and rotting them. Modern concrete and steel sleepers still need drainage even though they are less susceptible to deterioration from water than wood is. 

In model form ballast can take many forms. Usually crushed granite ballast is used or one of the other custom products from manufactures such as Woodland Scenics. You can even get underlay sheets such as those made by Hornby and Peco. Here at WMD and being tight fisted sand is the choice of ballast for this 009 gauge railway. Not ordinary sand but kiln dried sand. It is about the right scale for ballast in 4mm scale and it is cheap! What's more WMD HQ stores has a large bag in stock bought many years ago for about £3. 

So the material for the ballast is chosen. What happens next? Well before ballasting I should say that before laying the track I did weather it with a spray brush and picked out the spikes holding the rail to the sleepers with a rust colour so that was one job already done! Talk to many people about ballasting and they talk of problems with points. You do have to be careful but my dodge to try to minimise issues is to apply petroleum jelly to the moving parts. That way any glue used to fasten the ballast is unlikely to glue the point up and any stray ballast is therefore also unlikely to end up glued solid to the moving parts. Have a look at the phots below.


Applying the sand was done with a tea spoon (note to self; do not admit to Mrs. Woody use of kitchen utensils!) and a small soft flat brush was used to brush the sand into place. A handy tip is that when you have the ballast roughly as you want it use the spoon to tap the track or baseboard to in effect 'vibrate' the sand off the sleeper tops and into where it should be.


Once happy with the placing of the ballast it was time to fasten it down. The long used mix of diluted PVA glue with a few drops of washing up liquid was mixed ala James Bond style (shaken but not stirred) by putting the ingredients in a jam jar, remembering to securely put the lid on and shaking for a few minutes. The drops of washing up liquid will cause a froth but the main liquid is what is needed. Using an old syringe, (having cats means that you do end up with syringes from the vets to administer various lotions and potions) the glue mix was syringed onto the ballast. It looked a right mess as the pictures show, but as with any process where you have to let things dry, it takes on a whole different look once the glue sets.


Without admitting to Mrs Woody, the glue was given an encouragement to dry from her hairdrier!


Once the glue was set the track looked like this.


I think it looks good but then I would! With a bit of cleaning trains were soon testing their newly ballasted track. 


Tuesday, February 23, 2021

More Bridges and Roads

 With the road in place and painted it was time to start some detailing. I find I work best by doing a small amount and coming back on several occasions to add to the overall effect. For the road I first misted a very fine earth brown along the edges where the road surface meets the verge usually referred to as the gutter. If you look at any road the gutter will be full of dust, litter, nuts, bolts and many other things that commonly get called detritus and have either washes into the gutter or been dumped. For a country road like the one modelled I have assumed the locals are proud of their area and don't drop litter so the dust and other natural materials is the only things that accumulate in the gutter. On bends you tend to see an additional accumulation of detritus. My rendition of all of this so far and still more to do, looks like this -


With the road in place the bridge structure could also be added. This is the Wills SS28 Occupation Bridge and in an earlier posting I detailed how I had to make new abutments. I have painted the railings white and then have given both the bridge griders and the railings some rust weathering which I ma pleased with.


You'll notice that track ballasting and scenic work has also taken place but more of that another time. In the meantime I will await the first 00 gauge vehicle to cross the bridge and test its strength!  

Monday, February 22, 2021

We're on a Road to Nowhere!

Roads are a strange thing. They take you to places and most of us use them everyday. Lots of songs have been written about them including that classic by Talking Heads - We're on a Road to Nowhere - Youtube video. However in model form they usually go nowhere apart from in our minds and despite using real roads every day our modelling interpretations of them can be far off the mark. The main thing is that tarmac roads are not black apart from a few days after they have been laid. They weather and organically dry out so that the oils in the binder that holds the stones together become less effective. That is in essence how potholes start with the small stones becoming loose in the surface as the binder dries out forming a depression and allowing moisture into the structure. Anyway this is a modelling blog and not a highway maintenance tutorial! 

As we use roads so much it is interesting to still see the number of model railways where the road is modelled black. Have a look at some of the roads around where you live and you will see all sorts of shades of grey tarmac and chippings. On my 009 layout I do have a road which goes to nowhere and is of shades of grey. From one of my earlier posts you'll see in the picture below that the road just went along two thirds of the layout. 


Thinking of my plans to extend in the future I decided to run the road off the end of the board across the track. Some mounting card and some filler saw the road installed and then it was time to paint it all. The original part of the road had been given a random spray of Halfords (other brands are available but it was what was in the WMD HQ stores at the time ) grey primer just to seal the surface and I never saw this as the finished road surface. The grey for the road was mixed by putting some acrylic white paint into an old ice-cream tub (raspberry ripple if you are interested and no doubt there is a website somewhere that tells you what sort of person you are by the type of ice-cream you eat but I'm not going to look....yet!) and then putting blobs of black acrylic into it. Mixing the two colours in different parts of the tub gave slightly different hues of grey as you can see from the picture. 


You will also notice from the picture above a stranger to modelling materials - Talcum Powder! Strange as it may seem talcum powder mixed into paint gives it some texture. Roads are not smooth otherwise it would be like driving on a skating rink so they have some texture to allow tires and shoes to grip. Very difficult to achieve in 4mm scale but the talcum powder gives a good impression of it. In case you are wondering I have purloined this tin from Mrs Woody who informs that talcum powder is now out of fashion these days for various reasons so I have given it a good home and the road smells fragrantly lovely! Or is it my aftershave???!!!

Anyway the painting of the road continues and this road to no where will get finished!


Wednesday, February 3, 2021

V is for Victory and Volvo!


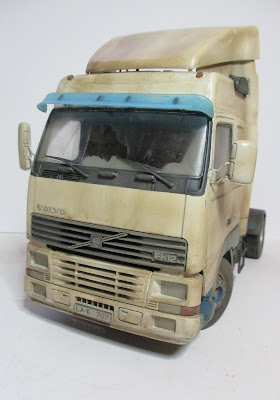
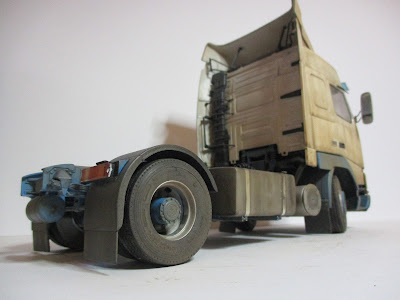
Its done! The Volvo FH16 is finished...well as far as I am going it. You may wonder at the title of this post - V is for Victory. Sometimes you just feel that the model is fighting with you to stop you making progress. Maybe it wants to be a Shelf Queen. The last couple of weeks in trying to finish off this kit have felt like a battle on several occasions. Some of it, well probably most of it, down to my stupidity but others where you think 'how did that happen?'. Stupidity illustrated by the fact that despite being an FH16 the grill badge is for an FH12! Did I stupidly put the wrong decal on? No, I did fit the FH16 decal. I however stupidly put the decal on the grill before attaching the grill to the body shell then finding out there was only one way the grill would fit. As you will have guessed it was not the way I had anticipated so the FH16 badge was upside down! No spare decal apart from the FH12 one so that is fitted. 'How did that happen?' illustrated by the fact that the front lower panel attached to the chassis fouled the cab tilting. I had tested everything before finally gluing in confidence that it all worked. Came to finally fit the cab to the chassis and suddenly the cab won't tilt! ' How did that happen?' only solution was to adjust the lower panel by breaking the joint with the chassis. Had it been any other part that I did not need to break it would have fallen apart. Not this joint though and some considerable force and a prayer that nothing would break ensued to separate the part. Would it glue back on after adjustment? Took me four attempts to get a solid joint. Anyway I am sure that other modelers go through similar experiences so I will leave it there but conclude by saying it felt a victory to finally finish.  If you do have a similar experience I would be interested to know -leave a comment.

I did say in an earlier blog that the cab needed to be toned down from pristine white to match the weathered chassis and that is what I did with a mix of airbrushing and weathering powders. There are areas where things could be better but overall pleased to have created a look of a truck that has been out on the winter roads for some days and needs a wash! I will leave you with the pictures and let you judge as to whether my weathering (pun intended) has worked! You will note that I left the side skirts off the chassis feeling that the chassis looked more interesting without them. In addition I also added some airlines to connect the truck to a trailer. Made from electrical cable wrapped around a tube with plastic tube connectors. It adds a bit of interest to the model.


Well time to move onto something else but more on that another time!


Thursday, January 21, 2021

Shelf Queen Trio Complete Thanks to the Tank!

 Yes! The trio of Shelf Queens have now been finished. Three models in a week. Normally with my glacial progress its three years a model. However lets have a look at where I started. The Emhar kit complete awaiting painting.


Following priming the tracks were sprayed Tamiya Tan and then masked whilst the main bulk of the tank received varying shades of Vallejo Russian Green! No one seems certain what colour WW! tanks were from what I have read and colours seem to vary from grey through karki to green. I am not a rivet counting modeler and green was to hand so that's what colour the tank is. 


Following on from this, the tracks were painted Vallejo rust and then the whole tank including the tracks was given a wash of dilute Vallejo Black-grey. A coat of gloss varnish later and the decals were added giving the tank its identity as 'Flypaper' It could have been Fantan as there are alternative decals or it could have been a captured tank remarked in German identity. The decals themselves are thick and by that I mean when you put them on the tank you can see the edge of the transparent carrier film. Now having watched the keen car modelers they do start to use very fine abrasives to smooth the edge of decals so that they do not show, but this isn't a Porsche or a Ferrari - its a WW1 tank so I hoped the weathering would go someway to disguise the decals. How well that went I will leave up to you. A coat of Micro Soll under and over the decals helped persuade them to conform to the surface, especially the rivets. A further coat of matt varnish to protect and seal the decals was applied and then it was onto weathering with some MIG powders to produce...


I'm happy with that! The weathering just used three products - dilute Vallejo black-grey paint and two MIG pigments as shown in the photo below.

Someone did ask me how long does it take to make a model? The answer depends upon so many variables and in my case the answer is likely to be too long! However, for this model the basic build took about two hours, then the gap of two years I will ignore, and then about an hour to paint and two hours of decal application and weathering. Five hours in total. I must admit that it was five enjoyable hours and a time to relax and be creative which is what any hobby is about. Why not build a kit this weekend and see how it goes for you.

Wednesday, January 20, 2021

Windy Wednesday

With here in the UK being battered by Storm Christoph I though it appropriate to post a wind related item - nothing to do with my diet but it is about the Dapol windmill! As mentioned in a previous post a Shelf Queen of some years standing which is now actually finished! I started with this.


Once primed, grays and white were sprayed t start to bring some life to the model.


The sails and wooden main structure were sprayed white and whilst the roof to the brick base building was sprayed grey. The bricks are not actually painted on this model. A trick I picked up from Phil Parker, he of British Railway Modelling and Garden Railways magazines fame showed this on his blog (well worth looking at Phils Workshop ), was to use coloured pencils! When I first heard what he was about to do I thought that it stood no chance of working but it does. The trick is to have several brown, orange and red coloured pencils and use them randomly to rub across the brick work of the model. Because the mortar lines of the bricks are recessed in the model , the pencils just colour the bricks leaving a great finish. If you doubt it try it!


A bit of weathering took place with some black dilute paint and earthy type weathering powers toning that pristine white finish back to a more life like battered one. The doors and windows were painted pale green and whilst the green was on the brush a bit was added to a few spots around the base to give that moss/algae look that old brick work gets when damp.  The finished item I think looks good and to say that the moulds from which this kit are made are over 60 years old they still have great detail There is even a horse shoe on one of the doors! 


As the two wires hint, I have motorised this kit and just to prove it works.....


If you have the volume you will probably hear a clunk on each revolution where one of the sails was hitting the base - soon sorted with a slight bend. You may also hear a cat in the background who wanted his dinner and had no understanding of the Spielberg moment going on!


If you are interested the kit is actually based upon a real windmill at Rolvenden in Kent - Picture here. 

Right , I better go see if I have a garden fence left after this Windy Wednesday!


Tuesday, January 19, 2021

Barn Done It!

 Well I am pleased to say that the barn is done! A mere two years since assembling the eleven parts of this Wills kit the painting and weathering was done over four days. This is where I started with the kit in its four plastic colours. As always, click on the pictures for a bigger image.

 
Primed in black and then with some thin gray sprayed on the stone work it looked like this.


Then things got interesting with the woodwork sprayed a tan brown. Being old wood this was not the final finish but gave a good base for what was to follow.


Individual stones were picked out in different shades of tan made by having a spot of both tan and white on a pallet and mixing different hues randomly and applying it randomly. Being random is harder than it sounds though!  The wood was given a light spray of gray to tone the tan down and give it that silvery look of old weathered wood. The roof tiles were given an overall coat of an orange which was toned down with white and then individual tiles picked out using various further shades of the orange and white mix. Then I took advantage of the detail that the model has by using a very dilute (about 1part of paint and four of water) mix of black to just flood the detail. Gravity is not your friend for this process if you want the paint to stay in the relief of the mouldings so once painted I left each side facing upwards for an hour to let the paint dry. The photos below probably give a better idea of the whole process.


Having done all that and let the paint fully dry a light dusting of MIG European Dust was applied all over and then a light spray of matt varnish to protect it all and remove any sheen. The final product looks good to me!


What was nice about this project was that as I had other projects on the go I could take the time to leave this one well alone whilst the paint dried - something that I have paid the consequences for not doing in the past! The other bonus was that it was finished over a relatively short period if I ignore that it sat on the shelf for two years! Anyway, another part of the bigger Shelf Queen project that I mentioned in the last post is complete and that has to be good for the sole Barn Done It!