Search this blog

Showing posts with label cats. Show all posts

Friday, August 16, 2024

The cat sat on the floor and getting plastered!

Kitchen rebuild

Murphy Cat, sat on the floor of the ripped out kitchen where his food bowl used to be and probably thinking, like me, when is this going to be back to normal!

There was a time when getting plastered was usually the result of a night out on the town but for me those days are long gone! Instead the kitchen rebuild has reached the stage where things start coming together with the walls and ceiling now plastered. John, the plasterer, did a fantastic job getting it all done in a day and with the warm, weather it should soon be dry.

Kitchen rebuild

Kitchen rebuild

Kitchen rebuild

It is fascinating watching a good plasterer as they seemingly defy gravity as they trowel on plaster and turn what looks like a disaster area into a smoothed surface ready for paint.

Meanwhile after a day of pulling electric cables through the underfloor area of upstairs which entailed emptying cupboards and pulling up carpets I did have half an hour in the Man Cave where another hatch is complete for the turret. 

Dragon Tiger tank

I have also started the rear storage container that attaches to the rear of the turret.

Dragon Tiger tank

There are some interesting brass etched clamps and padlocks for that storage container which look as though they could test my abilities and patience! Talking of which, I started bending these wing nuts up in the photo below from the etched sheet. They are designed to go under the turret hatch of the tank and there are 14 altogether but I suddenly thought why am I doing this? I'm never going to see them! So I made an executive decision and have left them off. Don't think Mrs. Woody will let me make decisions like that about the new kitchen though!

Dragon Tiger tank


Saturday, April 27, 2024

86 Wires!

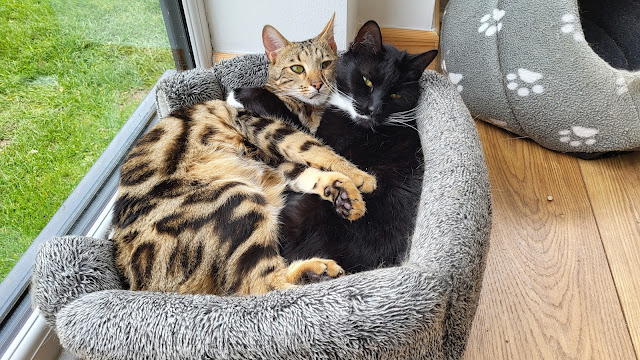
 Whilst these two WMD HQ moggies look as though they are wired together as they curled up in the comfort of one of the many cat baskets that have appeared over the years, I was busy finishing the some wiring in the cold of the Man Cave!

Cats

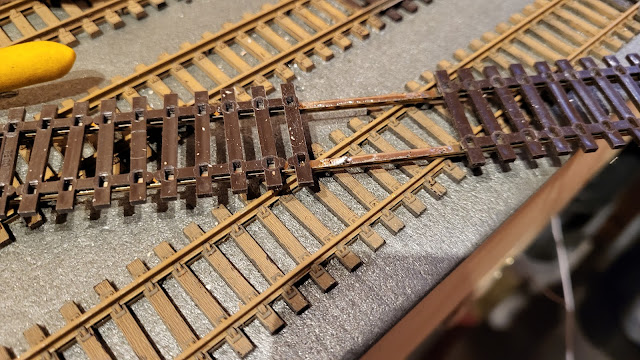
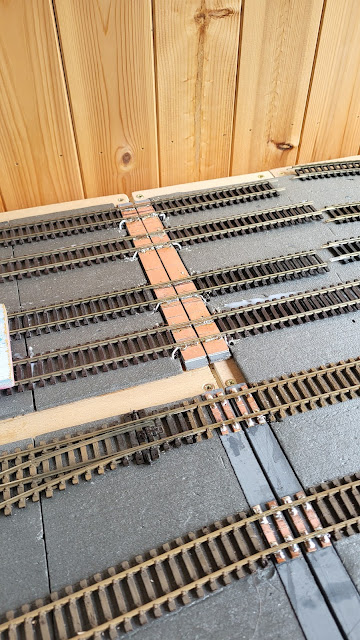
To make life easier where the rails go over the copper clad strips I had pre tinned them.

My Last Great Project

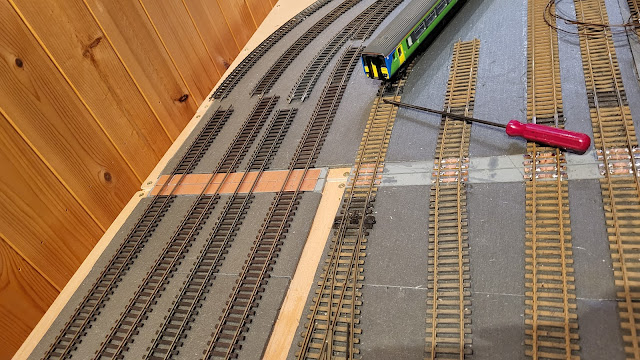
With everything in place, the track had been glued, it was time to add solder and wires!

My Last Great Project

And there you have it - the final wires of the 86 that I have soldered in place on this board! Once I cut the rails so that the baseboard is free I can turn it over and cconnect all the wires - all 86 of them - Gulp!

My Last Great Project


Thursday, February 8, 2024

RIP Smudge.

Smudge cat

As everyone who shares their life with an animal knows a day will come when you have a hard decision to be made. Having noticed over the past few days some difficulty in eating and a rattling breathing, Smudge was taken to the vets today. Unfortunately it was not good news with a growth around her windpipe which was not going to get better or be treatable. Having shared our lives for nearly 19 years with Smudge it was not easy for Mrs. Woody or me to part with her but it was the kindest thing. Smudge was a rescue cat. She had a kitten when she was about 6 months old just before she came to WMD. She loved a litter box that had just had new litter put in and would literally swim in it before leaving her mark. In later life she became deaf but could still sense when you were about and when food was being served. Later life also saw her take to using a cat bed and that was her favorite ne in the picture.She had a loud rumbly purr which if she came to bed at night would reverberate through the bed. She came to bed last night for the first time in some time - maybe she knew. Like all our cats she will always be remembered and missed so much!

Thursday, January 4, 2024

'Figures not included' or are they?

 After the flooding events of the last few days it was a pleasant relief just t sit in the Man Cave for a couple of hours and loose myself in the Italeri Kangaroo APC. That couple of hours allowed me to paint up a few of the details that are needed for the internal part of the vehicle as well as the two machine guns that are mounted on top of the hull. In addition, despite the kit box stating that 'figures not included', there are in fact three, seven part figures as well as a mortar and various kit bags included on one of the sprues. Not one to look a gift horse, or even a figure or three, in the mouth, I decided that I need to improve (drastically) my abilities to both construct and paint figures so I have started to put them together. If they come out OK they will be of use in some project and if I fail in doing an acceptable job they can go into 'Need to improve' container AKA the recycling bin!

The photos below show the painted internal hull, the figures, the machine guns, the radio and the dashboard for the driver. The dashboard is a decal that came with the kit and probably makes a better job of presenting the dials and switches then my painting of the moulded details could. I smoothed off the raised details to make applying the decal easier which it did. The radio however had no decal so I had to carefully paint the raised details and I think I did a reasonable job.


Italeri Kangaroo APC

The drivers seat is now painted and glued in position - not a comfy looking item though!

Italeri Kangaroo APC

The figures, although reasonably detailed, were not the best fitting in the join of the various limbs. I used acrylic putty to fill the joints. How successful that has been will be shown once I prime them.

Italeri Kangaroo APC

The machine gun is a nice moulding and with some careful painting looks the part mounted on the pulpit.

Italeri Kangaroo APC

Talking of  mounting I had to look a second time when I saw Milly the cat looking as though she had been mounted on the WMD fish tank! You can almost hear her say ' Fish? What fish!' The fish are however safe under the tank cover from any unwanted feline attention!

Tuesday, January 2, 2024

A short lived resolution and the cat has been fed!

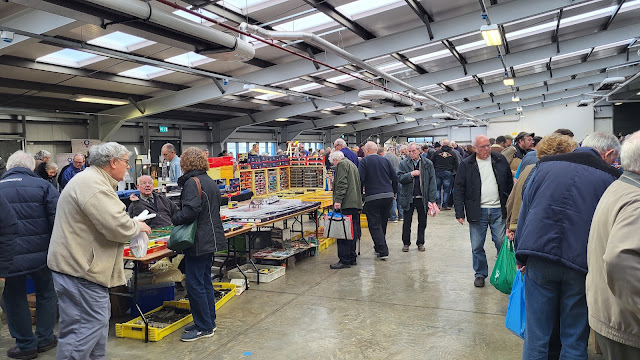
'No more kits or trains' I informed Mrs. Woody as my resolution for 2024 which I decided upon whilst doing my New Year's day bike ride. I then foolishly suggested we have a trip out - to the Newark Toy and Train Fair. Just for a look and a bit of exercise you understand! Having been before on several occassions, this years event seemed much busier when we arrived with large numbers of people carrying bags of purchases. However, as I reassured Mrs. W, that would not be the case for me!

Newark Toy and Train fair Jan 2024

Newark Toy and Train fair Jan 2024

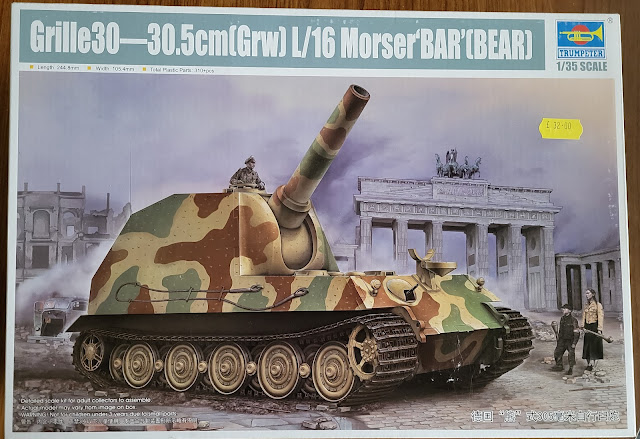
'Famous last words' came to mind regarding my newly and decidedly ill conceived and thought out resolution! There was just too much temptation! Several railway coaches at ridiculously good prices found their way into my bag - why did I take a bag if I wasn't going to buy anything???? Also I found a kit that caught my eye and ended up in the bag along with the coaches!

Trumpeter Grille30 30.5cm(Grw) L/15 Mörser "Bär",

The Grille30 was an anti tank gun with a 305mm cannon developed as a project in 1942. Based upon a modified Tiger 1 chassis and weighing 120 tons, the project never went into production but the work did influence other vehicles that did go into production such as the Sturmtiger assult gun. Should be an interesting build. Meanwhile Mrs. W, not to be out done, found a book to buy and this great sign that sums up the influence of cats at WMD HQ!

The cat has been fed

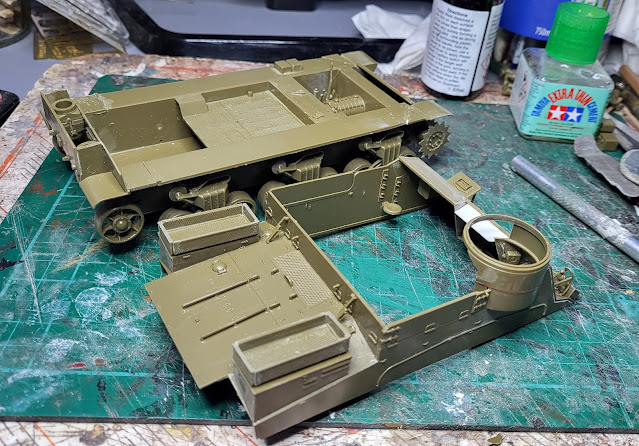
Meanwhile back at WMD HQ work on the Italeri Kangaroo APC has progressed a bit! I did realise at an early point in the build that as an open top vehicle the painting of the interior was going to be interesting! Despite being open, once the upper hull was joined to the lower hull the ability to easily paint the interior was going to be compromised. Therefore I have left the two parts unglued at the moment.

Italeri Kangaroo APC

I have primed the internal surfaces with a light grey and once dry that will get an initial top coat of a suitable green. 

Italeri Kangaroo APC

Now, whilst I wait for the paint to dry, I better go and feed that cat and make another resolution for 2024!

Wednesday, June 28, 2023

Relaxing?

It has been a busy few weeks at WMD HQ and it is catching up with me. I need to relax a bit I said To Mrs. Woody as she inspected the latest work I have done on finishing off the conservatory rebuild. Marty the cat certainly knows how to relax - maybe I should take some lessons from him?

Cats

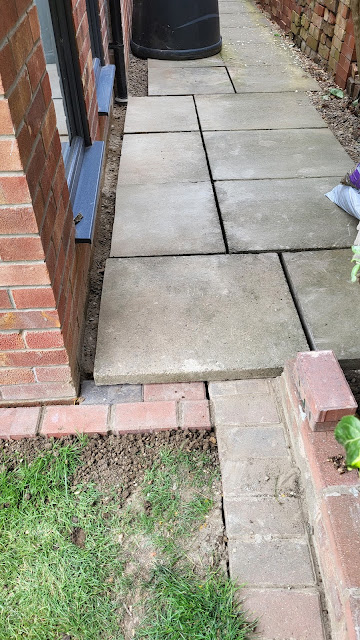
Anyway I think Mrs. W didn't hear me but is pleased with progress! Todays work was supposed to see the slabs at the side of the conservatory cleaned up and re-bedded in fresh cement. However they were that coated in mortar the builders let drop on them whilst bricklaying they took several hours of working with a hammer and chisel to clean them up. However they are much neater and lighter in weight and the bits of mortar that remain will weather off over winter.

Conservatory rebuild

With the surfaces cleaned off the slabs were lifted and all the muck under them cleaned out so that there is space for cement to re-bed them  Looks a bit neater already.

Conservatory rebuild

Those two bags on the left contain the stuff removed from on top and under the slabs!

Conservatory rebuild

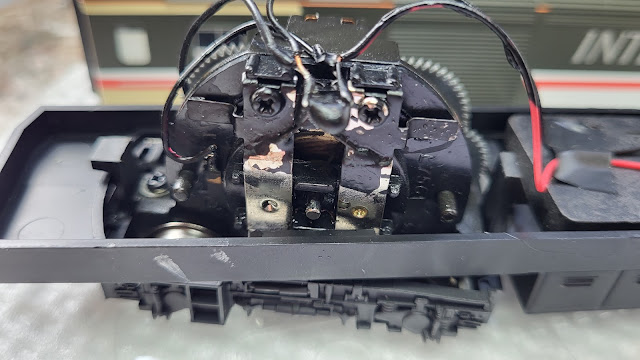
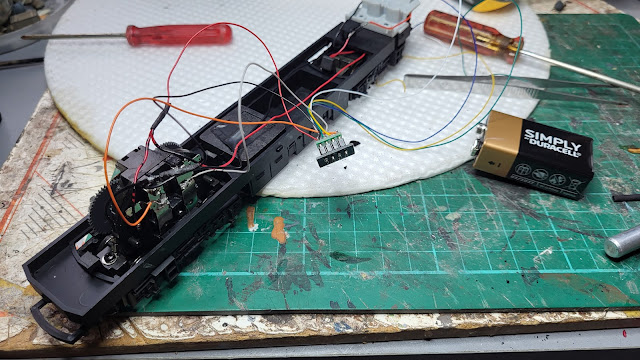
Back with the Hornby Swallow Livery HST I dealt with the spaghetti wiring. Getting the body off the driven power car revealed this. There are wires to the motor and the headlight from the pickups on both bogies..

Hornby Swallow Livery HST

This is the motor end. For some reason there is black paint on most of the wiring around the motor. In amongst the wiring is a capacitor that needs to come off. 

Hornby Swallow Livery HST

Disassembly saw the keeper plates for the motors removed and cleaned up and the capacitor removed.

Hornby Swallow Livery HST

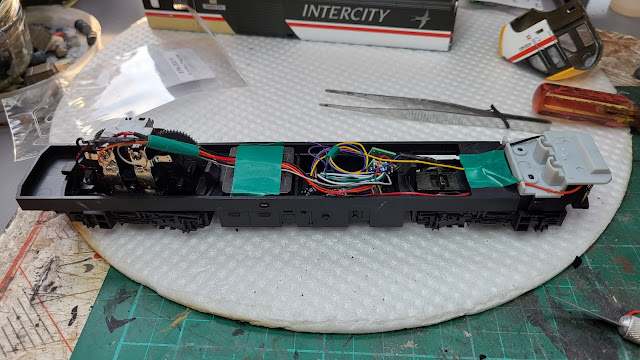
Cutting the various wires allowed me to solder in the 8 pin socket. Basically the socket fits between the pickups taking power from the track and the wires to the motor enabling the DCC chip to take its power from the track and then run the motor in accordance with the instructions it gets from the DCC controller which in this case is controlled by me!

Hornby Swallow Livery HST

The 8 pin socket is wired in to the motor and headlight. The 9 volt battery is a handy way of testing things. There is enough power in it to run the motor. In this case I plugged a blanking plate into the socket which allows the motor to run on DC power and used the battery to test that the motor still ran. It did!

The wiring was tidied up and with that done it was time to plug a DCC chip in.

Hornby Swallow Livery HST

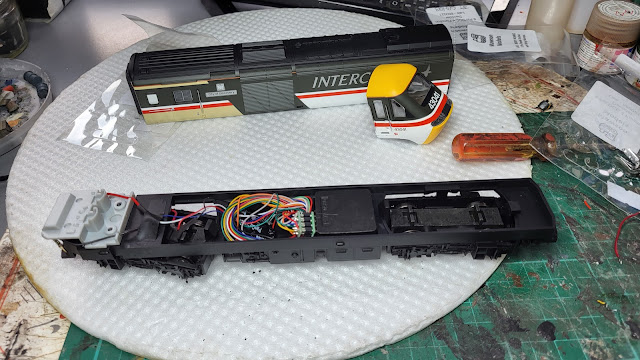
Meanwhile the rear un-motored power car needed a DCC chip in it to control the headlight. It was a simpler job then the motored power car as there was no motor to wire in.

Hornby Swallow Livery HST

There is certainly enough room for the wiring.

Hornby Swallow Livery HST

With all that done will it run? I feel fairly relaxed(in my mind but not body!) that it will but stay tuned to find out!

Wednesday, May 3, 2023

Gardening, rusting, cute cats and a mauled toilet roll - welcome to a day in the life of Woody!

Nobody I believe can accuse me of not having a variety of things going on in my life. Mrs. Woody would like to see those things expanded to include more of the jobs she has lined up for me but as I tell her I have lots on! Today was a case in point. An early morning bike ride and a bit of cleaning house started the day before a bit of a gardening as the weather was good. What remains of my lawn (after the builders destroyed much of it at the start of the year) was cut and edges trimmed. The reseeded areas of lawn are beginning to grow to so hopefully before long the mud pit will all be green! A bit of greenhouse work saw lettuce, spinach and radish seedings planted out so those together with the tomato plants should see some salads on the menu - then again with my growing skills......

In the sanity(or should that be insanity?) of the Man Cave I did have an hour doing some rusting of the tools and jerry cans that I had painted for the Tamiya Sd.Kfz 234/2 Puma over the past few days. I also did a bit more on painting the two figures.

Tamiya Sd Kfz 234.2 Puma 42

For the rusting I used Vallejo rust paint applied with a sponge. The procedure is to did the sponge into the paint, then dab it off on a paper towel until very little is left on the sponge. Dabbing the sponge on the item to be rusted then leaves a random pattern of rust paint that should replicate what happens with rusting metal in real life.

Tamiya Sd Kfz 234.2 Puma 42

Some two weeks after having had a clear up of my work bench I can say that it is surprisingly uncluttered!

Tamiya Sd Kfz 234.2 Puma 42

Going back inside I found these two cute cats - a real Ying and Yang. 

cats

How wonderfully incent I thought as I headed upstairs. That thought soon went out of my mind to be replaced by !!!!!!!! (cue contribution to the swear jar) as I found this mauled toilet roll that those two cuties had got off the holder and proceeded to destroy!

Cats

Now I need to get the hoover out - again! Just another day in the life of Woody!


Tuesday, September 27, 2022

Another day of achieving little!

In yesterdays post I said I hoped I was more energised today. However I woke up feeling a bi sick and before too long I knew I had a bug and migraine. So much for being energised! Most of the day I was in bed feeling sorry for myself but I did manage to spray the cab and tipper body for the Foden Haulmaster. The tipper body needs another coat of paint but it is looking much more like a real truck now.

Knightwing Foden Haulmaster,

Hopefully tomorrow I will be as energised as the new kittens who I caught taking a rare relaxing moment from causing chaos!

Marty and Monty kittens


Sunday, September 25, 2022

More cats and one step forward and two back with the Foden Haulmaster!

Firstly the WMD HQ is now slightly larger in population with the addition of these two kittens who needed a home - Mrs. Woody is as much a sucker for cats needing a good home as I am for model railway stuff!

Kittens

Marty and Monty join the other WMD cats which makes my life as Chief Litter Box Cleaner even more interesting!

Talking of interesting, once I had managed to get out to Man Cave having cleaned out the litter boxes, I carried out further work on the Foden Haulmaster kit. I was hoping to finish it ready for painting but that idea was a step too far not that you would guess from this photo which shows an almost complete model.

Knightwing Foden Haulmaster

In trying to get the cab pieces to fit together as the parts are so poorly moulded and don't fit properly I decided to use the wonders of an elastic band to pull the part stogether to where they should be. The theory is relatively simple. However in my execution I obviously over tightened the elastic band. It was like some episode of the Road Runner Cartoon where Wylie Coyote stretches an oversized Acme elastic band across the road and then ends up flattened as the band pulls the two rocks together that it is fastened to together. The four parts of the cab went flat and the swear jar ended up a bit fuller then before I started! That was the first step back. However, as with Wylie, I started over again but unlike Wylie my second attempt did work. However the fit of the panels still needs work with filler and files and the arrow on the photo below shows the area that this is needed in. The other side is the same.

Knightwing Foden Haulmaster

The other step back was with the tipper body. the sides splay out too far so that the rear tailgate did not fit properly. I could soon remedy that with a little gentle persuasion on the body sides to bend inwards. There was that snapping noise and a sudden loss of grip that indicated the persuasion had been too much and part of the side of the tipper had snapped off. I had to glue that back together and it will need further filling and sanding to make the repair invisible as the picture below shows. That swear jar did well tonight!

Knightwing Foden Haulmaster

Hopefully tomorrow will see the glue hardened and work can recommence!


Wednesday, August 17, 2022

Small and big steps!

With the wardrobe being fitted today I thought that I might have an opportunity to get some model making done. Well it did not really work out that way as I got involved in a bit of cleaning and sorting as instructed by Mrs. W. However I did sneak in an hour on the Italeri Scania making some small steps on its build. 

The engine and gearbox is now installed with the propshaft in place. I had constantly reminded myself that the propshaft had to go into position before the engine and gearbox was fitted as it can not be fitted once the engine and gearbox are in place. With this thought firmly in my mind I am still trying to figure out how I ended up congratulating myself on the successful fitting of the engine and gearbox without any contributions to the swear jar before I realised that I had forgotten the propshaft! In best Homer Simpson voice - Doh! Luckily the glue had not set and I was able to do the job as it should be!. Other parts have been fitted such as the small steps on the battery box and I have temporarily placed the rear mudguards in place which look as though they fit reasonably well. I just need to repaint them along with the side skirts.

 I am pleased I painted some of the details on the engine which looks better than it did

Italeri 799 Scania with Cool Fruits trailer

Italeri 799 Scania with Cool Fruits trailer

On the matter of big steps, the 'Expert' wardrobe fitter is here and I must admit he is an expert. There have been some big steps in its build but this is now going to be a two day job so Mrs. W and myself will be sleeping on the sofas tonight as the bedroom is covered in tools and the bed tipped on its side. A slight miscalculation by me means that the other bed is covered to a considerable depth with the contents of the wardrobe! In best Homer Simpson voice - Doh and Doh again! However as the old saying goes, you cannot make an omelet without breaking a few eggs.

Fitted wardrobe

Whilst Mrs. W will no doubt get the large sofa to sleep on tonight I will be left with the smaller one (such is my position in the importance of sleeping facilities) in the lounge. Luckily I don't have fight with the cats to get procession of their sofa in the cat conservatory. This lot may look cuddly and cute but they can bite and scratch! Honest! Upset that lot and I won't be taking any steps small or big!

Cats


Wednesday, July 6, 2022

Laid back!

With all that is going on the Country and the World, here at WMD HQ, Milly and Matty cats have a very laid back approach to it all - maybe we can all learn from them?

Laid back cat

Laid back cat

I did have a bit of a laid back day too and relaxed with a bit of progress on the MiniArt T34 Egyptian tank. 

Strangely the whilst the kit has the towing eye pieces for the tow cables you have to supply your own cable. Luckily in my stock of useful items that might be handy one day I had a length of multi strand electrical cable that was just right. A bit of super glue on the ends of the cable attached them to the towing eyes. 

MiniArt Egyptian T34/85 tank

The cables together with the gun and shovel have been primed and the two turret hatches have been given a top coat.

MiniArt Egyptian T34/85 tank

The turret itself has also had its top coat applied and I am pleased with that and especially the welded seam that I applied which was absent from the kit moulding. I have seen in the close up photo an area that requires a little more smoothing out but I am laid back about that! With the wheels painted up and a few bits left to add to the main hull it should not be too long before the whole tank is painted but in my laid back approach learnt from the cats what is the rush! Oh yes! Mrs. Woody's ever expanding list of jobs for me that is not a matter to be laid back about!
MiniArt Egyptian T34/85 tank

MiniArt Egyptian T34/85 tank

MiniArt Egyptian T34/85 tank