Search this blog

Friday, November 19, 2021

A mild time and a glazing time.

One of the problems with this very mild weather in November is that you feel you should be taking advantage of it and doing activities and jobs outside rather than sitting inside in the warmth doing model making. One of the activities that has benefitted is my cycling. I completed 5201 miles this year last Saturday the 13th November, some 6 weeks ahead of my target! Hopefully I can add a few hundred more before the years end. Job wise the garden is confused with bedding plants still in full flower and needing pruning and I am looking at my patch of grass that is laughingly referred to as a lawn and thinking that could do with a cut. Hmmmm. Maybe tomorrow! 

In the meantime modelling has been an evening activity and so progress is slow. However I have carried on with work on the K5350 Mustang truck - amazingly given my usual butterfly approach to projects! It is so near being finished I really need to focus myself on finishing this build instead of it becoming another of my shelf queens!

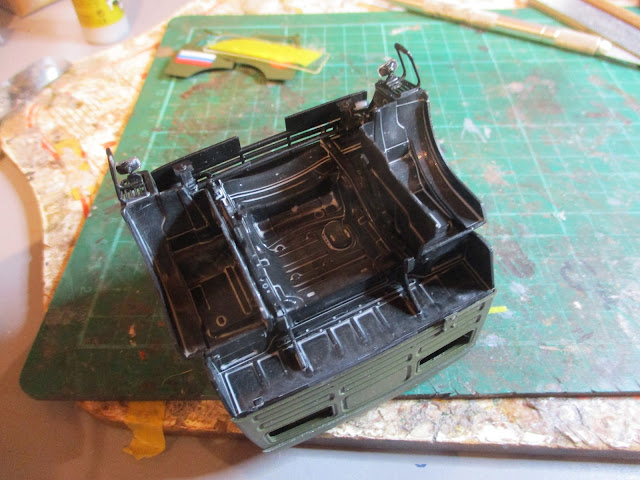
The cab has already had a wash of dilute grey paint following a similar pattern to that I did on the chassis and cargo bed. The pictures show this straight after being applied so it does look a little stark but dills and fades as it dries.

Zvezda 1/35 Russian K5350 Mustang 3-axle Truck Zve3697

Zvezda 1/35 Russian K5350 Mustang 3-axle Truck Zve3697

Tonight I fitted the glazing. This was fixed in place with Deluxe Materials Glue 'n' Glaze which is similar to PVA but specifically formulated to glue transparencies in models without damaging them or showing once dry. I have already masked the area that the windscreen wipers would clear and given that the door windows would be cleaned as they were wound down and up they too have been masked. This should mean that once all the weathering is complete the masking can be removed leaving clean glazing in the areas that should be clean. The mirrors have also been attached and the cab is almost finished!

Zvezda 1/35 Russian K5350 Mustang 3-axle Truck Zve3697

Zvezda 1/35 Russian K5350 Mustang 3-axle Truck Zve3697


Wednesday, November 17, 2021

Hang on a minute, lads. I've got a great idea!

Hang on a minute, lads. I've got a great idea! The final line of that fantastic film, the original 1972 and in my view best, Italian Job and if you want to reacquaint yourself with that final line in the final scene, you can see it here.

What that line has to do with this blog may appear somewhat strange but let me explain. Tuesday saw me at the Rocks by Rail Museum where the task for the day was a continuation of digging ballast out from between the track so that it could be cleaned. The work that day would see the end to that section of line. Having pick axed and shovelled my way through several tons of the stuff over the past few visits I was pleased that this would be the last day for a while anyway! Preparing my back for a session with the pick axe it was suddenly that Michael Caine moment when someone said - Hang on a minute, lads. I've got a great idea! Unlike Mr. Caine who had no idea what to do, this idea was actually a good one but unfortunately somewhat late in the overall job. Instead of using the pick axe, why didn't we use the Kango? A Kango is a sort of electric pneumatic drill and makes jobs a lot less back breaking! Great idea and it worked well and would have saved so much effort on all the other days when we did not use it! Doh and even double Doh! Anyway by lunchtime we had finished. Unfortunately I had to go home to take delivery of Mrs W's Christmas present (if she is reading this I trust that has bought me some bonus points!) so I missed out on the afternoons work of putting some clean ballast back which involved moving locomotives and ballast wagons. Oh well! There will be other times!

The Kango arrives!


Nearly done.


Back at WMD HQ the Man Cave AKA The Room of Gloom had a bit of a clean and tidy up today as it was getting somewhat reminiscent of a waste receiving depot. I tend to work in a mess on my things and much as I try to change it just does not work for me to be tidy model making. Strangely, and much to Mrs W's annoyance, if I am cooking, things get put away as soon as finished with and dirty utensils washed as soon as used, usually whilst Mrs. W still actually has a need for them hence her annoyance! Whilst tidying I came across the K5350 Mustang truck and I thought I really do need to finish it. So this evening it has reappeared on the workbench. All that remains is for the cab to be weathered and a few parts including the glazing attached. The first thing I did was to find the windscreen and mask out the area that the windscreen wipers would clean. In general you don't see even the most dirty vehicle with a windscreen that at least shows evidence of the wipers having been used. A piece of masking tape, a compass cutter and a bit of measuring saw the mask cut and in place.

Here the winscreen has been covered with a piece of masking tape.


The compass cutters are simply a compass with the pencil replaced with a cutting blade - very handy for cutting circles! The mask is in place and I had to amend the bottom as it is that long since I did one of these I forgot that the bottom off the wiper arc would be flat and not curved as I first cut it - Doh!


 Next up was to commence the weathering of the cab. Just like the cargo body and chassis the weathering starts with washed of dilute greys and brown paints. As I said in a previous post it is like watching paint dry waiting for the washed to do their thing. However given the way I do models it may be weeks before I come back to this again! 


Monday, November 15, 2021

You can't make an omelet without breaking a few eggs!

A phrase I have heard many times over the years describing the chaotic path you sometimes have to follow to get to your desired destination. In this case on my 009 narrow gauge layout I have had to weather the track and start on getting some of the main landscape features in place. The best way to weather the track was to airbrush it and I was not doing that in the man cave AKA The Room of Gloom! So the two boards were separated which meant moving anything loose on the boards off and then getting underneath to undo the joining bolts and wing nuts and separate the wiring. Once out of the room it was outside for an airbrushing with various browns for the rail sides and sleepers. However before I did that I was wise enough to mask the points where the blades contact the main rails. This avoids paint getting onto the contact surface and preventing electrical continuity. I will be brush painting these parts later. Although a lot slower than airbrushing the use of a brush allows a much more controlled and accurate application of the paint even with my shaky hands! If you have ever had issues with electrical contact on points you will understand the frustration that can be caused in trying to rectify it so anything that can be done to avoid issues gets a big thumbs up from me. .Working smarter, not harder as I get older! Once the paint was dry the tops of the track were cleaned with a Peco track rubber. The boards and wiring were rejoined and amazingly the loco used to test the track had no issues! Result! Yes I am still reeling from that success!

With the boards back together I have started work on putting the road in which carries on from the first board, goes over the river ( I did think of using lazy way of crossing the river and avoid a bridge by just creating a ford but then I came back to reality as the slopes down to the river would be far to steep) and through the village before crossing the track and exiting into a reality that is not modelled. Like the first board, the road surface is 2mm mounting card and I have sprayed it with some Halfords grey primer just to give it some colour. It will need to eventually be matched in shade to the road on the first board which will no doubt lead to some contributions to the swear jar as I fail to get that exact match. I think I need a cunning plan to try to deal with that. I also need to work on some pavement areas and put the bridge in so that the road can be fully fixed in place. At least I have tidied up a bit and it doesn't look to much like an omelet making franchise anymore but I guess I will be breaking a few more eggs yet as this project progresses. For some reason now, I have a desire for an omelet for dinner! Better get some eggs in.


Sunday, November 14, 2021

A moving find.

Out on a driver through some back roads with Mrs Woody, we came across this remarkable old phone box. Being Remembrance Sunday it seems fitting to post this today and for once I will stay quiet as the pictures do the talking and pay tribute to all those lost lives in times of conflict.


Tuesday, November 9, 2021

More wood butchery - but on a much smaller scale!

Anyone who may have had the mis-pleasure to read this blog will know my modelling activities are a bit butterfly like! I do one thing one day and then suddenly spring onto something else. A trait that Mrs. W has pointed out on occasions. In my defence I do usually come back and finish things - eventually and I will at some stage finish the floor in the lounge but that is another story! 

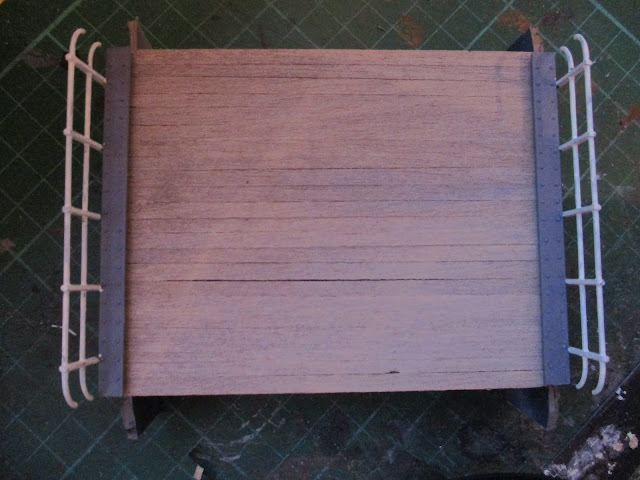
Today saw me put the bridge deck on the road bridge for the narrow gauge layout as started back here. In that post I said the bridge deck would be unusual and would you know it - its a wooden deck. Not the most often used material in this country for bridge decks on public roads but not unheard of and that is as good an excuse as I need to validate my choice!. In my usual manner of wood butcher, I cut a sheet of 3mm balsa into approximately 4mm wide strips and having measured the width of the bridge proceeded to cut these to length and attached the planks to two stringers that run under the bridge. UHU general purpose glue was used as I have only just realised I have some balsa glue in stock as used to make the narrow boats - which still need finishing! Anyway, following a dilute wash of acrylic brown/grey this is what it looks like. 

Wills SS32 Occupation Bridge (Double Track) and Stone Abutments,

Wills SS32 Occupation Bridge (Double Track) and Stone Abutments,

As to what I will be getting up to in the next few days is anyone's guess but I suspect lounge floors may not be on the agenda!

Sunday, November 7, 2021

Take Five - Part 2

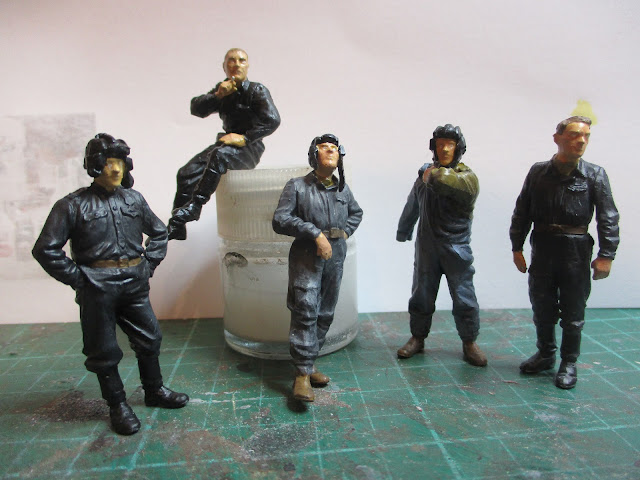
Back in September I introduced the MiniArt Russian Tank Crew. At that stage I had assembled them and had primed them. Over the last couple of evenings I have painted them. At this stage I should say that there are certain things in life that people just have a natural ability at or learn through practice. Painting figures is something that certain modelers excel on. Unfortunately I am not one of those. I have read books, watched videos and practiced on figures but I still struggle and my efforts don't stand close scrutiny so excuse the somewhat poor picture. Hopefully if you look from a distance (several yards probably) and squint they may look just about passable! Anyway, still some more to do to them but they should hopefully be finished and off my workbench in the next few days. I am hoping that they may be good enough to pose with the T34 Tank diorama (picture below) that I built earlier this year but I will wait and see how they finally look once finished.


I also did a bit on the Dapol Service Station so the windows and doors (the workshop door even opens and closes) are now in and some weathering of the roof has taken place but still more to do. It is surprising just how involved these kits can get.


Thursday, November 4, 2021

Gunpowder Plot?

Those reading this from the UK will know this Friday is Fireworks Night which celebrates, if that us the right term, the failure of Guy Fawkes and his 12 conspirators to carry out The Gunpowder Plot to blow up the Houses of Parliament along with King James the First in 1604. He was caught before he could carry out the destruction of Parliament on the 5th November 1604, then tried where he and his conspirators were found guilty and sentenced to death in a particularly cruel manner - more details by clicking here. The sentence was carried out on the 31st January 1606. However back in 1605, Londoners were encouraged to light bonfires to celebrate the King's escape from assassination. An Act of Parliament declared the 5th November as a 'day of thanksgiving' and remained in place until 1859. Well enough of the history but don't say this blog isn't, at times, educational!

So what has this to do with my blog? Well it was my day to volunteer at the Rocks by Rail Museum where I noticed these two new arrivals when I got there.


I understand that they have been acquired from another museum and are gunpowder wagons and that is about all I know. Lets just hope that they are empty and the both the wagons and museum will still be there next week after Fireworks Night unless of course there is a museum member called Guy Fawkes Jnr!

Getting back to the work for the day, it was back on the chain gang of digging out ballast for cleaning. A hard task when its been contaminated with mud and sand and compacted by vehicles running over it but as I said before - its a dirty job but someone has to do it! That is very true actually and until I started volunteering I had no full appreciation for just what goes it to keeping a museum such as this going - much of it unseen by the public. Anyway three of us managed a fair amount today and Richard's dog Riley was on hand to keep us in line and working!

Start of the day.....


Finish of the day with Richard and Riley the dog admiring the days work which resulted in about three and a half tons of ballast pick axed and shoveled out ....I will sleep well tonight! 


Tuesday, November 2, 2021

Pacing myself.

One of my less than imaginative titles to introduce this Hornby model of the Class 142 Pacer. The class of Diesel Multiple Unit (DMU) was in the headlines last year as the last ones were finally withdrawn from service. Originally built back in the 1980's in a collaboration between British Railways and Leyland. The design basically put a modified Leyland National bus body on a rail powered chassis. Its low price and running cost probably meant that several passenger lines were saved from closure. Some loved it and some hated it. I must admit having a soft spot for them so it was nice to unbox this some 15 years or so having bought it on eBay. It is a terrible runner and Hornby's model was always noted for that trait as it is powered by two Scalextric motors which are not up too the job. Still once it gets going it seems to at least get round my track.


Apart from unboxing the pacer I have also paced myself to do a bit more building work - this time on the Dapol Service Station which is now in basic paint awaiting the detail parts to be fitted.


Finally on the pacing front following my bike ride with Mr Motorlegs Beecham last Friday I was recovered sufficiently on Saturday to tackle the strong winds and bring my total mileage for this year up to 5001 miles. Had to pace myself a lot over the year so far to get that much in!

Saturday, October 30, 2021

100 and still going!

No, not my age, although my body does appear to think it must be that age on occasions when I ache after completing a Mrs W 'must be done' task! This is my 100th post! I did my first post back in June 2020 and then did nothing more until the start of this year and since then I have averaged 10 posts a month. When I started this blog there was always a strong possibility that I would do a few posts and it would then get forgotten about in my characteristic way. However I have persevered and the blog is in effect my record of what I have done and will hopefully continue to do. It is interesting for me to look back through the posts sometimes just to get a sense of what I have done and when. I am not going to go into a deep statistical and philosophical roundup of  the various things done apart from summerising it as 'Could do better!' but then that is always the case.

Back to reality now and it has been a busy few days. 

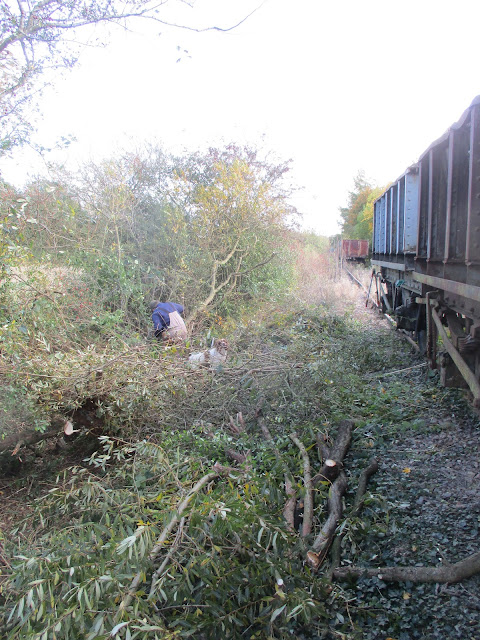
Thursday saw me heading into Rutland for another day of volunteering at the Rocks By Rail Museum. The task in hand was to start cutting back vegetation close to the running line. The track is only 3/4 of a mile long but when you have to walk all the way down it, as we are starting at the furthest point and working back, and then back for lunch, and then do the whole journey again after lunch you begin to feel it on your legs. However it was a good excuse for a piece of cake at lunchtime without too much of a guilt trip about calories! It was just Richard, his dog Riley who likes to dig grass up and myself but it was a nice warm day and we had a great time. As the pictures show the vegetation has not been cut back for years and given that we managed about a 40 foot length of cutting back this is going to be a long project! 

At the start of the day....


At the end of the day...... There is a long way to go!


Mr Beecham came round on Friday. As a fellow modeler he always has something to show me from his continuingly growing collection of quality models that he builds. Stupidly I forgot to take some photos but he had a very nice 1/35 scale Chinese tank transporter and a stunning 1/48 scale Lancaster bomber. Interestingly he also had a Superquick 1/76 scale row of terrace houses with him which he casually knocked up over a few evenings recently. Yes! He can knock up an entire terrace of houses whilst in the same time I can just about fit the windows for one house! I think I need to up my game on production of models! 

We also went for a 16 mile bike ride which may not be far but given the strength of the headwind for the first 8 miles and the various hills that we climbed (Mr Motorlegs Beecham left me a distant second on those) it felt further. We did stop on the way round for a sausage cob and a drink which aided us by adding weight so that gravity could assist us even more on the downhill stretch of the journey home. That's my excuse anyway! Whilst eating our cobs I was quite taken by the Halloween tractor on display.


This sign also brought a smile to my face and yes, they are right and something that we should all remember.


Model wise not a lot to report apart from having fitted most of the windows to the Dapol General Store. Maybe I need to give my kits to Mr Beecham to build if I am to make some better progress over the next 100 posts!


Wednesday, October 27, 2021

Getting slated or is it curtains for me?

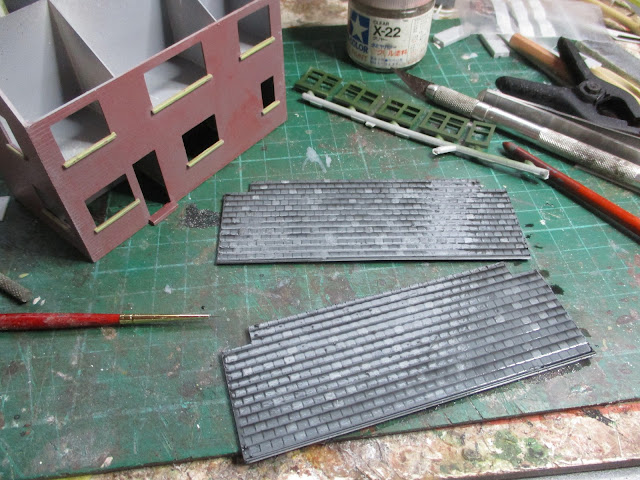
In this case this is not about me getting criticised or slated as the saying goes but it is about the roof of the Dapol General Store. The roof was sprayed in a light slate coloured grey which looked very boring and mono tone. Look at any roof and it will have variations in colour both from the material used and the aging process. The slates on this building needed some variation so putting three dabs of light grey, dark grey and white on a paint top I spent half an hour listening to the Budget roundup - no tax relief on model kits and model railways then - randomly mixing various hues of grey and picking out individual tiles until I was happy with the look. There is no art to it - its completely random just like my brain! Once dry I toned it all down with a wash of diluted black paint which would also highlight the gaps between the tiles.


It looks a bit of a mess when you first apply the wash but leave it alone for a while and do something else - I thought about Mrs Woody's list of jobs for me to do - and once its dry it will look fine.

Whilst I was waiting for the paint to dry and having thought about the list for a few seconds I turned my attention to the window frames which is going to lead onto the curtain bit of the post title. The kit comes with a sheet of acetate to glaze the windows. Mine actually came with two - maybe Dapol are giving you the opportunity to double glaze your windows??? Anyway I settled for one sheet. I glued the frame to the acetate with UHU glue. Super glue or plastic glue will just cloud the acetate. Once glued and cut to size the next thing was making the General Store look lived in and that means curtains in the windows. If you look at some models that modellers build of houses they have fantastic patterned curtains facing the window and it looks very grand from outside. However if you lived in the house you would be looking at the back of the curtain which would usually be a backing sheet in white or some other mono colour. So I at least avoided the mistake of having my curtains facing the outside by painting the curtain backing direct to the glazing. Saves cutting bits of paper which have to be glued in position and then fall off once the building is sealed up and all the issues that causes. The pictures below show what I mean.


Looks a bit rough from the back but turn the window frame over and...

Put them in the building and it looks even better....

Slowly getting there and it will be nice when I am able to draw the curtains on this build which is a pun I will probably get slated for!