Search this blog

Wednesday, March 31, 2021

All about the wood!

Well here at WMD HQ its been all about the wood for the last few days! My last great project still sees me battering pieces of wood together but progress is being made. Three more pieces to put on the last of the two end boards and that is the main sub baseboard constructed to stage one. Stage two involves a lot of sander work and some filler to hide the blemishes (a nice word for my poor workmanship) and then a final coat of paint to seal the wood and hopefully keep the structure sound and free of moisture.


It was a glorious day to be outside too so it despite the war of Woody and the wood going on I did enjoy it! Several people walking by must be wondering 'What is he up to???'. Certainly looks like a strange shelving unit. Looking at the weather forecast for next week and I see predictions of temperatures of 2C - I will be heading inside then.

Dealing with wood of another sort, the narrow gauge layout need some trees. I should be making them myself but on this occasion I have splashed out on some Woodlands Scenic trees about 4 to 5 inches high. I have placed them on the layout temporarily just to get a feel for where they look best. From my enforced gardening activities I am told plants and shrubs always look best with three and to be truthful even my eye can see that. Luckily that is how many trees come in the pack - they must watch Gardener's World at Woodlands Scenic too! As the baseboard to the layout is thinnish hardboard, mounting the trees was always going to be an issue. However they do come with a base into which the trunk plugs into. The base is not exactly fashioned by someone with an eye for nature but I think I can use the base and hide it so that the trees will stand without holes in the baseboard. More of that adventure another time - possibly next week when it is 2C outside! In the meantime lets have a look at the current temporary placement.


On the T80 tank front, all I can say is that the tracks are testing! I will get there but it is not a quick job and when a kit fights you like this you have to be in the right mood to make progress.


Sunday, March 28, 2021

Further wood butchery but creative times for the 009 gauge layout!

Although a bit sparse on entries over the last few days progress is being made on My Last Great Project with further battles at the WMD HQ garage/Room of Gloom between me and various bits of wood that just do not want to go together. The good news is that I have the basics of the 'trolley' that the layout will sit on in my Man Cave. The idea is that I can easily move the layout around to access all sides. As I talked about in a previous post I am not getting younger and I really do not want to have to duck down to get into a central operating well and I don't want a lifting flap with the issues that can cause so whilst it has compromises this trolley idea works for me - well at the moment at least! The trolley castors are rated for 55kg each so should be up to the job which is good as I want to put a shelf on the lowest level for storage.


Meanwhile back at the WMD HQ garage/Room of Gloom those geometry lessons all those years ago suddenly came in useful! I did not want a straight end to the baseboard, more of a curve and this is what I came up with.

The picture makes it look a little distorted but in essence there is a 2 foot radius 'curve' on each side. Lots of head scratching, lots of cutting, lots of bits of wood ending up in the firewood pile but eventually it all got there without to much in the way of force to make things join! Still more to do and probably several more days until the four sections of baseboard are complete.

Moving onto the 009 gauge layout there has been some progress made. In brief the dummy point levers and the buffer stops have been installed, the quarry siding has been 'toned' into its surroundings and a scrap pile and wood pile have appeared as well as some additional fauna.

First off the dummy point levers needed to be set into the scenery so a bit of ballast and landscaping had to be removed to reveal the baseboard surface onto which the lever was glued. Luckily the damage caused to the ballast and landscaping was minimal so little in the way of repair was needed. I must be getting good at this!


Having left some of the original plaster mix to set in the tub I mixed it in, I used this to tone down the ballast in the siding to give the effect that the quarry material had spilled onto the track over the years. The hardened mix was broken up and crushed to a powder and as the ballast is sand and is like a sandpaper, some lumps of the mix were simply rubbed along the ballast to produce a powder that adhered to the ballast and surrounding area.


After a little while the original siding turned from this


To this


To add some interest a scrap pile made up from parts from the scrap box and mainly consisting of 1/35 scale tank parts was created, sprayed black and then treated to some rust weathering powders. A srip of balsa wood was cut up into some suitable00 scale plank sized pieces, randomly glued together and then treated to a dilute wash of Vallejo black paint. Both were glued in place and then using a variety of grass tufts and vine type scenic products some further fauna was added to the area to give that 'wild' look. I think it all came out well - but I would! These photos give some detail as to what I did.


This weekend's modelling is going to suffer as we loose an hour going into summer time but hopefully progress will still be made on this layout over the following weeks. 

Just to finish off, it's always nice to 'play trains' so here are a couple of photos of a West Highland Railway Baldwin loco doing the very unlikely haulage of some Lynton and Barnstable Railway coaches. But its my railway so anything is possible!


Sunday, March 21, 2021

Testing Tracks!


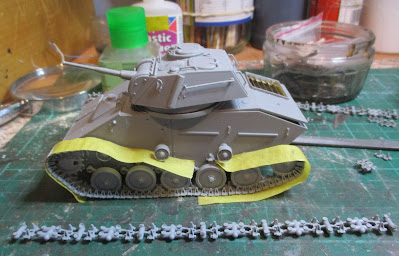
In my last post I ended by saying the tracks were not playing ball. The photo above shows what I am dealing with - very small pieces that are fragile and awkward to handle. The tracks are what is termed as 'workable'. That is they should click together and be free to move just like real tracks. Whilst there is no doubt someone at MiniArt who can put these together blindfolded and then use them as some form of towrope to rescue a real tank stuck in mud, for me, the reality is that they just don't work. Might be my ineptness at putting these together but an internet search does show I am not unique in having problems with these particular tracks. You need to be very careful how you remove them from the sprue as you can end up with the hole that is supposed to receive the peg on the joining track link being compromised. Use too much force and the link snaps in two. I have reverted to my old dodge in this situation of building up short lengths of track on a strip of masking tape and then running that around the running gear on the tank itself and lightly gluing the track links once in position so that they in effect become one track. I do this in sections so that I am at least gluing a loose length of track to a solid length to give me some chance of getting it all to sit right on the tanks running gear. It takes days to do as you need to await the glue drying for each section but it does at least allow you to maintain your sanity. Certainly a testing time!

The pictures below show the progress on the rest of the tank. Note that the upper hull part does have a bit of a fit issue at the back but nothing that some elastic bands at the gluing stage can't sort out - hopefully! You might note the magnify glass in the background which has come in very handy with this kit. 


Saturday, March 20, 2021

MiniArt T80 Russian Light Tank - The build begins

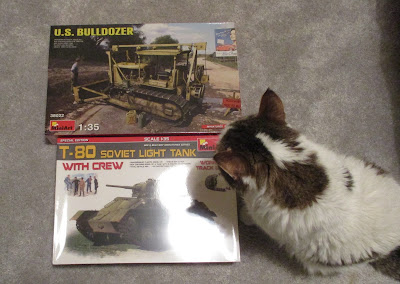
 I do not know a great deal about MiniArt but they are a model kit manufacturer who are producing new models almost on a weekly basis. They have a good reputation, from what I have read, in making accurate and highly detailed kits. On the basis of this and a good price on two kits I purchased the USA Bulldozer and the T80 Light Tank - not to be confused with the current T80 Main Battle Tank. You may recall the last time the kit was seen in this blog, Sammy the cat was eyeing up the boxes as a potential food container.


Having eventually managed to distract him and some of his fellow feline friends that live at WMD HQ by putting actual food in their bowls, it was time to open the box and have a look at what was actually in it.


First impressions were that the box was certainly well made and if it actually contained cat food would most probably resist feline attack to get into it for some time. It was also nice to see the sprues bagged which means if any components have come loose they are safely contained in the bag I recall in my earlier days of modelling Airfix kits where you opened a somewhat flimsy box to find many of the parts loose and making a dash for the carpet as you struggled to keep the box upright and in one piece. Taking the contents out this is what you get plus an instruction sheet which is not shown.


The molding quality is certainly good. I can not comment on accuracy as I am no expert in Russian WW2 tanks and there are better people out there in the World of Internet Forums who will no doubt highlight their thoughts and observations on that matter if you want to search them out. Here at WMD HQ, the general rule is if it looks right it must be right! This kit looks like the photos I have seen on the internet so that's good enough for me. Anyway, by the time I throw some weathering at it no one will be able to tell if the bolt holding the shovel on is the correct shape or not.

I was keen to see whether the quality molding translated into a pleasant build. The last thing you need is a kit that fights you - modelling is supposed to be relaxing after all. The first thing that you find out once you start building this kit is that the sprues have no part numbers next to the components. This means that you have to cross reference to the sprue diagram in the instructions each time you need to identify a part. Given that there are also a number of parts that are not used in this kit, the whole process of going backwards and forwards in the instructions as you build the kit becomes a bit tiring and something that you could do without. However that is just my experience and view.

Moving onto the kit itself, there is a basic hull and turret complete including some of the etched parts. There are some etched locker fasteners on that etch which I cannot see clearly even under a magnifier so those wont' be used. Luckily the plastic molding for the locker does have the fastener molded on so that will do me. As this kit is based upon an existing kit for a similar variant of the tank you do have to make a few alterations including cutting a large hole in the hull roof and taking the side out of a louvre. Anyway here are a few photos of what I have done so far which may explain matters beter than my words.


The brass etch louvres for the engine are fitted in the hole you have to make in the hull. I had to add some plastic strip to the inside of the hull to provide a mounting point for the louvres. There is a etched grill to go over the top which still needs to be made up. I really need to get some paint on that shiny brass before putting the grill over otherwise it could end up shining through the grill.


At the moment I am struggling to make the workable track links. More on that another time but they are not playing ball!


Friday, March 19, 2021

Wood butchery and 'My Last Great Project'!

A strange title but my woodworking skills are such that wood is unfortunately not crafted with skillful hands into something that is aesthetically pleasing to the eye. I have to coerce, force and batter wood into something that resembles, with a fleeting glance, what my mind has created as a beautiful project that would add class to any self respecting home. 

Something that I have not talked about on this blog before is what I will whimsically call 'My Last Great Project'. Not that I don't plan to be around for a while yet but given my rate of progress on matters it will take an age to get this finished. So what is this great project? Well nothing more than a large roundy style 00 gauge layout. Roughly 12 foot by 5 foot it will be unashamedly a place on which I can watch my accumulated over the years collection of engines and rolling stock finally run on a decent length of track (cue the theme to Born Free with visions of locomotives free to stretch themselves on a lengthy track and get back to their natural habitat). No prototype, no historic accuracy, no timetable operation, no worries about the Flying Scotsman running next to a Class 66, but it will be fun and that to me is my own desire for this project. 

Whilst it sounds like it will be more like a Hornby Trakmat layout, it will, hopefully, be a little more detailed. First thing though is the baseboard. It will not be a flat sheet of ply or chipboard but it will be an open top one to allow for below track level scenery. Material is ply for lightness with soft wood corner strengtheners. In addition it will be built in four sections. Two 6 foot by 2.5 feet and two 5 foot by 3 foot but with rounded ends. That will allow it to be separated into manageable boards if it needs to be moved. Not that I am expecting to take it to exhibitions (if you recall those events pre Covid!) but I have to be realistic in that I am not going to be here for ever and if the layout can easily be dismantled it is probably far easier to dispose of and might make it more attractive to a buyer if it were to be sold. Much as it is a sobering thought you do get to a stage in life where you need to be sensible and take account of a World without your presence! Anyway, moving on from these dark thoughts, the baseboard is under construction at WMD HQ in what I laughingly call my garage or Room of Gloom! It really needs a further clear out but that can wait for the moment with this more pressing project taking precedence. 

The photo below shows progress after about a week. Doesn't look much after that time but I am taking my time and trying to think things out before committing saw to wood but even then there are still things I would do differently but hey ho! If you try to get perfection you sometimes will never finish it. So, as long as it is basically flat, solid and enables me to move onto stage two that will do! Here is what I have so far.


The one thing I will highlight is that trying to get decent timber at the moment is difficult. I eventually managed to get some ply at Wickes but to be honest it is not the straightest of materials and has need some coercion to be straight where needed. This is where being a Wood Butcher does come in handy  though - Now where's that lump hammer?????


Sunday, March 14, 2021

Time to load up!

Progress is being made on this layout at a pace not normally associated with my modelling. Usually progress is measured in some form of astrological event schedule such as the return of an asteroid from its journey in deep space. However I have to see this speeding up as a positive step. The layout has a quarry face and therefore some means of loading whatever the quarry produces (yet to be finally decided upon) has to be in place. In the last post I did state that what I had constructed bore some resemblance to what Tony Beets from the Gold Rush programme might have made. I constructed this on the basis of an auger that is loaded by machine from the quarry face  feeding some overhead hoppers that would then discharge into wagons waiting underneath. From an engineering view this whole contraption would have probably never worked and condemned for safety reasons before it had even seen any material pass through it. However, this is the World of model railways so imagination, available materials and skills all trump what engineering and health and safety might do in the real World!

The hopper and auger were made from sheet plasticard, some H-beam strips and some lengths of strip and rod ending up after a few evenings work looking like this.


It took a three evenings to build this with no real plan to it other than knowing how wide and how high it had to be to allow the rolling stock under. Guess how I knew to take account of that at an early stage? Lessons learnt from previous failures!

Once built it was sprayed in Tamiya Earth and this formed the undercoat for a light coat of blue Vallejo. The idea was that the overall structure would show age and negelect. Some weathering powders followed this and again highlight the rust and aging that such a structure would show after some years. Some weathering powders were put in the hoppers as the sort of residues you would find on a working loader and hopper and fixed in place by dripping acrylic thinner over them It all ended up looking like this. 


The hopper still needs to be fixed in place on some concrete blocks and a lot more blending of the quarry floor and siding need to take place but its getting there!


Thursday, March 11, 2021

'Jab Done' and a good few days!

 A welcome trip away from WMD HQ on Monday as being of a certain age I got my Covid jab. A very slick operation by all concerned at the jab centre and my heartfelt thanks to them all.

Monday also saw the arrival of some post in the form of two MiniArt kits. I broke my New Years Resolution of no more kits but couldn't resist when an email popped up from Jadlem Models with the US bulldozer and a perusal of their site for some 1/35 Russian tankers to go with my recently finished T34 found me looking at paying about £13 or buying the T-80 light tank kit with a crew kit for £22. It was a no brainer! In effect the 1/35 MiniArt tank kit for £12! As a satisfied customer only, I will say it was good service from Jadlem - well packed and arrived in three days and no postage charge. Upon arrival at WND HQ unpacking was soon undertaken with the help of Sammy the cat who probably thought his food was in there somewhere!


Never built a MiniArt kit before but it has been started and I will update on progress and thoughts another time.

I have made progress with the narrow gauge 009 model railway. Most of the posts so far about this have been about various aspects such as baseboards, ballasting, landscaping and other such things. Today has seen a lot of progress on the scenics. Although some work has already been done a lot came together over the past few days. So here are some pictures that give a bit more of an insight into the layout. You can get a larger picture by clicking on them if you want to see more detail.

First off from the drone an aerial view showing the whole thing.


View looking down the road with a scratch built field gate, hedge and post and wire fence now installed.

Coming under the bridge the Baldwin hauling a goods train.


A bit further round the curve the crewless Baldwin (must sort that out as it looks most odd!) heads towards the quarry.


Passing the quarry the start of the loading facilities can be seen - again scratch built.


A closer look at the loading facilities and the grounded van store. All need a lot more work but gives a sense of what it will be like. I was aiming for something that if you watch Gold Rush you would think Tony Beets had constructed!


The train crosses the level crossing to head back up the cutting to continue its round and round journey!


I'll give a little more detail about some of the scenics and the structures in a later post but in the meantime I better feed that cat who looks as though he is about to open the boxes thinking his dinner is inside!


Wednesday, March 3, 2021

Surprising post!

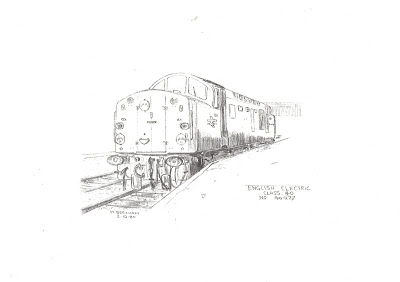
Normally at WMD HQ the post comes it usually contains a mixture of bills, offers of funeral plans and other assorted junk! However something a bit different arrived the other day from a good friend and fellow modeler. It was a pack of some pencil drawings of a T34 tank and some diesel locos he had done when aged 14 or 15. I was amazed at the detail, finesse and quality of what I saw and those early creative talents have certainly translated and matured into his modelling from what I have seen of his master pieces. Take a bow Mr. Beecham for here are those drawings and just to make it clear he has given his permission for them to go on the WMD Blog as I didn't want any solicitors letters adding to the bills, offers of funeral plans and other assorted junk! As always click on the picture for a larger version and see these drawings in much better detail.