Search this blog

Showing posts with label MIG. Show all posts

Tuesday, January 19, 2021

Barn Done It!

 Well I am pleased to say that the barn is done! A mere two years since assembling the eleven parts of this Wills kit the painting and weathering was done over four days. This is where I started with the kit in its four plastic colours. As always, click on the pictures for a bigger image.

 
Primed in black and then with some thin gray sprayed on the stone work it looked like this.


Then things got interesting with the woodwork sprayed a tan brown. Being old wood this was not the final finish but gave a good base for what was to follow.


Individual stones were picked out in different shades of tan made by having a spot of both tan and white on a pallet and mixing different hues randomly and applying it randomly. Being random is harder than it sounds though!  The wood was given a light spray of gray to tone the tan down and give it that silvery look of old weathered wood. The roof tiles were given an overall coat of an orange which was toned down with white and then individual tiles picked out using various further shades of the orange and white mix. Then I took advantage of the detail that the model has by using a very dilute (about 1part of paint and four of water) mix of black to just flood the detail. Gravity is not your friend for this process if you want the paint to stay in the relief of the mouldings so once painted I left each side facing upwards for an hour to let the paint dry. The photos below probably give a better idea of the whole process.


Having done all that and let the paint fully dry a light dusting of MIG European Dust was applied all over and then a light spray of matt varnish to protect it all and remove any sheen. The final product looks good to me!


What was nice about this project was that as I had other projects on the go I could take the time to leave this one well alone whilst the paint dried - something that I have paid the consequences for not doing in the past! The other bonus was that it was finished over a relatively short period if I ignore that it sat on the shelf for two years! Anyway, another part of the bigger Shelf Queen project that I mentioned in the last post is complete and that has to be good for the sole Barn Done It!


Thursday, January 7, 2021

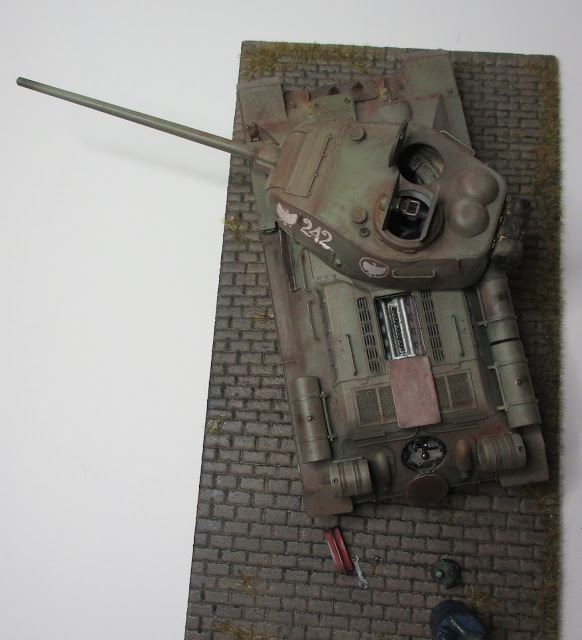
Italeri T34 finished!

Something unusual for me in that I have finished something - must be a subconscious New Year resolution although I did start this kit in January 2020!

Although revealed in the last post here are some, I hope better pictures - click on the pictures to see a larger version.

Italeri T34 tank built, painted and weathered

Italeri T34 tank built, painted and weathered

Italeri T34 tank built, painted and weathered


Italeri T34 tank built, painted and weathered


The interesting part about this kit is that it does have an interior and although not mentioned in the instructions it is possible to leave the top part of the hull loose so that the top half can be removed to see the interior. There is not a lot of room in there and the floor was covered in ammunition boxes which lessened the space for the crew even more.


If you want to get a really good understanding of the T34 and its anatomy there are two good videos on YouTube that I found. 
Inside the Chieftain's Hatch T34/85 episode 1 does an external walk around https://www.youtube.com/watch?v=BRtj_TSOHjw 
episode 2 covers the interior 
https://www.youtube.com/watch?v=rTnS0XS2al8 
I have no connection with this site but I learnt so much about this tank from these two videos.

From a build point of view not too much to note and there are a number of reviews on the net by far better modelers than me. However I would highlight that the rear engine hatch will not fit into its opening unless it is reduced in size - I left mine in the open position as the tank is supposed to be undergoing maintenance. The other thing is that there is no mention in the instructions regarding the turret rotation ring. It is a self evident fit and without it the turret cannot be located properly into the hull. The kit does include either molded tracks or the rubber band type. I went for the molded ones and they seemed to work well. The base is a piece of Styrofoam pizza base ( I have a stock of these as it seems pizzas in the interests of the environment now come on a cardboard base - good job I like pizza!) with the road stones scribed by using the end of a round file. Painted and with some static grass I think it looks good. The oil drum, oil can and tools come from the Italeri Field Workshop kit 0419S which is a great source of diorama accessories and as mine cost 50p from a club stand at a model railway exhibition great value!

With no connection to any of the firms involved the photograph below shows most of the products used to finish the model. I do like the Tamiya Extra Thin Cement and it is less aggressive on the plastic parts than other solvents if you get too much around the part. Paints from Vallejo with the main colour being 71017 Russian Green. The interior was painted during construction and was masked off for the final painting. I did not prime the model which is unusual for me but sprayed the green straight from the bottle which is a great advantage of the Model Air paints. A second coat which was lightened with white was sprayed over the horizontal areas to give a contrast. After a coat of matt varnish weathering started with coating the lower parts of the hull where mud would accumulate Mig Turned Earth Ground acrylic mud  Ref A.Mig-2103. This was then followed up by weathering powders from MIG and Ammo once the decals had been added. The canvas roll on the back of the turret is a piece of kitchen towel painted, rolled up and fastened with some very fine wire.


I think the kit is a good one and with some care in building and painting you can create a model to be proud of. Have you built this kit and if so how did it go? Tell me in the comments section.