Search this blog

Showing posts with label vallejo. Show all posts

Wednesday, December 29, 2021

A tale of two sheds!

Over the past few days and defying my normal one or two days of frenzied activity and then nothing for weeks, I have made further progress on the narrow gauge layout - must really think of a name for it! 

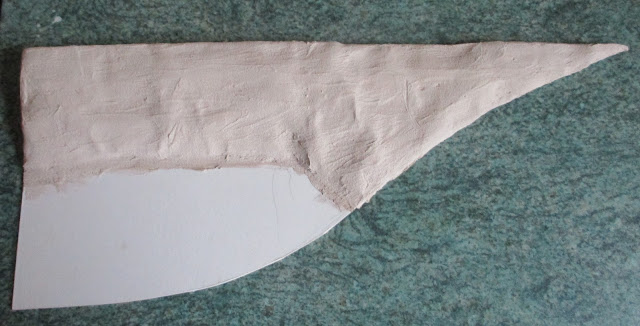
The hillside that I started constructing a few days ago and left in the kitchen has dried undetected by Mrs. W and as you can see has dried to a light earth shade - lovely!

009 narrow gauge layout

As shown in a post a few days ago this hillside will be at the side of the canal wharf. Between the hill and the wharf there are two sheds which are supposed to represent a small traders storage sheds. The sheds themselves come from the Wills SS12 Station Garage Kit but can be built differently to that supposed and instructed in the kit giving two shed like structures. Another case of the male of the species not following instructions! However in this case it does work!

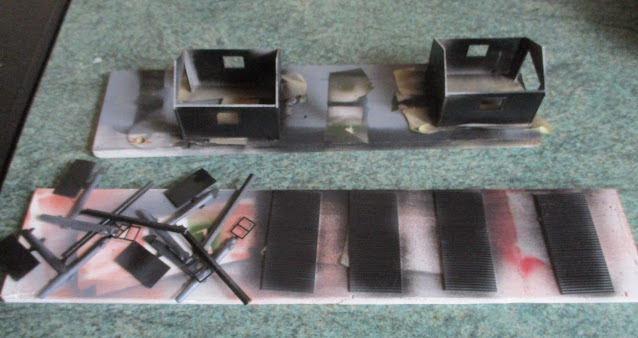
I had already constructed the walls of the shed back in the summer when I wanted to get a feel for where various buildings would go on the layout. The kit is moulded in a white plastic and as I have previously highlighted in this blog white attracts the eye. Whilst I had plans to paint the sheds a blue I did airbrush all the parts, including the inside of the sheds, with Vallejo's black surface primer. As a hint, when I have a large number of parts that need to be airbrushed I tend to get a piece of plywood or cardboard to fasten them onto to be painted. You can use Blutack or what ever your chosen poster temporary adhesive is to fasten the parts to the board or you can use masking tape. if you turn the sticky side up and fold the two ends over on themselves before fastening the ends to the board you are left with a strip of stick masking tape to which you can fasten the parts that need to be painted. 

009 narrow gauge layout, Wills SS12 Station Garage Kit

The photo below probably shows the masking tape in a better light. The various drums, barrels and crates are for the layout eventually but as I had some primer left in the airbrush it seemed a good idea to prime these up.

009 narrow gauge layout,

I do plan to have a door open on one of the sheds so a wooden floor was required. There is nothing better to represent wood in model form then wood itself. A small piece of balsa sheet was cut to size and then planks forming the floor were scribed into the balsa wood using a straight edge and the back of a scalpel blade. Using the blunt back of the scalpel means you don't have much risk of cutting right the way through the wood and it gives a nice visible groove in the wood.


009 narrow gauge layout,

009 narrow gauge layout,

In its basic form the wood was far too clean so a coat of my favorite diluted back paint was washed over it highlighting the groves and giving a nice weathered and worn appearance. Once dry it can go into the shed.

009 narrow gauge layout,

I also started on the cobbled surface which will cover the wharf area and into which the rail tracks will be inlaid. I found, in the WMD HQ stock pile of things bought long ago and which may come in handy one day a couple of sheets of vacuum formed plastic cobbles which should do the job.


009 narrow gauge layout,

A bit of cutting has the first piece fastened in front of the two sheds.

009 narrow gauge layout, Wills SS12 Station Garage Kit

If I can manage to keep the momentum up hopefully the whole scene will come to life in a few days. However I understand Mrs. W does have a new list of jobs for me for 2022! Gulp!
Tuesday, October 26, 2021

Bricking it!

No! I am not in fear (for those outside the UK there is an online description of the phrase here ) although I may be later on if I don't get Mrs Woody's list of jobs finished! Bricking it in this case is related to the Dapol General Store where I have amongst other things painted the brick work. The windows, doors and roof have also been painted.

The painting started with what was a fairly vivid red although it was my personal mix from Vallejo Earth Brown, Orange and Red but it did not finish the shade I thought it would. Lesson to be learnt here - never trust me to mix anything as Mrs W has already learnt from one or two kitchen related incidents. Enough said! Back to the red paint. Never mind there are other things that would be done to it to tone it down.


This is what it looked like looking almost Post Office Red. However a caot of Earth Brown mixed with some Light Grey was gently wafted from a distance so that it dusted rather than painted the surface which still allowed that red base coat to be seen but through a opaque shading colour - nice!


At the moment I am adding washes of very dilute grey to highlight the mortar courses. The relief in the casting of the building is not very deep which is causing some issues and was the main reason that I did not use my usual way of colouring bricks with coloured pencils. However the picture below shows the concrete window cills have been painted in and one window frame is temporarily in along with the roof  to give an idea of how the building will eventually look. Now where is that list of jobs.........


Tuesday, August 24, 2021

The Dirty Seven


This is not a WMD cheapskate rip off of The Dirty Dozen film! Mrs Woody holds the purse strings and me entering the World of making films is not something that would pass the funding analysis. Anyway this evening I left Mrs. W pursuing a handbag website and had a few minutes to do a bit more on the K5350 truck. Before finally assembling the wheels I need to do a bit more weathering. Trying to give the wheels that dirty look was done with the aid of a very dilute coating or two of Vallejo Earth colour. The idea is that being dilute it will be drawn into the nooks and crannies as well as toning the overall look of the tyres a bit further. They will need to dry overnight and you can see in the phot above they are still damp.

I also had time to put the seats, steering wheel and dashboard in the cab so that is almost complete. Not entirely happy with the weathering inside yet. I did use a Humbrol Dust Wash which took about 3 days to dry and still is shiny. I have splashed a bit of the dilute earth mix (almost sounds like the old advert for Brute aftershave with Henry Cooper and Barry Sheen - Splash it all over! - See the advert on YouTube by clicking here) that the tyres had in the cab to see if it will tone it all down. I will wait to see what tomorrow brings - possibly Mrs W's new handbag! Antway off to see if there is a Blood Moon again tonight as there was a great one last night.


Wednesday, August 18, 2021

Its never as finished as you think.

A busy day at WMD HQ with a major session of gardening and some model making slipped in just to ease the pain of the gardening. I feel as though its more like Autumn with the number of leaves down on the ground and if I hadn't of been working so hard and getting warm (hope Mrs Woody reads that part) I would have been exchanging the T shirt for a fleece!

Model wise the tyres for the Zvezda K 5350 Mustand truck were painted yesterday and the wheel rims were painted today. When painting small components I try to afix them to something so that they can be
airbrushed without getting finger prints on them.


In this case a spare piece of plywood with small lengths of masking tape attached so that the sticky side is facing up acted as the base. I keep the lengths of masking tape short as if you try to do one long length the air from the airbrush will get underneath ala Marilyn Monroe and the masking tape and whatever is attached to it will start flying about. A coat of black primer which will also act as the top coat was applied and the wheels along with a few other bits were left to dry before being given a coat of matt varnish.


I have tried many matt varnishes over the years, some successfully some not so leaving what is more like a sheen to the item sprayed. At the moment I am using a product from MIG called Lucky Matt Varnish and it is great. It is so matt you almost expect a black hole to appear when you apply it to something!


I saw it at a model railway exhibition if anyone remembers those. I almost didnt but it as it was about £7 but you do get a lot and it works. I will be using it again.

The K5350 chassis has aslos been primed. There are a couple of bits that I missed but given the complexities of all the nooks and crannies that is not surprising.


I primed the chassis because I thought I had finished the construction work on it. However as the title of the post suggests it wasn't! Looking through the sprues for a couple of parts yet to be fitted to the cab I noticed on Sprue G two parts left. I knew this sprue was mainly engine components so looked through the plans. After a short while the two parts were located on the plan and then attached to the model.


I think the above photo shows the two parts in question very well! It does make sense to check back on sprues and I never throw them away until the kit is fully complete just in case. If you are wondering, yes there is a sprue with the bell on the bridge of a model ship out there somewhere just not here!

On the T-85 tank the tracks are just about there!!!!! Yey! I will however delay any further celebrations until that model is finished as it is bound to throw up some more issues!


Tuesday, August 17, 2021

Tyred of the tracks of my year!

 A bit of a play on words but as I revealed a few posts ago I have recommenced the MiniArt T-80 Light Tank with trying to get the tracks together. Slowly they are coming together but I am getting tyred, sorry tired of them and it seems like it's been going on a year! Hopefully another one or two swear jar contributing sessions should see both sides finished. As you can see from the picture below one side is done and the other side two thirds or so finished. They are not the best of my modelling but so long as they stay together that is all I need. A good dose of heavy mud weathering should hide my incompetencies! I have found the best way to put these together is to get short runs of about six links together and then run some liquid cement along the top. Not a lot but just enough to go into the joints. Where the tracks have to bend around the drive wheel or rear road wheel I then join several shorter glued lengths whilst the joints between the tracks are still soft and bend the length around the wheel and use some tape to hold it in place. Left over night the tracks should hold their shape as can be seen from the photo below.


 Hopefully, what this means is that I can paint the tank body, wheels and tracks separately which will make that process a lot simpler - I hope! You will also see that three Russian tank crew have arrived to see how their DIY tank build is going. When I bought this kit the main selling points were the price and the inclusion of five figures. Two remain to be assembled but I have to admit to being quiet taken by these figures which are posed well, have good detail and go together easily - unlike the tracks. Whether my painting skills will do justice to them remains to be seen but I have undercoated one with some paint left over from painting the tyres (see there was a connection in the title to this post) of the Zvezda K5350 Mustang truck.


The tyres are molded in a shiny black vinyl which makes the tyres look as though they have undergone a full on valet and detailing. So far as I am aware, apart from the Red Square parade in Moscow, most Russian military vehicles are usually out in the field getting dirty and the tyres take on that grey look as the rubber weathers and oxidises. To recreate this effect I used Vallejo Air light grey with a few drops of German Grey from the same company and a few drops of thinner to enable it to be sprayed using my airbrush. Once dry a coat of matt varnish was sprayed on to seal the paint and give a base for weathering. 

I placed one of the yet to be painted wheels in the tyre center just to see how it looked and it looked good so I took a photograph. It was only when I came to edit that photo that I noticed two things.


Firstly is that despite cleaning up the wheels from where they were joined to the sprue I need to do a better job - you can see two spots on the wheel rim towards the bottom of the picture. Secondly there is a rotation arrow on the tyre pointing the direction in which it should face when placed on the vehicle. I would no doubt end up with tyres facing the wrong way had I not spotted that so always useful to look at what you are building through a picture. You will spot things that you never notice when you just look at the actual model with the naked eye.


Friday, July 30, 2021

Thinking ahead!

There comes a point in building a kit where you have to make a decision as to whether you build the whole kit and then paint it or do you build it as sub-assemblies after which the painting is carried out and the final assembly is done. Each has there advantages but I made the decision early on in this build to paint sub-assemblies. On a complex kit like this it makes sense. Generally I airbrush most of my models and you have to have a reasonable level of access to allow the atomised paint to get to all parts of the model. Sprayed paint by its nature travels in a straight line from the tip of the airbrush to the surface being painted and so if there is a part that you can see but can not get a straight line from the airbrush to it the likelihood is it won't get any paint on it. In addition if the plastic that the kit is molded in is a light or contrasting colour to the finished paint job you can be assured that it will stick out like a sore thumb. In the case of this kit the plastic is light grey and the overall finish to the model will be black and green. Any unpainted parts will show as clear as daylight. 

In view of the above I looked at the construction of the body to the truck. I had assembled the park bench style seats onto the bed and sides of the body and was about to glue the sides on when it struck me that once they were on there was no way I could reasonably get any paint to the underside. I therefore, in my working smarter not harder as I get older approach to matters and actually thinking ahead (an unusual event according to Mrs. Woody), decided to paint the parts prior to final assembly. First stage is a primer coat and there is a lot written about their use on models. Some say you don't need them and others swear by them! For me I generally use one to at least get a uniform base (and hide my poor skills) upon which to paint the finishing coats. For armoured and military vehicles I tend to use black for three reasons. Firstly it is a good base for the greens and other dark colours that these vehicles are generally painted in. Secondly and there is no doubt some optic science behind this, but the eye tends to ignore black so if a part is not fully painted it sticks out less then if the primer were white. Thirdly, on those difficult to reach parts with the airbrush, if you do have a black primer it gives an effect of shadow even if there is no final colour on it. 

I airbrushed the Vallejo primer yesterday and I am giving it a day to dry fully. The photographs below perhaps add some clarity to the above text.


I have also started on the cab. Progress s far has the floor, tow seats and the bunk done Believe it or not there are twenty parts just in the part of the build in the photographs below but the detail is amazing.


A bit of music to keep me sane during the build was provided by a compilation album, Soft Metal. I am guessing there is no soft metal in the truck though! Strange how something as daft as a price ticket on something can bring back memories. In this case I paid £2 for this cassette, second hand from a charity shop many years ago along with a few others. Oh the joys of going through piles of records and tapes to find something of interest - amusement and entertainment for hours! Now all you have to do is type in a title in Google from the comfort of your home and you can download it in seconds but is it as much fun????


Thursday, July 15, 2021

Keeping on the straight and narrow!

Building a chassis for a model truck is a bit like keeping on the straight and narrow. The chassis has to be straight so that all the wheels touch the ground and everything is level and it is narrow meaning the chances of getting it straight are difficult. Luckily this kit of the Zvezda K5350 is great in that the parts fit so well that you have confidence that it will have a straight chassis even with me building it. I am further amazed by the detail in this kit. For example all the valve blocks for the air brakes are included. Although I am down to using a magnifying glass to clean the joints up from where I cut them from the sprue and to actually fit them, they are there which is something I have never seen on the bigger 1/25 scale kits of trucks that I have build. My build yesterday got me as far as Section 16 on the plans which means I have a basic chassis to which all the other parts will eventually fix to. As well as this progress I also managed to prime the engine/gearbox and fan and surround in Vallejo black primer ready for top coat. 

Cassette tape music entertainment was supplied by re-listening to Sounds of the Suburbs and then moving onto Soft Metal - It ain't heavy (various artists) and 18 Driving Hits (again various artists) Those of a certain age will remember the continued release of complication albums claiming to be The Best Driving Hits, The Ultimate Driving Hits, The Greatest Driving Hits Ever Vol 96 and so on and so on to the point you ended up with 17 tapes all with Free Alright Now and My Sharona and many other duplicates. Those were the days! 

Back to the model where breath taking progress has been made so far on this kit which is unusual as here at WMD HQ progress is usually measured in geological terms! Will this keep up or will Mrs W find some important, must be done now, not to be questioned chore for me to do???? Stay tuned! 


Wednesday, July 14, 2021

Back to the 70s and 80's!

Well my music choice for today's model making session was Hits of the 70s, An anthology of Supertramp and Sound of the Suburbs! That all added up to about 4 hours of music/model making as the Hits of the 70s tape is a double one.


The time saw me complete the engine and gearbox of the present build of the K5053 and even get as far as starting part of the chassis with the winch which fits in-between the chassis rails. 

The next stage with the engine and gearbox is to get it painted The instructions don't indicate what colour it should be but a brief internet search reveals that the colour is usually aluminum/silver as I guess the components are mostly aluminum! A coat of black primer should give a good base for the aluminum paint that I will be using and then it will be picking out the few components such as hoses and fluid reservoirs in the appropriate colours. Having used a magnifying glass to see various parts of the engine I can see the hose clamps have even been included on the moulding. I continue to be impressed by both the quality of the mouldings, their detail and the fit of them. Despite so many parts the locations are all positive and when you bring sub assemblies together all the parts meet up where they should which given my ability to get things wrong is amazing! Hopefully the rest of the build proves as good as these first stages. There are a couple of small areas at the bottom of the engine where I had to fill a gap in the plastic. For these small areas my filler of choice is Vallejo acrylic putty which literally can be brushed into place, dries quickly and sands easily to a smooth finish. 

I have now completed up to Section 11 on the plans which totals about 50 parts so far. Given that there are 69 sections in the plans and over 400 parts there is still a long way to go! Good job I have a few hundred music cassettes to go through before I even start on the CDs!

Thursday, January 21, 2021

Shelf Queen Trio Complete Thanks to the Tank!

 Yes! The trio of Shelf Queens have now been finished. Three models in a week. Normally with my glacial progress its three years a model. However lets have a look at where I started. The Emhar kit complete awaiting painting.


Following priming the tracks were sprayed Tamiya Tan and then masked whilst the main bulk of the tank received varying shades of Vallejo Russian Green! No one seems certain what colour WW! tanks were from what I have read and colours seem to vary from grey through karki to green. I am not a rivet counting modeler and green was to hand so that's what colour the tank is. 


Following on from this, the tracks were painted Vallejo rust and then the whole tank including the tracks was given a wash of dilute Vallejo Black-grey. A coat of gloss varnish later and the decals were added giving the tank its identity as 'Flypaper' It could have been Fantan as there are alternative decals or it could have been a captured tank remarked in German identity. The decals themselves are thick and by that I mean when you put them on the tank you can see the edge of the transparent carrier film. Now having watched the keen car modelers they do start to use very fine abrasives to smooth the edge of decals so that they do not show, but this isn't a Porsche or a Ferrari - its a WW1 tank so I hoped the weathering would go someway to disguise the decals. How well that went I will leave up to you. A coat of Micro Soll under and over the decals helped persuade them to conform to the surface, especially the rivets. A further coat of matt varnish to protect and seal the decals was applied and then it was onto weathering with some MIG powders to produce...


I'm happy with that! The weathering just used three products - dilute Vallejo black-grey paint and two MIG pigments as shown in the photo below.

Someone did ask me how long does it take to make a model? The answer depends upon so many variables and in my case the answer is likely to be too long! However, for this model the basic build took about two hours, then the gap of two years I will ignore, and then about an hour to paint and two hours of decal application and weathering. Five hours in total. I must admit that it was five enjoyable hours and a time to relax and be creative which is what any hobby is about. Why not build a kit this weekend and see how it goes for you.

Monday, January 18, 2021

Paint it Black!

Paint it Black - not the old classic song by the Rolling Stones, but something model related. Been able to progress on a few projects since my last post. Although not a Finish Friday project three Shelf Queens were chosen as they all form part of a bigger project which as you may have guessed is also a Shelf Queen! However in the interests of moving matters forward and taking account that if I started the three at once then one job I do not like would only have to be done once and that is cleaning the airbrush after priming them. Having 'sacrificed' one or two airbrushes over the years by my laziness of assuming that if you leave thinner in the cup than all will be well when you come back six weeks later, I am now somewhat more diligent and my wallet somewhat less thin! Moving more across to acrylic paints has also helped in that water seems to clean out the residues as well as any airbrush cleaner if you do it straight after finishing spraying. Anyway, the three Shelf Queens, in no particular order, are:

The Dapol windmill kit CO16 (previously Airfix) and if you are wondering it is motorised and more of that later. However the good guys across at Budget Model Railways (always worth a look to see what they are up to) on YouTube did a video on how to motorise it if you are interested. Video is here - Tutorial Tuesday Episode 3 - How To Motorise A Dapol Windmill Kit.


The Wills Scenic Series Barn Kit ref. SS30 for 00 Gauge.


And finally the Emhar 5001 MkIV "Male" Heavy Battle Tank in 1.72 scale.


I used, for the first time, Vallejo black primer that I bought in a 200ml bottle for about £10 (UK price) which, for what you got, seemed good value. Having now sprayed it I can say it worked well for me and it does indeed "Paint it Black" so I will be using it again. Here are the three Shelf Queens now basking in their new colour.


 More to come on progress with these but anyone wanting a Volvo fix I can report that it is not back on the shelf and although progress has slowed it now has its full body kit. Just waiting with the side skirts as I am in two minds as to whether to fit them. I will ponder but leave you with the latest Volvo FH 16 pictures.


Hmmmm! That white looks - well white! Think it will need toning down a bit!


Thursday, January 7, 2021

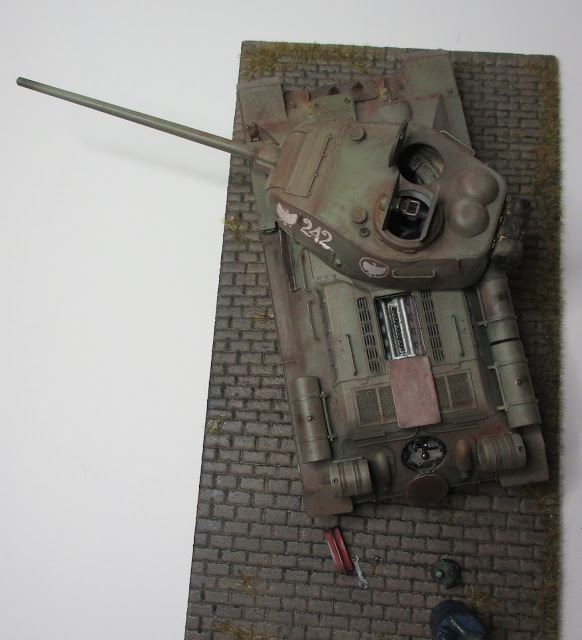
Italeri T34 finished!

Something unusual for me in that I have finished something - must be a subconscious New Year resolution although I did start this kit in January 2020!

Although revealed in the last post here are some, I hope better pictures - click on the pictures to see a larger version.

Italeri T34 tank built, painted and weathered

Italeri T34 tank built, painted and weathered

Italeri T34 tank built, painted and weathered


Italeri T34 tank built, painted and weathered


The interesting part about this kit is that it does have an interior and although not mentioned in the instructions it is possible to leave the top part of the hull loose so that the top half can be removed to see the interior. There is not a lot of room in there and the floor was covered in ammunition boxes which lessened the space for the crew even more.


If you want to get a really good understanding of the T34 and its anatomy there are two good videos on YouTube that I found. 
Inside the Chieftain's Hatch T34/85 episode 1 does an external walk around https://www.youtube.com/watch?v=BRtj_TSOHjw 
episode 2 covers the interior 
https://www.youtube.com/watch?v=rTnS0XS2al8 
I have no connection with this site but I learnt so much about this tank from these two videos.

From a build point of view not too much to note and there are a number of reviews on the net by far better modelers than me. However I would highlight that the rear engine hatch will not fit into its opening unless it is reduced in size - I left mine in the open position as the tank is supposed to be undergoing maintenance. The other thing is that there is no mention in the instructions regarding the turret rotation ring. It is a self evident fit and without it the turret cannot be located properly into the hull. The kit does include either molded tracks or the rubber band type. I went for the molded ones and they seemed to work well. The base is a piece of Styrofoam pizza base ( I have a stock of these as it seems pizzas in the interests of the environment now come on a cardboard base - good job I like pizza!) with the road stones scribed by using the end of a round file. Painted and with some static grass I think it looks good. The oil drum, oil can and tools come from the Italeri Field Workshop kit 0419S which is a great source of diorama accessories and as mine cost 50p from a club stand at a model railway exhibition great value!

With no connection to any of the firms involved the photograph below shows most of the products used to finish the model. I do like the Tamiya Extra Thin Cement and it is less aggressive on the plastic parts than other solvents if you get too much around the part. Paints from Vallejo with the main colour being 71017 Russian Green. The interior was painted during construction and was masked off for the final painting. I did not prime the model which is unusual for me but sprayed the green straight from the bottle which is a great advantage of the Model Air paints. A second coat which was lightened with white was sprayed over the horizontal areas to give a contrast. After a coat of matt varnish weathering started with coating the lower parts of the hull where mud would accumulate Mig Turned Earth Ground acrylic mud  Ref A.Mig-2103. This was then followed up by weathering powders from MIG and Ammo once the decals had been added. The canvas roll on the back of the turret is a piece of kitchen towel painted, rolled up and fastened with some very fine wire.


I think the kit is a good one and with some care in building and painting you can create a model to be proud of. Have you built this kit and if so how did it go? Tell me in the comments section.