Search this blog

Friday, September 20, 2024

And now for something completely different!

And now for something completely different! Those of a certain age and certain sense of humour will recall that phrase from the Monty Python Show. In this case though no humour, unless you think my YouTube videos should be classified as such, but a video I have been meaning to do for some weeks but not had the chance to do due to kitchen rebuilds, Norovirus, Rocks by Rail and Mrs. Woody's seemingly increasing jobs for me to do list! Anyway, today was the day so it was completely different! 

Ballasting model railway track usually involves the ballast itself and a means of adhering it to the baseboard. Usually that is done with a diluted glue which penetrates the layers of ballast and glues it in place. The problem comes near to points. Due to the dilute nature of the glue it can seep under the tie rod which operates the switching blades and in effect glues it in place. Depending on the strength of the glue it is sometimes possible to free the tie rod with some force, a tool such as a screwdriver or solvents or indeed a combination of these. If you are lucky it works without damaging the point but it is frustrating and time consuming. However you can end up damaging the point which means a new one is required. £15 buys a basic set track point with the larger points coming in with equally larger prices! So not only can a glued up point cause frustration, time but it can cost money too. 

Not sure how I came up with this idea but suspect it was some years ago reading a car magazine where petroleum jelly was rubbed on the rubber door seal to prevent the door freezing shut. My brain must have done its usual unconventional thinking and transposed that to model railways!  The thought was that if it stopped ice sticking to metal and rubber then petroleum jelly should stop glue sticking to the plastic tie rod of a point. 

My Last Great Project,

It worked for me! Rubbing a small amount on the underside of the tie rod ended any problems I had with glued up points.

My Last Great Project,

That hint is now in a short WMD YouTube video available for your visual delight! Now that really is something completely different compared to the last few weeks of blog posts!


Thursday, September 19, 2024

You always learn new things!

I did find time to get out to my Man Cave for a short while and this is the sum of what I managed to produce!

Dragon Tiger tank

More etched parts for the Tiger turret stowage bins. I did actually make a bit of a break through in dealing with these small parts in that instead of try to hold both parts using my hands and get the pivot points of the one part into the holes on the other I taped some making tape to the workbench and fastened one etch part to that it was held steady. Made it much easier. 

You always learn new things! Just wish I had learnt that years ago!

Wednesday, September 18, 2024

A bonus find of £1.05!

 Another day at WMD Recycling! This time the old washing machine was subject to reverse engineering! It is surprising just how much space a machine takes up when in bits!

Kitchen rebuild,

Once it was all tidied up and sorted there is a a fair amount of metal including a 5p and a £1 coin found in the filter - bonus find!


Inside, the kitchen is so near to being finished that tomorrow should see it done with just a few painting jobs for me to do - as well as the fact that Mrs. Woody has now deemed that every other room now requires repainting! Great!

Kitchen rebuild,

Today saw Phil the builder finish off the floor that leads out of the kitchen and down the hall. It makes the place feel bigger and as Mrs. W has pointed out it is easy clean so my cleaning tasks will be easier! Fantastic!


What would be more great and fantastic would be to get out in my Man Cave and finish that Tiger. Maybe tomorrow and maybe I can get another kit with that £1.05 bonus find!


Tuesday, September 17, 2024

Reverse engineering!

As a day for doing any model making today was not the day! However I did reduce the old cooker into kit form using a screw driver and pair of pliars in my reverse engineering escapades so that could count as some form of reverse kit building! It is actually quite interesting to see how something has been put together - a good insight into both design and engineering - whether it is reverse or forwards!.

Kitchen rebuild

Meanwhile, whilst I have been reverse engineering, Ben the electrician has fitted a new consumer unit as the old one which was state of the art 32 years ago is now classed as barely adequate - a bit like me!

Kitchen rebuild

Wish I could wire that neatly!

In the kitchen itself things are progressing with handles and splash backs being fitted and held in place with clamps and wood so it still looks a work in progress. One thing is certain though, I don't want to reverse engineer that kitchen - Mrs. Woody certainly would have words to say even if I just mentioned it!

Kitchen rebuild


Monday, September 16, 2024

Abraded, worn and weathered - and that is not me!

A great day at WMD HQ as the kitchen rebuild skip has now departed! That does not mean that the Kitchen rebuild is complete, just that the skip was as full as it was safe to do so!

Kitchen rebuild,

Kitchen rebuild,

The skip had obviously been recently painted and with its shiny paint yet to be abraded, worn and weathered by use and nature. The Tiger has also recently been painted with a clean looking coat of paint that will be abraded , worn and weathered by me!

Dragon Tiger tank

First I need to finish the turret though but this project is moving on again!

Sunday, September 15, 2024

Where has the year gone?

Whilst a cliché,  the phrase 'where has the year gone' did strike me yesterday evening as I put up the banners for one of the final events at the Rocks By Rail Museum this year.

Rocks by Rail Museum

Hopefully it and the other two remaining events will be good ones! In one way I will be glad when the season is over as I won't have to make the adaptations to last years banners to save on the cost of new ones! Then again will next year mean I have to adapt the already adapted banners? 

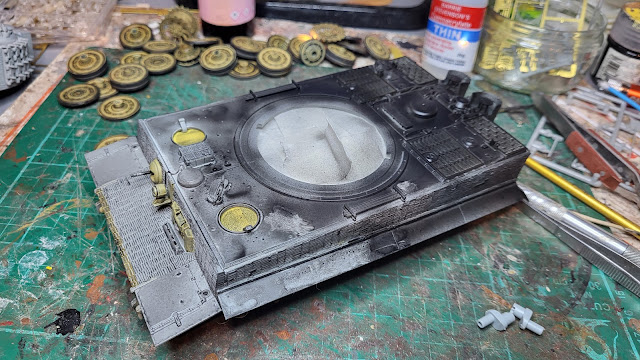
Whilst I mull that over in my somewhat confused mind, more progress with the Tiger build with the hull now being fully primed.

Dragon Tiger tank,

Before I prime the turret I thought I would confuse my already confused mind further by trying to put together the brass etch latches on the storage bins. These are so small that my camera doesn't seem to be able to focus on them! However one is partly in place so just three and a half and my sanity to go!

Dragon Tiger tank,


Saturday, September 14, 2024

More of the etched brass to brass me off!

Things are moving on with the Tiger build but there have been some more etched brass parts to fit. One largish piece that has laid in the box for some time mystified me. I had been looking at the plans for some days to find where it went as I did not recognise what it was supposed to represent. I thought it was a grill mesh but I finally found it on the plans and it all clicked! It is designed to replicate the zimmerit coating over the join of the deck to the lower hull. Easy once you know!

Dragon Tiger tank

It was glued down just by melting the plastic surface with some liquid glue and gently pressing the part in. You can also see that I have rammed some tissue paper into the drivers vision block to mask the clear part behind it. One of those things about digital photos is that they pick up things that my aging eyes miss. In this instance I did not realise that the bow gun moulding even has a representation of the barrel being a tube! Must go to Spec Savers - usual disclaimer in that other vision enhancing purveyors are available! 

Dragon Tiger tank

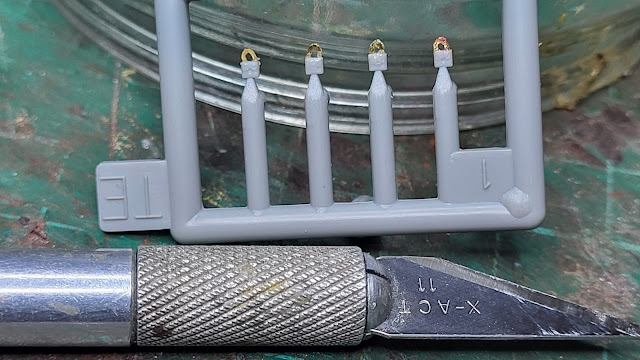
Talking of eyesight, mine was really tested along with my sanity by these padlocks. The main body is plastic and the shackle is a brass etch. You can see the sizes involved by scaling with the scalpel. Doing a few of these can really brass you off!
 
Dragon Tiger tank

After an hour the four etches were glued with super glue to the plastic bodies. Again, digital photography is not forgiving! Whilst this close up may show some crudeness in assembly, at normal viewing distance and with aging eyesight they look fine!

Dragon Tiger tank

I had a few minutes to start priming the main hull in my usual black colour. It needs a few more coats but it does provide a good base for the top coats.

Dragon Tiger tank


Friday, September 13, 2024

Tiger hull glued!

It has been a busy, interesting and varied week. Getting over Norovirus, the kitchen rebuild, working at the museum and making some progress with the Tiger tank rebuild. 

The Tiger now has a glued together deck and hull following some final fettling with the bow gun and masking off of the two forward hatches and the turret aperture. 

Dragon Tiger tank,

The fitting of the deck to the hull was not without a few near miss contributions to the swear jar but it all eventually went into the right places. With some liquid glue seeped into the joints it was all successfully held together.

Dragon Tiger tank,

With the hull and deck together it was time to fit the side track guards - a fiddly but greatly rewarding task once done as the pair really added to the character of the tank..

Dragon Tiger tank,

Placing the turret on top of the hull shows what a beast this tank was.

Dragon Tiger tank,

Hopefully getting to this stage makes the rest of the build a bit easier but that is never my luck!

Thursday, September 12, 2024

Woody meets a blog reader!

A day at the Rocks by Rail Museum today but lets talk Tiger tank kit building first where the steps towards getting it finished have become somewhat glacial in speed! However, it is not always about the speed, but about the journey itself. Just wish this one was a bit more interesting at the moment! The bow gun has been painted and is in place and the clear vision block for the drivers position is in place.

Dragon Tiger tank

To help in the painting process and to try to avoid painting the clear vision block and blasting paint over the bow gun I have just hand brushed some base colour around the required places. Whether it works or not is something I will find out later! 

Dragon Tiger tank

Meanwhile at the Rocks by Rail Museum, things are looking very autumnal with fading greenery, a low sun and long shadows. But on a day like today there was no better place to be! 

Rocks by Rail Museum,

Rocks by Rail Museum,

Rocks by Rail Museum,

And interestingly I met someone who reads this blog! That was a surprise to me, both that someone other than Mrs. Woody and Mr. Beecham reads it and to actually have met them! A great chat was had and thank you Margaret for taking the time to read my ramblings!

The Museum played host today to a short commemoration alongside locomotive Singapore of the allied losses suffered when two Japanese Hell Ships were sunk. You can read more about that on the museum website by clicking here! For me a poignant moment as my Uncle was captured in Singapore during WW2.

Rocks by Rail Museum,

As always, white orchids were laid by thoose present and the poem below tells why.

Rocks by Rail Museum

The work of the museum does of course continue and Alex is still making progress on Ketton No1 having moved onto painting the engine bay and all the ancillaries. It is somewhat concerning in my mind that he may finish painting this loco before I get my Tiger kit finished!

Rocks by Rail Museum

Rocks by Rail Museum

For me, the grass never stops growing so it was a day of mowing! How unusual!

Rocks by Rail Museum


Wednesday, September 11, 2024

Running water!

Kitchen rebuild

This picture marks a massive step towards completion of the kitchen rebuild and my return to more model making - unless Mrs. Woody has other plans!

However getting to that point took both Phil the builder and myself on a journey neither of us had been on before. Having installed the waste pipes - always best to get those in before the running water is connected - Phil connected up the water. Testing the connections, the cold ran and the hot ran, both without leaks. Great! Turn the two on together and all was well for two minutes before the overflow at the top of the house started gushing! Not great! Phil had never seen that before and neither had I. What was going on? We had running water in two places! Phil had a theory which was backed up by my perusal of the internet. 

The issue was that the cold water was being supplied straight from the mains at a high pressure. The hot on the other hand was supplied from the hot water tank upstairs using gravity and its pressure was low. Inside the mixer tap, when both the hot and the cold were turned on full, the outlet of the tap could only allow a certain amount of water out which was less than the water being supplied by the cold and hot inlets. Therefore the cold water, with its much higher pressure, was able to backfeed into the hot pipe and push the water back into the hot water tank. The hot water tank then needed to expel the excess water which it did through its feed from the cold water tank in the loft. The cold water tank then had to get rid of the excess water through its overflow pipe hence the gushing water we saw outside.

The answer was a one way valve on the hot supply which Phil had one of in his van - almost as good as WMD Stores! Once fitted, the problem was solved and we only had running water in the sink!