Search this blog

Saturday, September 28, 2024

Uncared for - just like me!

After seeing things being smartened up with a coat of paint at the Rocks By Rail Museum earlier this week you would think that I would be influenced to smarten some of my things up with a fresh coat of paint. Mrs. Woody certainly has a list of painting jobs for me but I have decided to against the flow! The Tiger 1 tank looked in showroom condition but I have started the process of rusting up parts. The exhausts have been subject to paint and weathering powders and look suitably uncared for - just like me!

Dragon Tiger tank

Dragon Tiger tank

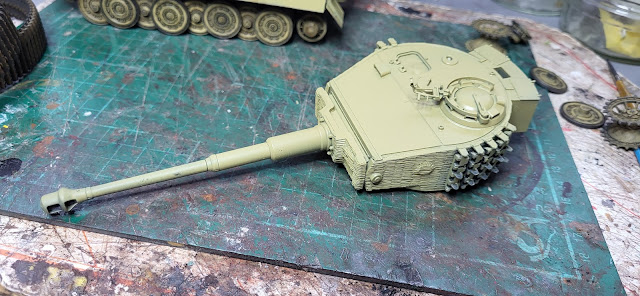
I have also attacked the spare track links on the turret with the same treatment.

Dragon Tiger tank

Still more to do but each session brings a little more character to this build. Strange that you have to work so hard to make something look uncared for!


Friday, September 27, 2024

The painting bug!

Having not gone to the Rocks By Rail Museum last week due to the kitchen rebuild escapades I ventured in yesterday knowing that things will have changed - they always do! First off one of the steam locos, Andrew Barclay 1391, is now in the restoration shed with work starting on its re-tubing. It ran out of what is termed as 'ticket' in July so needs work doing to it so that it passes an inspection to gain a fresh 10 year ticket - hopefully before next years season starts!

Rocks by Rail Museum

Rocks by Rail Museum

And the work has indeed started with Richard in the cab dismantling various components. At least the Museum has some volunteers who know what they are doing, unlike me!

Rocks by Rail Museum

An interesting stack of wood has appeared as well - wonder where that came from? Oh yes! My kitchen ceiling! John was delighted when I arrived - almost as though it was his Birthday and Christmas rolled into one!

Rocks by Rail Museum

Meanwhile, in the exhibition centre, the Shark brake van has now filled the space left by the steam loco. Hopefully it will now dry out ready for another overhaul which will involve a lot of woodwork and painting.

Rocks by Rail Museum

Talking of painting, Pete and Pam have been busy with the Sundew cab which is looking very smart as it gets painted with that cream top coat.

Rocks by Rail Museum

Rocks by Rail Museum

And the painting bug is catching with Martin now painting the dragline excavator!

Rocks by Rail Museum

For me, it was another day of battling the ever growing grass and vegetation! At least as Winter comes that should take a break and maybe I will catch the painting bug and smarten something up!


Thursday, September 26, 2024

Dimmed lighting!

 It is time to start painting in some details on the Tiger 1 tank and I have started with the turret mounted spare track links. An initial coat of  Vallejo Rust paint will be a base for further rust treatment.

Dragon Tiger tank

Dragon Tiger tank

Painting the details takes a while just like the finishing painting details in the WMD kitchen rebuild. However, after dark, with the lights on, which hides those areas still to paint, it does look good! 

Kitchen rebuild,

Kitchen rebuild,

Kitchen rebuild,

And with the under unit lighting only it looks even better - just like me in dimmed lighting!

Kitchen rebuild,

Kitchen rebuild,

Mrs. Woody is really happy with it and thinks it is now the ideal place for me to prepare her meals! Something not quite right with that but I guess just don't say anything is the best thing!


Wednesday, September 25, 2024

Recycling!

 A fruitful day at WMD today! Unusual but nice!

First off the Tiger 1 has had the third element of its camouflage added in the form of the red brown paint which adds greatly to the character of the tank.

Dragon Tiger tank,

Dragon Tiger tank,

Dragon Tiger tank,

Still lots to do such as adding the tools, tow ropes, hatches and weathering the hull and turret but I am really pleased so far!

Adding t the pleased list is that I have cleared most of the remnants of the kitchen rebuild with the scrap metal having gone off to the recyclers and my bank account added to from the proceeds. No doubt Mrs. Woody has plans to spend that!

Kitchen rebuild

And the wood from the ceiling has been trimmed to size to fit in my car to take down to Rocks By Rail Museum where it will be used as the new cab floor for Mr. D. I do like recycling!

Kitchen rebuild


Tuesday, September 24, 2024

Tracking onto painting!

With all the Tiger 1 wheels 'polished' it was time to fit them and the tracks.

Dragon Tiger tank,

The problem with the rubber band type tracks is that they do not sag like real tracks. However a few drops of superglue on certain wheel rims and things looked more tank like!

Dragon Tiger tank,

With the tracks on I tracked onto the camouflage painting. Starting with the green, the airbrush was loaded and a pleasant half hour or so saw the paint applied. The brown will come next. However, the Tiger takes on yet another look just with that first green applied.
 
Dragon Tiger tank,

Dragon Tiger tank,

Dragon Tiger tank,

I'm happy with that! Time to track onto the brown paint!

Monday, September 23, 2024

Polishing the tracks!

Things move on a pace with the Tiger 1 build. The turret is now in its dark yellow base coat.

Dragon Tiger tank
 
When added to the hull it really looks the part especially as I temporarily fitted the wheels and tracks.

Dragon Tiger tank

Before I can permanently fit the wheels and tracks I need to do a bit more work on them. The Tiger 1 had metal rimmed running wheels so where these came into contact with the tracks both surfaces in dry weather would take on a polished look. The same with the drive wheel teeth. So it was time to polish the tracks, oh and the wheels!

Choosen product was MIG pigment in gun metal that gives a subtle look of polished metal.

Dragon Tiger tank

Applied with a small brush and cotton bud the pigment was run around the parts of the track where tthe running wheels would come into contact.

Dragon Tiger tank

The teeth of the drive sprockets were also done as are the rims of the running wheels. There are a lot of wheels to do on this tank!

Dragon Tiger tank

The WMD film crew  have even videoed the process and its available here as your new cure for insomnia!


Sunday, September 22, 2024

Several steps forward!

After yesterdays step back, today sees several steps forward with the Tiger 1 tank build.

With the hull already in its base coat of dark yellow it was a good time to add some muck and weathering where the wheels and tracks go before these were fitted. As it will end up as Tiger based somewhere around the Normandy area of France in early 1944 if the painting guide in the instructions is correct, it is likely that the terrain it drove over would be muddy leading to the underside of the tank also becoming muddy. 

My favoured product to recreate that gritty muddiness is an acrylic product from MIG that has a grainy texture to it.

Dragon Tiger tank
 

What I did not realise is that I have had the product so long that the half of it left in the container had almost dried out. Not one to waste things if there is a way around the issue I poured some acrylic paint thinner into the container and then used a knife blade to work it into the semi dried out product - and guess what? It actually worked!

Dragon Tiger tank

With a useable product a stiff brush was used to apply the product to mimic the build up of mud. I concentrated especially on the areas where the tracks would throw up mud.

Dragon Tiger tank

Once dry, I airbrushed some  earth coloured paint over both the mud as well as the underside of the hull to create that dirt layer that covers this type of vehicle.

Dragon Tiger tank

It is going to also get some weathering powder treatment but overall I am pleased with that. Certainly a step forward!

The turret has also been undergoing some more painting with almost all of it now primed so it will soon be time for a top coat which will be another step forward!

Dragon Tiger tank

Saturday, September 21, 2024

Taking a step back!

Dragon Tiger tank
 
Sometimes you can get caught up in something which, when you actually take a step back, makes little sense! That is how I am feeling about the five hours I have spent on getting these four brass etched assemblies made and glued in place on the Tiger turret in the picture above. Looking at them I have a sense of some achievement in actually having been able to put these tiny things together but there is also an awful lot of frustration at the time it has taken and will I or anyone else actually notice them once painted and weathered?

However, as an old boss of mine used to say, 'We are where we are!' so forget about this occasion but next time I am dealing with tiny frustrating parts I will try to take a step back sooner!


Friday, September 20, 2024

And now for something completely different!

And now for something completely different! Those of a certain age and certain sense of humour will recall that phrase from the Monty Python Show. In this case though no humour, unless you think my YouTube videos should be classified as such, but a video I have been meaning to do for some weeks but not had the chance to do due to kitchen rebuilds, Norovirus, Rocks by Rail and Mrs. Woody's seemingly increasing jobs for me to do list! Anyway, today was the day so it was completely different! 

Ballasting model railway track usually involves the ballast itself and a means of adhering it to the baseboard. Usually that is done with a diluted glue which penetrates the layers of ballast and glues it in place. The problem comes near to points. Due to the dilute nature of the glue it can seep under the tie rod which operates the switching blades and in effect glues it in place. Depending on the strength of the glue it is sometimes possible to free the tie rod with some force, a tool such as a screwdriver or solvents or indeed a combination of these. If you are lucky it works without damaging the point but it is frustrating and time consuming. However you can end up damaging the point which means a new one is required. £15 buys a basic set track point with the larger points coming in with equally larger prices! So not only can a glued up point cause frustration, time but it can cost money too. 

Not sure how I came up with this idea but suspect it was some years ago reading a car magazine where petroleum jelly was rubbed on the rubber door seal to prevent the door freezing shut. My brain must have done its usual unconventional thinking and transposed that to model railways!  The thought was that if it stopped ice sticking to metal and rubber then petroleum jelly should stop glue sticking to the plastic tie rod of a point. 

My Last Great Project,

It worked for me! Rubbing a small amount on the underside of the tie rod ended any problems I had with glued up points.

My Last Great Project,

That hint is now in a short WMD YouTube video available for your visual delight! Now that really is something completely different compared to the last few weeks of blog posts!


Thursday, September 19, 2024

You always learn new things!

I did find time to get out to my Man Cave for a short while and this is the sum of what I managed to produce!

Dragon Tiger tank

More etched parts for the Tiger turret stowage bins. I did actually make a bit of a break through in dealing with these small parts in that instead of try to hold both parts using my hands and get the pivot points of the one part into the holes on the other I taped some making tape to the workbench and fastened one etch part to that it was held steady. Made it much easier. 

You always learn new things! Just wish I had learnt that years ago!