Search this blog

Saturday, February 13, 2021

Lets get plastered!

It maybe time for a drink but in this case the plastering I am referring to is part of the landscaping process. I had a rough idea in my head of what I wanted to do and although there are some modelers out there who have the skills and mindset to plan and draw out their layouts in incredible detail before they start to build it I am unfortunately not blessed with such skills. If you want to see someone who has theses skills, I would suggest having a look at James Hilton's Blog and this post as an example.

In the meantime my method is very much one of physically putting things on the baseboard and seeing how they look and making alterations as necessary. With this layout, there is a quarry face with a hill and a bridge taking the road across the railway. Having already built the bridge that at least set up a reference point for the rest and I had already shaped the profile boards on the edge of the baseboard when I built it so that gave further reference points to work to. So in true Blue Peter fashion out came the mount card that I luckily had in stock and I built a contoured set of formers to get the basic shape. Hacking bits off and adding bits eventually gave me the shape I wanted complete with the road in place. I infilled the contours with some styrene packaging that I had and carved this to shape with a bread knief. All very messy but great fun!


With the contours set and the styrene in place it was time to give a surface to it all. For this I used paper towel cut into strips roughly 8 inches long by about 2 inches wide and used a thin mix of wall filler type plaster to coat and soak these as I laid them over the contours. Two or three layers of paper towel were laid to eventually give a firm shell over the card formers and styrene. It takes about a day to dry fully in a warmish house. If you are doing a similar job it can be messy so make sure you cover what you don't want plastered. How do I know........!


Next time it will be time for some scenics.


Friday, February 12, 2021

The wonders of wiring!

The track plan for this layout is fairly simple and was shown in this post. Happy with the fit of the various track pieces wires were soldered to the fishplates strategic points. This is a neat way of in effect hiding wires and avoiding that soldered blob on the side of the rail. You do learn over the years and I do now wire power cables at each point so that both the entry and both exits have power to them rather than relying on the point itself. It may seem over the top but better safe than sorry as I have learnt over the years!, In addition as I was going to use both DC and DCC on the layout it made sense at this early stage to take this approach. The picture below shows the initial wiring in place. It needs tidying but it works. As I was going to use DCC, a tip I think I saw on a British Railway Modelling DVD was to twist the wires together to minimise electrical interference. I have no idea of the science behind it but that is what I did and it also avoids loose wires flapping about so even if the science doesn't work there is something to be said for doing it! In addition, although not doing it at this stage, holes were cut under the points to allow point motors to be retro fitted should I want to in the future - as I get older I think smarter! The track was fastened down to the baseboard using small blobs of superglue on the sleeper base. Track pins are a normal choice for most but gluing avoids those unsightly mushroom heads of the pin tops in the sleepers. You can also lift the track fairly easily if you only use small blobs of superglue by sliding a thin bladed screwdriver under the sleeper base and breaking the bond if an alteration to the track is needed. Eventually the ballast that will be applied will provide the final bond of the track to the baseboard.


Next on the agenda is getting some landscaping done.


Thursday, February 11, 2021

What's the point!

As this layout was started during the first Lock Down of 2020, it was hard getting materials. The Lock Down saw many people suddenly with time on their hands. Things like model railways and other similar hobbies got a much needed boost as they became popular once more and it seems that their popularity has continued which is great! However, with a sudden surge in interest and shops shut, getting hold of materials such as track became a major problem. I recall points for all gauges simply disappearing from the on-line retailers. Luckily I had some 009 track in stock for this project. I had specifically bought the Peco ST-412 First Radius curves as I find with tight radius curves a set track curve gives a far better curve than trying to make flexi track do things that it really doesn't want to and was probably never envisaged by the designers as being able to. I also had some flexi track and some points. What I did not have was an 009 left hand set track point. Searching through the WMD HQ stock pile of things I never throw away I came across an N gauge left hand set track point. It looked a bit worn and dirty but testing with a multi meter showed electrically it worked which was a big relief. 

Whilst I know N gauge track has been used by modelers to depict a narrow gauge track, with all my other track being 009 an N gauge pint would stick out. I therefore got a small saw balade and cut alternate sleepers out of the plastic base of the point. I took care not to weaken the overall structure and I ended up with this.


 The white blobs on the sleepers to the left are filler where I filled in the holes for track pins as I would not be using these. Overall it looks more 009 then N gauge which is what I wanted. We will see how this fitted in later on but sometimes when a problem comes up rather than thinking 'What's the point?' thinking outside of the box can provide a solution.

Wednesday, February 10, 2021

Building Bridges!

As part of the landscape for this layout, I needed a road to cross the railway by means of a bridge. Peco, in their - 009/H0e Setrack Planbook show the Wills SS28 Occupation Bridge (Single Track) and Stone Abutments as being suitable. Looking at the character of the bridge it seemed ideal for what I was after for a narrow gauge railway. Having ordered one, it was upon opening the kit and studying the parts that I found that the abutment walls were not high enough to allow a steam 009 gauge type loco under it without a major incident! I guess if you were using very small industrial diesel locos with limited height then it might work. However there are solutions! Liking the bridge structure itself I had some SSMP227 Wills English Bond Brick sheet in stock so measurements were taken, head scratching undertaken, internet searching carried out and after a bit I ended up making these abutments which are 5cm tall which in old measurements is just a tad over 2 inches! 


People either seem to love or hate the Wills sheets. They are thick, can be difficult to cut and need mitered joints on the corners if you want a continuity in the bricks and bond. I have got used to them although I have at times cursed them but as you will note from the photo I still end up with filler on the joints. The coping stones on top of the brickwork are just balsa wood which was cut to size. 

Once happy with things the bridge components were treated to a coat of Halfords grey primer in a rattle can which handily was nearby.


Then it was time for some colouring - literally! As described in my post on the construction of the Dapol Windmill kit the brick work was rubbed over with a selection of  brown, orange and red coloured pencils randomly. Because the mortar lines of the bricks are recessed in the model, the pencils just colour the bricks leaving a great finish. 


More on the bridge and how it fits in the layout in another installment to follow later but I can say my calculations on heights and clearances were right - just!


Tuesday, February 9, 2021

And now for something completely different! - Small 009 Narrow Gauge Layout

Well since various tank and truck related projects have been completed the time has come to move onto something different although this does go back in time - almost another Shelf Queen. As you may have noted I have varied model making  interests - possibly too many both for my sanity and wallet! However in the spirit of 'you only live once', here is my excursion into 009 narrow gauge modelling. Not my first but I wouldn't say I am an expert so follow this and learn from my mistakes!

The basis of this layout is a piece of hardboard that came as part of the packing on some furniture. In true 'that will come in handy' style it went into the garage but unlike many of its friends in there, it re-emerged to become the baseboard to this layout in a matter of months. Whilst hardboard is not seen as the best material for a layout it was what I had, fitted size wise to what I was going to do and with some bracing it would be stable enough and given the Lock Down getting any new materials was next to impossible. The pictures below show the construction. The measurements of the board are, and as I am old these are in inches, 22 by 44. Bracing is some soft wood 2 x 1inch cross braces and 2 x 1/2 inch longitudinal braces all held together with screws. All components were painted in acrylic white undercoat to give a bright clean background on which to start working on. The pictures show better than my words!


You will note from the date stamp on the photo the baseboard was constructed in April of last year and as I was still working despite the pandemic this was a weekend job - it was from memory a nice warm weekend when I should have perhaps cut the grass but it will only grow again!.

The track plan is fairly simple as the picture below shows, with an oval and some sidings. My plan was always to add another board so there are two sidings leading off the oval to facilitate that when the time comes! As you can see profile boards for the landscape are in place and painted a satin grey. At this point the trackwork is yet to be finally laid and more of that next time. 


Wednesday, February 3, 2021

V is for Victory and Volvo!


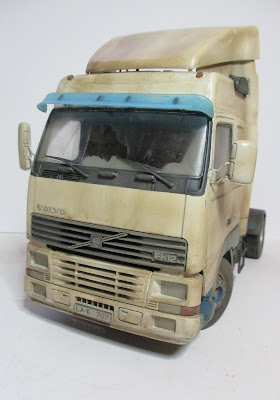
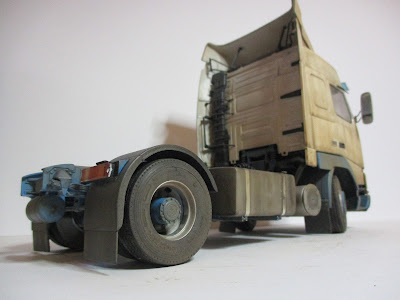
Its done! The Volvo FH16 is finished...well as far as I am going it. You may wonder at the title of this post - V is for Victory. Sometimes you just feel that the model is fighting with you to stop you making progress. Maybe it wants to be a Shelf Queen. The last couple of weeks in trying to finish off this kit have felt like a battle on several occasions. Some of it, well probably most of it, down to my stupidity but others where you think 'how did that happen?'. Stupidity illustrated by the fact that despite being an FH16 the grill badge is for an FH12! Did I stupidly put the wrong decal on? No, I did fit the FH16 decal. I however stupidly put the decal on the grill before attaching the grill to the body shell then finding out there was only one way the grill would fit. As you will have guessed it was not the way I had anticipated so the FH16 badge was upside down! No spare decal apart from the FH12 one so that is fitted. 'How did that happen?' illustrated by the fact that the front lower panel attached to the chassis fouled the cab tilting. I had tested everything before finally gluing in confidence that it all worked. Came to finally fit the cab to the chassis and suddenly the cab won't tilt! ' How did that happen?' only solution was to adjust the lower panel by breaking the joint with the chassis. Had it been any other part that I did not need to break it would have fallen apart. Not this joint though and some considerable force and a prayer that nothing would break ensued to separate the part. Would it glue back on after adjustment? Took me four attempts to get a solid joint. Anyway I am sure that other modelers go through similar experiences so I will leave it there but conclude by saying it felt a victory to finally finish.  If you do have a similar experience I would be interested to know -leave a comment.

I did say in an earlier blog that the cab needed to be toned down from pristine white to match the weathered chassis and that is what I did with a mix of airbrushing and weathering powders. There are areas where things could be better but overall pleased to have created a look of a truck that has been out on the winter roads for some days and needs a wash! I will leave you with the pictures and let you judge as to whether my weathering (pun intended) has worked! You will note that I left the side skirts off the chassis feeling that the chassis looked more interesting without them. In addition I also added some airlines to connect the truck to a trailer. Made from electrical cable wrapped around a tube with plastic tube connectors. It adds a bit of interest to the model.


Well time to move onto something else but more on that another time!


Saturday, January 23, 2021

Saturday Reflection - The Tamiya 35252 King Tiger

With a cold and sometimes snowy day it has been a good excuse to stay in and do those usual weekend chores as well as some modelling. That modelling has been spent on finishing up the small jobs on the Italeri Volvo FH16. It still surprises me just how long putting the final details on a model can take but they are probably the most important parts in giving that overall view of your model. Hopefully it will be complete to the point of being ready for the cab to be weathered by the end of this weekend but with my record of completing models there is no guarantee!  

In the meantime I thought it would be good to have a reflective look back on a model I finished probably about eight to ten years ago (the mere fact that I cannot remember when exactly is proof that this blog will indeed be my diary to look back on and find out when!)- The Tamiya 35252 King Tiger Ardennes Front edition. Still available to buy and a search on the internet brings about the fact that it will cost about £35. For that you get Tamiya's usual quality kit with three figures and a motorbike. From memory the kit went together well and ends up as a large and impressive model for your display shelf. At the time I built the kit the painting would have been airbrushed Tamiya acrylics with a mixture of powders and oil paints used for the weathering. Being reflective, I can see how I might have done the kit differently. Some more weathering, especially on the wheels and tracks and perhaps some aftermarket etch parts would have added to the overall detail. I won't say too much about the figures. Firstly the motorcyclist and bike included in the kit and built by me at the same time as the tank, would have appeared in the images below if they had not decided in Evil Knievel fashion to launch themselves off the display shelf as I picked up the tank! Unlike Evil, who spent months in hospital to get his body back in shape after one of his Dare Devil motorbike stunts, a few minutes with some glue should bring the model rider and motorbike back to life. Secondly I cannot paint figures! I do believe figure painting, especially faces, is an art that you either have or don't and there is little in between. I have admired and studied the work of those who can, I have read the books on how to do it, watched the video tutorials in how to achieve perfection in a few  easy steps, spent hours practicing on figures and still I end up with something that looks either like a clown or death! In view of that, the figures on this tank are there more as a token gesture rather than any great historic record of King Tiger tank crews. However overall I am still pleased with what I produced but it is useful to sometimes look back to reflect on the lessons that can be learnt by seeing what you did nearly a decade ago. 

Now to the pictures which you can click on to get a larger image....