Search this blog

Saturday, January 23, 2021

Saturday Reflection - The Tamiya 35252 King Tiger

With a cold and sometimes snowy day it has been a good excuse to stay in and do those usual weekend chores as well as some modelling. That modelling has been spent on finishing up the small jobs on the Italeri Volvo FH16. It still surprises me just how long putting the final details on a model can take but they are probably the most important parts in giving that overall view of your model. Hopefully it will be complete to the point of being ready for the cab to be weathered by the end of this weekend but with my record of completing models there is no guarantee!  

In the meantime I thought it would be good to have a reflective look back on a model I finished probably about eight to ten years ago (the mere fact that I cannot remember when exactly is proof that this blog will indeed be my diary to look back on and find out when!)- The Tamiya 35252 King Tiger Ardennes Front edition. Still available to buy and a search on the internet brings about the fact that it will cost about £35. For that you get Tamiya's usual quality kit with three figures and a motorbike. From memory the kit went together well and ends up as a large and impressive model for your display shelf. At the time I built the kit the painting would have been airbrushed Tamiya acrylics with a mixture of powders and oil paints used for the weathering. Being reflective, I can see how I might have done the kit differently. Some more weathering, especially on the wheels and tracks and perhaps some aftermarket etch parts would have added to the overall detail. I won't say too much about the figures. Firstly the motorcyclist and bike included in the kit and built by me at the same time as the tank, would have appeared in the images below if they had not decided in Evil Knievel fashion to launch themselves off the display shelf as I picked up the tank! Unlike Evil, who spent months in hospital to get his body back in shape after one of his Dare Devil motorbike stunts, a few minutes with some glue should bring the model rider and motorbike back to life. Secondly I cannot paint figures! I do believe figure painting, especially faces, is an art that you either have or don't and there is little in between. I have admired and studied the work of those who can, I have read the books on how to do it, watched the video tutorials in how to achieve perfection in a few  easy steps, spent hours practicing on figures and still I end up with something that looks either like a clown or death! In view of that, the figures on this tank are there more as a token gesture rather than any great historic record of King Tiger tank crews. However overall I am still pleased with what I produced but it is useful to sometimes look back to reflect on the lessons that can be learnt by seeing what you did nearly a decade ago. 

Now to the pictures which you can click on to get a larger image....


Thursday, January 21, 2021

Shelf Queen Trio Complete Thanks to the Tank!

 Yes! The trio of Shelf Queens have now been finished. Three models in a week. Normally with my glacial progress its three years a model. However lets have a look at where I started. The Emhar kit complete awaiting painting.


Following priming the tracks were sprayed Tamiya Tan and then masked whilst the main bulk of the tank received varying shades of Vallejo Russian Green! No one seems certain what colour WW! tanks were from what I have read and colours seem to vary from grey through karki to green. I am not a rivet counting modeler and green was to hand so that's what colour the tank is. 


Following on from this, the tracks were painted Vallejo rust and then the whole tank including the tracks was given a wash of dilute Vallejo Black-grey. A coat of gloss varnish later and the decals were added giving the tank its identity as 'Flypaper' It could have been Fantan as there are alternative decals or it could have been a captured tank remarked in German identity. The decals themselves are thick and by that I mean when you put them on the tank you can see the edge of the transparent carrier film. Now having watched the keen car modelers they do start to use very fine abrasives to smooth the edge of decals so that they do not show, but this isn't a Porsche or a Ferrari - its a WW1 tank so I hoped the weathering would go someway to disguise the decals. How well that went I will leave up to you. A coat of Micro Soll under and over the decals helped persuade them to conform to the surface, especially the rivets. A further coat of matt varnish to protect and seal the decals was applied and then it was onto weathering with some MIG powders to produce...


I'm happy with that! The weathering just used three products - dilute Vallejo black-grey paint and two MIG pigments as shown in the photo below.

Someone did ask me how long does it take to make a model? The answer depends upon so many variables and in my case the answer is likely to be too long! However, for this model the basic build took about two hours, then the gap of two years I will ignore, and then about an hour to paint and two hours of decal application and weathering. Five hours in total. I must admit that it was five enjoyable hours and a time to relax and be creative which is what any hobby is about. Why not build a kit this weekend and see how it goes for you.

Wednesday, January 20, 2021

Windy Wednesday

With here in the UK being battered by Storm Christoph I though it appropriate to post a wind related item - nothing to do with my diet but it is about the Dapol windmill! As mentioned in a previous post a Shelf Queen of some years standing which is now actually finished! I started with this.


Once primed, grays and white were sprayed t start to bring some life to the model.


The sails and wooden main structure were sprayed white and whilst the roof to the brick base building was sprayed grey. The bricks are not actually painted on this model. A trick I picked up from Phil Parker, he of British Railway Modelling and Garden Railways magazines fame showed this on his blog (well worth looking at Phils Workshop ), was to use coloured pencils! When I first heard what he was about to do I thought that it stood no chance of working but it does. The trick is to have several brown, orange and red coloured pencils and use them randomly to rub across the brick work of the model. Because the mortar lines of the bricks are recessed in the model , the pencils just colour the bricks leaving a great finish. If you doubt it try it!


A bit of weathering took place with some black dilute paint and earthy type weathering powers toning that pristine white finish back to a more life like battered one. The doors and windows were painted pale green and whilst the green was on the brush a bit was added to a few spots around the base to give that moss/algae look that old brick work gets when damp.  The finished item I think looks good and to say that the moulds from which this kit are made are over 60 years old they still have great detail There is even a horse shoe on one of the doors! 


As the two wires hint, I have motorised this kit and just to prove it works.....


If you have the volume you will probably hear a clunk on each revolution where one of the sails was hitting the base - soon sorted with a slight bend. You may also hear a cat in the background who wanted his dinner and had no understanding of the Spielberg moment going on!


If you are interested the kit is actually based upon a real windmill at Rolvenden in Kent - Picture here. 

Right , I better go see if I have a garden fence left after this Windy Wednesday!


Tuesday, January 19, 2021

Barn Done It!

 Well I am pleased to say that the barn is done! A mere two years since assembling the eleven parts of this Wills kit the painting and weathering was done over four days. This is where I started with the kit in its four plastic colours. As always, click on the pictures for a bigger image.

 
Primed in black and then with some thin gray sprayed on the stone work it looked like this.


Then things got interesting with the woodwork sprayed a tan brown. Being old wood this was not the final finish but gave a good base for what was to follow.


Individual stones were picked out in different shades of tan made by having a spot of both tan and white on a pallet and mixing different hues randomly and applying it randomly. Being random is harder than it sounds though!  The wood was given a light spray of gray to tone the tan down and give it that silvery look of old weathered wood. The roof tiles were given an overall coat of an orange which was toned down with white and then individual tiles picked out using various further shades of the orange and white mix. Then I took advantage of the detail that the model has by using a very dilute (about 1part of paint and four of water) mix of black to just flood the detail. Gravity is not your friend for this process if you want the paint to stay in the relief of the mouldings so once painted I left each side facing upwards for an hour to let the paint dry. The photos below probably give a better idea of the whole process.


Having done all that and let the paint fully dry a light dusting of MIG European Dust was applied all over and then a light spray of matt varnish to protect it all and remove any sheen. The final product looks good to me!


What was nice about this project was that as I had other projects on the go I could take the time to leave this one well alone whilst the paint dried - something that I have paid the consequences for not doing in the past! The other bonus was that it was finished over a relatively short period if I ignore that it sat on the shelf for two years! Anyway, another part of the bigger Shelf Queen project that I mentioned in the last post is complete and that has to be good for the sole Barn Done It!


Monday, January 18, 2021

Paint it Black!

Paint it Black - not the old classic song by the Rolling Stones, but something model related. Been able to progress on a few projects since my last post. Although not a Finish Friday project three Shelf Queens were chosen as they all form part of a bigger project which as you may have guessed is also a Shelf Queen! However in the interests of moving matters forward and taking account that if I started the three at once then one job I do not like would only have to be done once and that is cleaning the airbrush after priming them. Having 'sacrificed' one or two airbrushes over the years by my laziness of assuming that if you leave thinner in the cup than all will be well when you come back six weeks later, I am now somewhat more diligent and my wallet somewhat less thin! Moving more across to acrylic paints has also helped in that water seems to clean out the residues as well as any airbrush cleaner if you do it straight after finishing spraying. Anyway, the three Shelf Queens, in no particular order, are:

The Dapol windmill kit CO16 (previously Airfix) and if you are wondering it is motorised and more of that later. However the good guys across at Budget Model Railways (always worth a look to see what they are up to) on YouTube did a video on how to motorise it if you are interested. Video is here - Tutorial Tuesday Episode 3 - How To Motorise A Dapol Windmill Kit.


The Wills Scenic Series Barn Kit ref. SS30 for 00 Gauge.


And finally the Emhar 5001 MkIV "Male" Heavy Battle Tank in 1.72 scale.


I used, for the first time, Vallejo black primer that I bought in a 200ml bottle for about £10 (UK price) which, for what you got, seemed good value. Having now sprayed it I can say it worked well for me and it does indeed "Paint it Black" so I will be using it again. Here are the three Shelf Queens now basking in their new colour.


 More to come on progress with these but anyone wanting a Volvo fix I can report that it is not back on the shelf and although progress has slowed it now has its full body kit. Just waiting with the side skirts as I am in two minds as to whether to fit them. I will ponder but leave you with the latest Volvo FH 16 pictures.


Hmmmm! That white looks - well white! Think it will need toning down a bit!


Monday, January 11, 2021

VW means Volvo Weathered!


No doubt upset some VW fans with the title to this post but yes, whilst the weather may have been cold outside over the weekend the weathering inside was a much warmer affair. The chassis of the Italeri Volvo FH-16 saw some further weathering from the airbrush and the application of some washes to further tone down that bright blue chassis. The fuel tank was also installed having been modified with some new straps and chassis mounting brackets. I never got to the bottom of why the tank as supplied and instructed in the instructions just would not fit. More than likely that it is my ineptitude or misreading or both but the problem has been solved - the fuel tank mounting not my ineptitude or inability to understand instructions. My wife would agree with that last part and probably the first too! Anyway on the chassis front the rear lights and French registered number plate have been added (it is left hand drive so unlikely to be a British truck) and at the front, the lower panel with lights and blank number plate has been added. You may be wondering why the matching number plate has not been added. There lies a tale of old decals! Whilst the first applied yellow backed number plate for the rear went on without issue the front white backed number plate from these ten or so year old decals split into a thousand pieces. I forgot about the fragility of old decals and should have put a coat of varnish on them or some decal save solution before soaking them - lesson learnt - just have to find some more suitable decals in my stock. A few more pictures of the chassis and as with any build the obligatory balancing of other parts on it to see how the whole model will look. As always you can click on the picture to open it up and see it at full size.


That cab will certainly need some toning down!

On the 009 layout some grassing has taken place. With the basic landscape formed its the perfect base to start the scenic activities and there is something very satisfying about turning baron plaster into something that looks (hopefully!) green and lush. Part of the landscape was painted with PVA and then hanging basket liner was pressed into it with the backing side left exposed and left to dry over night. Once torn off the results were mixed. One part had stuck well the other not so well with bald patches resembling a scale representation of my lawn!


I should have painted one coat onto the plaster and left it to dry and seal the surface before applying a second coat and basket liner. Lesson learnt again! However not all was lost as my intention had always been to use some static grass on top of the liner to give that rough grass look of an embankment where it was not mown or cultivated. After trimming the liner (a bit like shaving stubble) and getting rid of the bits of string and other odd fibers that come with it a pleasant hour or so was spent with a mixture of fibers and the static grass applicator. I ended up with this - still more to do but it is getting there and progress is being made. Just hope it continues! 


Friday, January 8, 2021

Finish it Friday

I am guessing that most modelers have them - a model or two or even more that sit on a shelf or in a box just waiting for a few small jobs to finish them. I have to admit with the number I have I probably bump up any averaging calculation by an immense amount. However with today being Friday and there being no such thing as Model Kit SOS (now there's an idea for a TV show!) I thought it about time to start lowering that average with a 'Finish it Friday' project. The lucky recipient for todays attention  was a Revell 1/25 scale Kenworth Dump Truck kit number 07406. I built this back in about 2015 and for some reason never got round to adding some steps and ladders to the chassis and tipper body and applying some final transfers or are they now decals - shows my age! Anyway for reasons that probably made some sense to me at the time the truck went on a shelf and the steps and decals hung around the work bench for nearly 5 years including surviving the work bench moving without being lost! Today in little less than an hour the steps were added and the decals applied. Job done - well almost - just have to straighten the CB aerial that I see to have knocked and only just noticed as I uploaded the photographs! Oh well! 

From the point of view of the kit it certainly is not the best and shows its origins from the 80's. There are only half formed brake cylinders so if you look inside the chassis there are just holes where the rest of the cylinders should be. The tyres do not sit on the wheel rims very well. As with most kits with vast amounts of chromed parts the designers always seem to have the part attached to the spru so that when removed the loss of the chrome is very visible. However for all of its faults it still builds up into an impressive truck with that full on American look. No weathering (apart from a dilute wash of balck on the radiator grill) as these guys keep their rigs uber clean in real life.


On the Volvo front there has been some movement. Unlike the Kenworth dump truck above the Volvo FH 16 will be showing evidence of a working life where cleaning is something for the outside bits like the cab and side skirts. The chassis is being treated to some airbrushing, washes and weathering at the moment. Still more to do but there is progress.


Whether next week will se another 'Finish it Friday' is uncertain but at least there is now one less model awaiting! Do you have any models in a similar situation? Let me know in the comments section.


Thursday, January 7, 2021

Italeri T34 finished!

Something unusual for me in that I have finished something - must be a subconscious New Year resolution although I did start this kit in January 2020!

Although revealed in the last post here are some, I hope better pictures - click on the pictures to see a larger version.

Italeri T34 tank built, painted and weathered

Italeri T34 tank built, painted and weathered

Italeri T34 tank built, painted and weathered


Italeri T34 tank built, painted and weathered


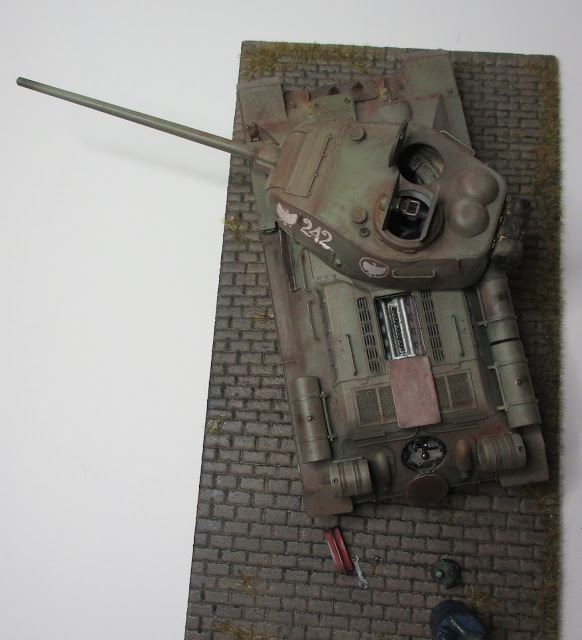
The interesting part about this kit is that it does have an interior and although not mentioned in the instructions it is possible to leave the top part of the hull loose so that the top half can be removed to see the interior. There is not a lot of room in there and the floor was covered in ammunition boxes which lessened the space for the crew even more.


If you want to get a really good understanding of the T34 and its anatomy there are two good videos on YouTube that I found. 
Inside the Chieftain's Hatch T34/85 episode 1 does an external walk around https://www.youtube.com/watch?v=BRtj_TSOHjw 
episode 2 covers the interior 
https://www.youtube.com/watch?v=rTnS0XS2al8 
I have no connection with this site but I learnt so much about this tank from these two videos.

From a build point of view not too much to note and there are a number of reviews on the net by far better modelers than me. However I would highlight that the rear engine hatch will not fit into its opening unless it is reduced in size - I left mine in the open position as the tank is supposed to be undergoing maintenance. The other thing is that there is no mention in the instructions regarding the turret rotation ring. It is a self evident fit and without it the turret cannot be located properly into the hull. The kit does include either molded tracks or the rubber band type. I went for the molded ones and they seemed to work well. The base is a piece of Styrofoam pizza base ( I have a stock of these as it seems pizzas in the interests of the environment now come on a cardboard base - good job I like pizza!) with the road stones scribed by using the end of a round file. Painted and with some static grass I think it looks good. The oil drum, oil can and tools come from the Italeri Field Workshop kit 0419S which is a great source of diorama accessories and as mine cost 50p from a club stand at a model railway exhibition great value!

With no connection to any of the firms involved the photograph below shows most of the products used to finish the model. I do like the Tamiya Extra Thin Cement and it is less aggressive on the plastic parts than other solvents if you get too much around the part. Paints from Vallejo with the main colour being 71017 Russian Green. The interior was painted during construction and was masked off for the final painting. I did not prime the model which is unusual for me but sprayed the green straight from the bottle which is a great advantage of the Model Air paints. A second coat which was lightened with white was sprayed over the horizontal areas to give a contrast. After a coat of matt varnish weathering started with coating the lower parts of the hull where mud would accumulate Mig Turned Earth Ground acrylic mud  Ref A.Mig-2103. This was then followed up by weathering powders from MIG and Ammo once the decals had been added. The canvas roll on the back of the turret is a piece of kitchen towel painted, rolled up and fastened with some very fine wire.


I think the kit is a good one and with some care in building and painting you can create a model to be proud of. Have you built this kit and if so how did it go? Tell me in the comments section.