There is a YouTube video about it for your viewing pleasure or possible cure for insomnia!
Recording my progress, or usually the lack of it, in building kits, creating model railways and other related and sometimes unrelated matters!
Search this blog
Tuesday, June 4, 2024
3D printed diesel loco finished and on YouTube!
There is a YouTube video about it for your viewing pleasure or possible cure for insomnia!
Saturday, June 1, 2024
Lucky 7!
I
I'm really pleased with that! I certainly had some luck with getting it to this stage though. Remember the abortive, botched orange paint job that I had to strip posted about a few days ago? Maybe all my locos should be numbered Lucky 7!
Wednesday, May 29, 2024
Couplings.
The 3D printed diesel loco did not come with couplers so that was something I had to address. I needed to emulate something like thee coupling on the black loco in the picture below so out came some scrap plastic card and following some slicing and dicing suitable shaped couplers were crafted. These would be mounted on some plastic rod.
Monday, May 27, 2024
Too tall!
Time to find a driver figure for the 3D printed diesel loco. My first choice was a figure I had already painted some time ago and looked right. However mounting him in the cab showed that the roof would have to be left off if he was going to stay! Not ideal!
Sunday, May 26, 2024
Grab it!
Using that against the loco cab, I could drill holes in the right place! A bit of superglue and some choice words as a result of them being fiddly to fit saw the grab handles fitted.
The cab interior built yesterday also got a spray of white and the details just need picking out. The grill also got painted red just to add some variation to the Lemon Yellow!
I do like the way the grab handles have come out.
More to do yet but coming along. If I can grab a moment or two in the next few days I might see it finished!
Saturday, May 25, 2024
How to fill an empty space!
Now Mrs. Woody would like to fill the empty space of my head with more tasks from her list of jobs for me but I think my head is better left an empty space! However, back to the now Lemon Yellow 3D printed loco and it has a largish cab with big windows so I decided that it really needed some form of cab interior to fill that empty space. Nothing too detailed, just the basics of a floor and an operating consul with perhaps a few dials and levers. Out came some plastic card and after a few measurements a floor was created along with the parts for a consul.
Once the consul was glued together.....
...some thin slices of plastic rod were cut and glued to form instrument dials and some lengths of rod were glued into drilled holes to form the brake throttle and direction levers.
Thursday, May 23, 2024
Lemon yellow!
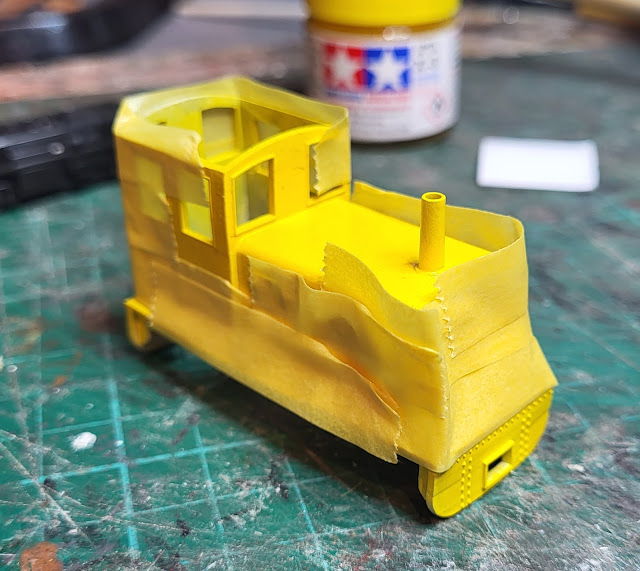
I made my mind up! I was not going to risk the orange paint again so went for Tamiya's Lemon Yellow. As you can see it went on through the airbrush much better than the orange. The 3D print still has a couple of defects in it but I can live with that and with an eventual matt finish they will be less visible.
Whilst the yellow is a nice colour it does need some contrast so the buffer beams were masked up.
Wednesday, May 22, 2024
Whose toothbrush????
Following on from the splattered orange paintwork disaster as posted about yesterday, I did try to see if I could sand the paintwork smooth but gave up on that idea after a short while. It just did not work! So Plan B, strip the paint and start again. I have described using Mr Muscle Oven cleaner before when stripping the chrome finish off model parts and it works on paint as well. So out came the aerosol, and it was sprayed. Leaving it for a while to do its job I thought that I needed a brush to get into the various parts of the model and a toothbrush was the answer. Handily Mrs. Woody's tooth brush was about so that came in useful! Hope she doesn't read this!
Next up is the top coat. Do I attempt the orange again or something different?
For those of you worried about Mrs. W's well being toothbrush wise I can reveal that it had been thrown out before I got my hands on it - but she does now have a nice electric tooth brush which would be good at cleaning up model parts!
Tuesday, May 21, 2024
Splattered!
Just like most people who build models things can go wrong for me, probably more than most other modellers! Take the 3D printed diesel loco for example. I managed to smooth out the print lines and then applied a white under coat through my airbrush for what I hoped would be an eventual orange top coat. The under coat went on well and I left it a day to dry. I also found the Kato Pocketline chassis that the body would be mounted onto. Things were looking good!


Monday, May 20, 2024
3D printed diesel loco
For my 1001 post I have in my usual way picked up another project! This time the 009 3D printed loco body that I picked up at the Market Deeping Model Railway Show last week. Like many 3D prints this required a little fettling to smooth the ridge lines left by the printing process.
A mix of sanding sticks, wet and dry paper and a scalpel blade slowly created a smooth surface. It took a couple of hours but was worth the effort for a smooth paint job - I hope!
.png)


