Search this blog

Thursday, March 10, 2022

Growing and cutting grass.

Today saw the WMD lawn mower withdrawn from its winter quarters. A check of the oil, some fresh petrol and the engine primed saw it start on the third attempt! Not bad and with the cutting blade set high the lawn looks a lot better. Mrs. W will be pleased - hopefully!

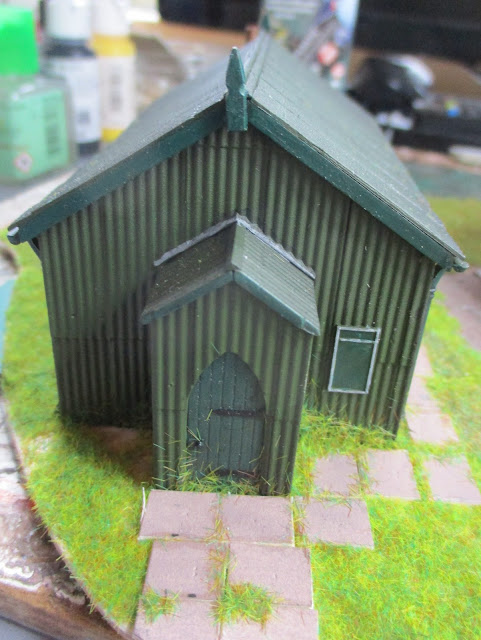
That was the cutting grass part and once completed meant I had the opportunity for an hour on the 009 narrow gauge layout where todays task was to grow some grass. I had previously 'graveled' the service station forecourt and last night I had given it a wash of some dilute greyish paint to tone it down a bit. Today I glued the chapel in place and used some card that I had given a wash of the same paint that I used on the gravel to manufacture some concrete slabs. Slab sized pieces were cut and then laid around the chapel to give an effect that they had been in place for a long time and had moved and vegetation was finding its way into the gaps.

009 gauge layout, Wills Corrugated iron chapel,

With those in place it was time to get the grass growing with some static grass. Around the chapel I used some Peco 2mm Spring grass to give a representation of grass that got mown on occasions. At the back of the service station I used the same mix as around the river bank to give the impression of unkempt grass left to its own devices. I need to clean off the stray fibers from the chapel once the glue has fully dried and then add some further vegetation but the basics are there and I think looking good! I particularly like the grass in the joints between the slabs.

009 gauge layout,Wills Corrugated iron chapel,

Using a sub-base means I can work on these at the comfort of my work bench which does make life easier.

009 gauge layout,Wills Corrugated iron chapel,

009 gauge layout,Wills Corrugated iron chapel,

Back on the layout and it is beginning to come to life.

009 gauge layout,Wills Corrugated iron chapel,


009 gauge layout,Wills Corrugated iron chapel,

009 gauge layout,Wills Corrugated iron chapel,


Wednesday, March 9, 2022

Getting a face!

A couple of hours to put on a few decals on a model may seem a bit over the top. However the decals on the front cab panel of the Scania 143H have been difficult. Partly this is because they don't fit particularly well and I have had in some cases to trim and cut parts out and secondly they need to line up properly or they will look terrible. I cant claim that they are perfect but its the best I can do under the circumstances so here is where I have got up to getting the Scania its face.

Italeri Scania Streamline 143H


Tuesday, March 8, 2022

The reason for washing!

Nothing to do with my personal bathing habits but todays work at the Rocks by Rail Museum was more ballast washing. I actually enjoy doing this. Big machines, lots of water and noise, what more could you want! People do ask why you wash ballast? Well ballast has two functions. Firstly it forms the foundation to hold the sleepers and track and secondly to allow drainage as especially with wooden sleepers water can both damage the track as well as undermine the structural integrity of the railway as a whole. Large stones that form the ballast have spaces between them through which the water can drain into the ground below. Fill those spaces up with muck and that drainage slows or stops and the ballast becomes a large sponge or swamp. The ballast washing gets rid of that muck and restores the ballast and its drainage abilities once back in place.

Just how much muck gets into the ballast is best illustrated by this photo.

Rocks by Rail Museum

These two barrows of muck came out of about half a ton of ballast washed through the oversized washing machine that the Museum has. Its a mix of sand, grit and pebbles and you can see how it just flows into an almost concrete like material that will flow into and fill any available void. Over the past five months we have probably washed well over 100 tons of ballast. We do put the muck to one side or use it to build up the adjacent road and you can see from the photo below just how much muck has been accumulated. That road is about 9 inches higher than when we started!

Rocks by Rail Museum

The area around the washing plant is a store for all sorts of railway related stuff and being out of the public gaze it does have that abandoned look to it but that is all part of the character of the place.

Rocks by Rail Museum

Rocks by Rail Museum

Rocks by Rail Museum

Rocks by Rail Museum

Back at WMD HQ the Scania 141LB has progressed with the prop-shaft, exhaust, wheel hubs and air intake having been added.

Heller Scania 141 LB

Heller Scania 141 LB

On the Scania 143 the front valance has been completed and a start made on the cab decals which are a pain to fit!

Italeri Scania Streamline 143H

Italeri Scania Streamline 143H


Monday, March 7, 2022

Second Look!

Out on my bike ride this morning I happened to go round a roundabout and spotted the price totem at a local petrol station near a major trunk road. I thought I was mistaken in what I saw so went round the roundabout a second time no doubt to the amusement or otherwise of other road users. However despite the prospect of getting dizzy as I went round and round I was actually right in what I saw the first time! 

Highest petrol price in the UK?

Somewhat unbelievable and frightening! Luckily neither me or my bike required the services provided by this service station! 

Having returned home without getting any more dizzy and having done some mundane jobs I did have a chance for a bit of time with the Scania 143H truck model. Mud guards are now on the chassis together with the rear lights and battery box cover. Now beginning to get to the stage where you would have a second look at it!

Italeri Scania Streamline 143H

Italeri Scania Streamline 143H

Italeri Scania Streamline 143H

Italeri Scania Streamline 143H


Sunday, March 6, 2022

Moving on!

The Scania 143H caught up on some of what I failed to do to it yesterday so it is moving on. 

The exhaust and air intake are connected to the engine. The exhaust is never going to satisfy me but that is one of those things I will have to live with and probably will never be seen again once the kit is finished! The wheels are on as well and the fuel tank has also be glued in place - good job it is not real and needing filling with diesel with current prices! The mud guards are next and I have painted the rear light lenses and put them in the light case that then need to be fastened to the rear mudguards. I still have concerns about the fit of the cab on the chassis as I had to raise the engine slightly in the chassis to get it to fit and this may cause problems but I will have to wait to see if that is an issue! In the meantime the chassis looks like this. 

Italeri Scania Streamline 143H

Italeri Scania Streamline 143H


Saturday, March 5, 2022

Exhausted!

Exhausted s ow I feel today. Not because I am tired but because I have spent several hours dealing with the exhaust system on the Scania 143H model truck. I had high hopes of finishing the chassis today but that went out of the window! 

Italeri have issued this kit using the existing cab moulding from a kit that used a 4 x 2 chassis and mounted it on a chassis from a kit for a bonneted Scania on a 6 x 2 chassis. The result was that to make it look right Italeri requires the builder to shorten the chassis so that the truck looks right. Whilst they make reference to shortening the chassis rails, the side skirts and the prop-shaft, they make no reference to the exhaust system other them saying you have to make sure you drill holes in the chassis rail. Putting the kit supplied exhaust together results in a system that can not be installed because it ends up in the area occupied by the rear axles. The only thing that you can do, and this took me some time to ponder, is to mount the exhaust silencer as far back on the chassis as possible and then cut and shut the exhaust pipe  to it from the engine into four parts and glue something together from those that fits. I eventually got there and the pipe is held in position with Blu Tack whilst the glue hardens. I am not even going to bother looking what Scania actually do as it won't be what I have done but given the parts in the kit that is all I could do. Luckily much of this is hidden from the view topside of the model. Hopefully the exhaust can now be finished allowing the rest of the chassis to be completed!

Italeri Scania Streamline 143H


Friday, March 4, 2022

Holding stock!

We have heard a lot over the past few months about the pressures on industry and commerce by a break down for varied reasons of the Just In Time System (JIT) of production and commerce. Basically the idea is that you don't hold stocks of materials or products to minimise the amount of money tied up in holding stock and the facilities to store them. Instead you order when you require it and the materials and products appear through a streamlined delivery system that delivers just as you need the item. That is the theory and to be fair nowadays until recently it has worked well. However I can remember when a Company I worked for introduced the JIT system of working back in the late 80s. It soon became known as the TFL system by the staff - the first word is Too the third is Late and I will let you work out the middle one!

Here at WMD HQ, possibly tainted by those early experiences of JIT, I do keep stocks of materials which will be useful one day. Mrs. Woody just refers to it as junk. However my prudence pays off on occasions such as today. I started to install the engine for the Scania 143H and I need to put the prop-shaft in as part of that process. As with other parts of this kit there is a need to shorten the kit part. I did try doing this by cutting the appropriate amount out of the part but to be honest the parts did not glue back together well and I could see broken parts at some stage. I decided that I would just cut off the universal joints that enter the gear box and rear axle and then join them with a new piece of plastic tube. Now where would I get some tube from? The WMD stock holding - that is where!

Italeri Scania Streamline 143H

This is just some of the junk  stock that I have and yes there was a suitable piece of tube which was soon cut to size and then the part painted.

Italeri Scania Streamline 143H

Italeri Scania Streamline 143H

Italeri Scania Streamline 143H

The tube may be slightly larger in diameter than the original part but once painted it looks OK.

Trial fitting the engine I found that the front engine mounts on the chassis and engine block did not come into contact with each other. Despite filing down part of the exhaust manifold that was part of the issue the parts still had a gap between them. Back to the stock holding and a smaller diameter tube provided a suitable solution by filling the gap. Here the two slices of tube have been glued to the chassis and once the glue has hardened they can be painted and the engine mounted. Hopefully such a small alteration will not have adverse impacts on the cab fit - fingers crossed and swear jar at the ready!

Italeri Scania Streamline 143H


Thursday, March 3, 2022

Bits and pieces!

Bits and pieces - not the Dave Clark Five hit from the 60s but more bits and pieces of the Scania 143H truck model. 

This build, along with the Scania 141LB, is dragging out a bit and perhaps with a bit more planning in the builds they might have progressed a little more quickly. However I don't do planning well so it is what it is! 

Today saw the mirrors constructed and painted along with a few other parts. In addition I have gloss coated the mud guards and side skirts to protect the recently applied decals. I also had to repaint part of the front cab panel as some static grass had found its way onto the original applied paint. A hazard of having a messy work place but then again that is how I work! They are all hardening off in the Man Cave so will be ready to be united with the main build over the next day or so.

Italeri Scania Streamline 143H


Wednesday, March 2, 2022

One of those days!

A wet, cold and miserable day when I just could not get going with anything! We all have them and my day didn't even see me get out on my bike - the first time this year. Still I have managed 787 miles this year with 776 up to February so I guess I cannot grumble!

I did manage to do a bit of model making with the making of a base for the Dapol Service Station on the 000 narrow gauge layout and a forecourt laid out in what is supposed to be gravel. This was common for rural areas back in the 60s and 70s so hopefully looks the part. All I did was spread PVA glue in the required areas and then cover it with some kiln dry sand which gives a good representation of gravel.

The handy thing with having separate sub-bases is that you can move them off the layout and work on them in the comfort of the workbench.

009 gauge layout

The gravel laid and looking a bit more finished.

009 gauge layout

Hopefully tomorrow I will be a bit more energised. In the meantime I will have to explain to Mrs. W why those jobs on her list didn't get done!

Tuesday, March 1, 2022

Thatched delight!

My journey to the Rocks by Rail Museum takes me through the Rutland village of Cottesmore which is one of those quintessential English chocolate box cover villages. Over the past few weeks I have watched as one of the cottages has been rethatched and a wonderful job it is to. However there is one part which I just find, well, delightful and just shows the skill of the thatcher.

Thatched cottage

Moving in a little closer and you see this.

Thatched cottage

Wonderful!

At the Museum it was another day of track levelling and packing and you can see looking back towards the locomotive shed that the track is looking good.

Rocks by Rail Museum,

Look the other way and there is still some work to do but a lot less than back in October!

Rocks by Rail Museum,

If we ever finish the track there are plenty of other projects waiting their turn!

Rocks by Rail Museum,

On the model making front a few more decals applied to the Scania 143H model but lots more to go yet!

Italeri Scania Streamline 143H